- Document History
- Subscribe to RSS Feed
- Mark as New
- Mark as Read
- Bookmark
- Subscribe
- Printer Friendly Page
- Report to a Moderator
- Subscribe to RSS Feed
- Mark as New
- Mark as Read
- Bookmark
- Subscribe
- Printer Friendly Page
- Report to a Moderator
3D Image Reconstructor
The three-dimensional image reconstruction is to reconstruct a three-dimensional model from a set of two-dimensional image slices. It provides a realistic visualization technique that helps you do analysis and make judgment. This technique is widely used in many areas from medicine to physics and engineering. For example, the MRI scanner produces a set of two-dimensional image slices of tissue. By using image reconstructor, clinicians can view the internal structure in three-dimension, which provides detailed information to region they are interested in.
The iso-surface is one of the common ways to reconstruct image from volume data in three-dimension. The iso-surface is an analog of contour line but in three-dimension. It is a surface constructed by points of constant value, such as pressure, temperature and velocity, within a volume of space.
The 3D Image Reconstructor is an application for reconstructing a three-dimensional model by iso-surface way. You can either load the pre-defined model data or external image files from real applications. This application offers miscellaneous ways to visualize both the generated iso-surface and the original two-dimensional image slices.
Loading Pre-defined Model Data
Complete the following steps to load the pre-defined model data.
- Launch the 3D Image Reconstructor.
- Click the Model control and select the pre-defined model from BiPole (+-), BiPole (++), Nordstrand, Roman, Saddle, and Sphere.
Loading External Image Files
Complete the following steps to load the external image files.
- Launch the 3D Image Reconstructor.
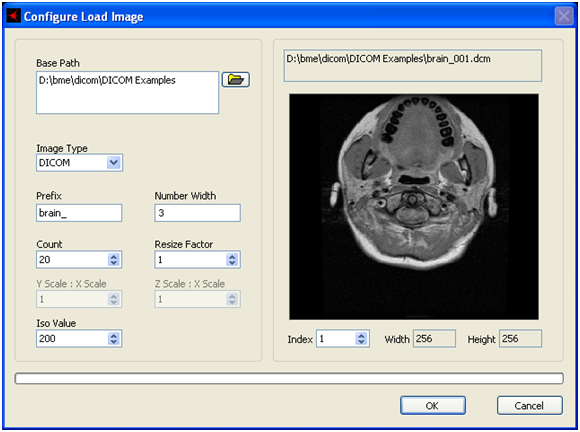
- Click the Model control and select Image Files to display the Configure Load Image configuration dialog box.
- In the Configure Load Image configuration dialog box, click the Base Path button and navigate to the directory in which the image files you want to load reside.
- In the Configure Load Image configuration dialog box, click the Image Type button to select the type of your image files. The 3D Image Reconstructor supports the following image types:
- BMP
- DICOM
- JPEG
- PNG
- BMP
- In the Configure Load Image configuration dialog box, enter the prefix of your image file in the Prefix control.
- In the Configure Load Image configuration dialog box, enter the width of number of your image file in the Number Width control. For example, your image files are named as MYPIC_0001.bmp, MYPIC_0002.bmp, then use MYPIC_ in the Prefix control and 5 in the Number Width control.
- In the Configure Load Image configuration dialog box, enter the number of image files you want to load in the Count control.
- In the Configure Load Image configuration dialog box, enter the factor to resize the image files in the Resize Factor control. If the original image size is m-by-n, the 3D Image Reconstructor resizes the images to m/factor-by-n/factor.
Note The 3D Image Reconstructor costs more CPU and memory footprint to reconstruct a three-dimensional model for image files with larger size. |
- In the Configure Load Image configuration dialog box, enter the volume level at which the 3D Image Reconstructor generates the iso-surface in the Iso Value control.
- (Optional) In the Configure Load Image configuration dialog box, use the Index control to select different image to view.
- In the Configure Load Image configuration dialog box, click the OK button to load specified image files and to close the Configure Load Image configuration dialog box.
This screenshot is using the sample data from Taylor S. Amarel (http://decibel.ni.com/content/message/18240#18240😞
Miscellaneous Visualization Features
- Launch the 3D Image Reconstructor.
- Load the pre-defined model data or external image files.
- The 3D Image Reconstructor provides the following visualization features:
- Click the Colormap control and select different color map setting that applies to both the Isosurface Plot and Model Plot.
- Use the Rotation control in the Camera section to change the position of camera for both the Isosurface Plot and Model Plot.
- Use the Zoom control in the Camera section to zoom in or out both the Isosurface Plot and Model Plot.
- Place a checkmark in the Model Point checkbox in the Model Plot page to show the model point in the Model Plot.
- Place a checkmark in the Cursor checkbox in the Model Plot page to show a cursor indicating the current position in the Model Plot.
- Use the Position control in the Model Plot page to change the current section of page, row and column to show in the Model Plot.
- Place a checkmark in the Section checkbox in the Model Plot page to show the section of page, row and column in the Model Plot.
- Place a checkmark in the Contour checkbox in the Model Plot page to show the contour lines at specified volume level on the section of page, row and column in the Model Plot.
- Use the Isosurf Level control in the Isosurface Plot page to change the volume level at which the 3D Image Reconstructor generates the current iso-surface.
- Click the Colormap control and select different color map setting that applies to both the Isosurface Plot and Model Plot.
Note Click the item in the iso-surface table in the Isosuface Plot page to choose the current iso-surface. The iso-surface table lists the volume level as well as the number of triangles that defines the iso-surface. |
- Click the Stop button to stop and quit the 3D Image Reconstructor.
See the following as an example – (the same data from Taylor S. Amarel http://decibel.ni.com/content/message/18240#18240)

ZJ Gu
National Instruments
- Mark as Read
- Mark as New
- Bookmark
- Permalink
- Report to a Moderator
Hi Zhijun,
I have installed the Biomedical startup kit. But as soon as, I am launching the 3D image constructor link the same stops working and the image reconstructor window closes. Please help. I have Windows Vista.
Thanks.
KP
- Mark as Read
- Mark as New
- Bookmark
- Permalink
- Report to a Moderator
Hi KP,
We tested on Windows XP. I will test Vista on my own to see whether it could be reproduced.
Thanks for your quick feedback.
BTW, have you installed the LabVIEW 8.6 Runtime Standard?
ZJ Gu
- Mark as Read
- Mark as New
- Bookmark
- Permalink
- Report to a Moderator
Hi KP,
I tested on Windows Vista 32bit. It works.
What's your OS? Also please check whether or not you install LabVIEW 8.6 Runtime Engine Standard (not minimum).
Thanks!
- Mark as Read
- Mark as New
- Bookmark
- Permalink
- Report to a Moderator
Hi....can I installed
LabVIEW 8.6 Runtime Engine Standard on 32 bit OS(XP)
Thanks!
