Source Code Control: Using TortoiseSVN (Subversion) with LabVIEW for Diff and Merge Operations
- Subscribe to RSS Feed
- Mark as New
- Mark as Read
- Bookmark
- Subscribe
- Printer Friendly Page
- Report to a Moderator
Overview
Most source code control providers have built-in diff and merge capabilities for text-based files, but they also typically allow users to override the default utilities for specific file-types. The binary nature of LabVIEW file-types requires the use of custom utilities for diff and merge, which are available in the professional version of LabVIEW 2009 or later.
Calling graphical merge from an external application requires the ability to pass parameters to the command line. In windows, the executable to be run for Graphical Diff is available at the following location: C:\Program Files\National Instruments\Shared\LabVIEW Compare\LVCompare.exe. The analogous executable for Graphical Merge is available at C:\Program Files\National Instruments\Shared\LabVIEW Merge\LVMerge.exe.
Both executables offer a variety of command-line parameters that can be used to customize the behavior and results of the utility. As an example, these settings can be used to exclude changes that are purely cosmetic and do not affect the behavior of code.
Configuring TortoiseSVN for Graphical Diff
- Right-click in Windows Explorer to expose the TortoiseSVN options
- Mouse-over 'TortoiseSVN >> Settings'
- In the list of settings on the left, select 'Diff Viewer' under 'External Programs'
- On the right side of the dialog, select 'Advanced'
- When the 'Advanced diff settings' dialog appears, select 'Add'
- In the dialog that appears, type .vi as the extension
- Where it prompts you for the path to the external program, type the following: "C:\Program Files\National Instruments\Shared\LabVIEW Compare\LVCompare.exe" %mine %base -nobdcosm -nobdpos
- Repeat this operation for the file-type .ctl
Configuring TortoiseSVN for Graphical Merge
- Right-click in Windows Explorer to expose the TortoiseSVN options
- Mouse-over 'TortoiseSVN >> Settings'
- In the list of settings on the left, select 'Merge Tool' under 'External Programs'
- On the right side of the dialog, select 'Advanced'
- When the 'Advanced merge settings' dialog appears, select 'Add'
- In the dialog that appears, type .vi as the extension
- Where it prompts you for the path to the external program, type the following: "C:\Program Files\National Instruments\Shared\LabVIEW Merge\LVMerge.exe" %base %mine %theirs %merged
- Repeat this operation for the file-type .ctl
Related Links
- Exercises 1 and 2 in the Software Engineering Technical Manual
- For more general information on group development and configuration management best practices and the use of other source code control tools with LabVIEW, please review Software Configuration Management in LabVIEW.
NI Director, Software Community
Example code from the Example Code Exchange in the NI Community is licensed with the MIT license.
- Mark as Read
- Mark as New
- Bookmark
- Permalink
- Report to a Moderator
Elijah,
thx for this summary. I've got a Q:
Since most of my workhorse projects are still under LV711, I am not that familiar with using the project explorer and I simply use TortoisSVN to externally doing my revision control. And here's my Q coming from.
I have a lot of apps that share several 'libraries', mostrly from user.lib and instr.lib. Doing revison control I have to control those libs as well and shall relate different versions of those libs to the different revisions of the apps. I could copy the linked modules from the libs into the respective development working copy - and loose the links. Or I can hardlink into the lib, but this would not provide specific revision info. Or I could use SVN:Externals, as Jim Kring mentions at http://thinkinging.com/2008/10/21/set-the-revision-of-your-svnexternals-or-else/
What would you suggest? Do you have a better solution?
TIA!
Greetings from Germany!
--
Uwe
- Mark as Read
- Mark as New
- Bookmark
- Permalink
- Report to a Moderator
Lul,
I haven't worked with LV7 in a while, but here are some ideas:
Since the VIs are in your user.lib and instr.lib I would keep those in a separate repository. That way you only have to keep up with the reusable code in one place.
You could save your libraries as application distribution (in LV 8 and later this can be done with via a source distribution). Another option is to use VIPM to create a VI Package Configuration (VIPC).
More on the VIPC files: http://blog.jkisoft.com/products/secrets-of-the-vipc/
Fab
Check out DSH Pragmatic Software Development Workshop!
DQMH Lead Architect * DQMH Trusted Advisor * Certified LabVIEW Architect * Certified LabVIEW Embedded Developer * Certified Professional Instructor * LabVIEW Champion * Code Janitor
Have you been nice to future you?
- Mark as Read
- Mark as New
- Bookmark
- Permalink
- Report to a Moderator
Fab,
Thx for your reply.
My problem is not on _how_ to utilize revision control (SVN does quite a good job here), but how to keep the app revision consistent with the lib revision. So to keep v3 of app A referring to v43 of a given device driver, while v4 refers to v 46 AND while v21 of app B refers to v41 of that driver.
Enlarge this to about 10 different, but similar test sequencer apps, about 8 different device drivers, several other 'private libraries' in user.lib and those apps consisting of some 100 to more than 1000 modules. Not to talk about other related code like databases, MS-word for reporting, several system helper tools like those from the Sysinternals suite etc. pp.
And as I am working in a higly regulated environment, I have to take special care of version control and have to provide traceability info...
- Mark as Read
- Mark as New
- Bookmark
- Permalink
- Report to a Moderator
Just so you know, I've moved the latest version of this content here: http://zone.ni.com/devzone/cda/tut/p/id/4114
I'm in the process of changing the scope of this community page to the specifics of integration with third-party tools.
NI Director, Software Community
- Mark as Read
- Mark as New
- Bookmark
- Permalink
- Report to a Moderator
Lul,
I believe you can use the VI Package Configuration files with SVN to provide the traceability information you need.
Here is a post in LAVAG of someone in a similar situation than yours (LabVIEW 7.1, figuring out how to reuse code in user.lib): http://lavag.org/topic/13492-reuse-packages-and-scc/ that might help.
Fab
Check out DSH Pragmatic Software Development Workshop!
DQMH Lead Architect * DQMH Trusted Advisor * Certified LabVIEW Architect * Certified LabVIEW Embedded Developer * Certified Professional Instructor * LabVIEW Champion * Code Janitor
Have you been nice to future you?
- Mark as Read
- Mark as New
- Bookmark
- Permalink
- Report to a Moderator
Hi Lul,
As Fabiola pointed out, what you describe is pretty much the exact use case that VIPM Professional is designed to cover.
In brief, what you'd typically do is the following:
(1) Use VIPM (Community or Pro) to build all those various reuse libraries and modules and drivers into different VI Packages, some of which will depend on other packages. You can even use VIPM to do this for non-VI things like system drivers and utilities, depending on what you need.
(2) Use VIPM Professional to create a VI Package Configuration (VIPC) file for each of your projects (refer to the blog post Fab linked to). A VIPC file is basically an index of packages for a specific project, so you and VIPM both know exactly which versions of which libraries are required for your project.
It takes a bit of work to get everything arranged and built into packages in Step #1, but the results pay huge dividends by making it easy to maintain the traceability you need.
Please contact JKI and I'll be glad to give you a trial license of VIPM Pro so you can see if it helps you.
- Mark as Read
- Mark as New
- Bookmark
- Permalink
- Report to a Moderator
This works well when resolving a conflicted file (a file marked with the yellow caution sign glyph), but how do i get it to work when resolving a conflict during an svn merge? The button seems to be grayed out. Am i missing something or is it supposed to be broken?
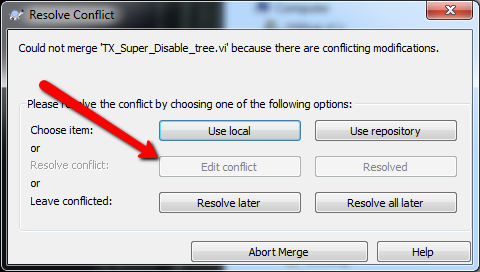
My solution right now is to use the "resolve later" action and then resolve it later. I would be so much easier to do this in one step...
- Mark as Read
- Mark as New
- Bookmark
- Permalink
- Report to a Moderator
Did you configure Tortoise for both diff and merge operations? Does this same limitation exist with other file-types, or is it specific to VIs?
NI Director, Software Community
- Mark as Read
- Mark as New
- Bookmark
- Permalink
- Report to a Moderator
Simple thing but had me head scratching for a while! Using TortoiseSVN on 64 bit and so you have to use the 64 installer for TSVN I found:
- Doesn't like the quote marks!
- Not a simple copy and paste, need to change to Program Files (x86)
Hopefully that saves someone a few minutes.
========
CLA and cRIO Fanatic
My writings on LabVIEW Development are at devs.wiresmithtech.com
- Mark as Read
- Mark as New
- Bookmark
- Permalink
- Report to a Moderator
Thanks for posting that James. So is this correct for 64-bit?
C:\Program Files (x86)\National Instruments\Shared\LabVIEW Compare\LVCompare.exe %mine %base -nobdcosm -nobdpos
NI Director, Software Community
- Mark as Read
- Mark as New
- Bookmark
- Permalink
- Report to a Moderator
Yes, I can now copy that directly in.
EDIT: Not sure if it is necessary to differentiate at this point that this is with 32 bit LabVIEW on 64 bit OS. Not sure what happens with the compare location on 64 bit LabVIEW.
========
CLA and cRIO Fanatic
My writings on LabVIEW Development are at devs.wiresmithtech.com
- Mark as Read
- Mark as New
- Bookmark
- Permalink
- Report to a Moderator
JamesMcN: Yes, a 32-bit install of LabVIEW on a 64-bit OS will put LVCompare into the "Program Files (x86)" folder for compatability reasons. For a 64-bit install on a 64-bit OS, the original post is correct.
Copyright © 2004-2024 Christopher G. Relf. Some Rights Reserved. This posting is licensed under a Creative Commons Attribution 4.0 License.
- Mark as Read
- Mark as New
- Bookmark
- Permalink
- Report to a Moderator
Elijah- are you certain about the order of the mine/ theirs arguments for LVmerge?? I don't know if perhaps it's a change in the latest Tortoise, or perhaps something odd about our repository (although we're seeing from two entirely separate repositories, one googlecode, one local)
It's looking to us like "theirs" is mine, and "mine" is theirs...
It doesn't hugely matter, if you're assiduossly inspected the merged code; but if you're manually resolving conflicts with "reflex action"- knowing for instance you want "theirs", then you're (we were!) in trouble...!
The odd thing is, I found I already had my Tortoise configured with "mine" and "theirs" reversed from your advice; I must have noticed this before and not reported it!!
Can you check/ clarify?
~Tom
- Mark as Read
- Mark as New
- Bookmark
- Permalink
- Report to a Moderator
Ahaaa- following through your links to the new version of this page, I ended up at http://zone.ni.com/reference/en-XX/help/371361G-01/lvhowto/configmerge_thirdparty/ , which confirmed the correct order is base-theirs-mine(aka yours)-merged
- Mark as Read
- Mark as New
- Bookmark
- Permalink
- Report to a Moderator
I am experiencing an error when following the instructions and trying to "diff" a changed VI:
"An error occurred while running LVCompare.
Open VI Reference in LVCompare.vi<APPEND>
VI Path: <b>C:\Program Files (x86)\National Instruments\Shared\LabVIEW Compare\supportVIs\_prolvcmp.llb\%mime</b>"
Since the block diagram is pw-locked I can't even figure out why this would be. It doesn't matter whether 32bit or 64bit LabVIEW with either LVCompare-Path. I am running TortoiseSVN v1.7.7 and LV2011 sp1 with the DeveloperSuite. Any hints on what I might miss here?
- Mark as Read
- Mark as New
- Bookmark
- Permalink
- Report to a Moderator
How did you configure the command line to call LVCompare? Maybe make sure you type %mine instead of %mime in the command line?

- Mark as Read
- Mark as New
- Bookmark
- Permalink
- Report to a Moderator
Hi
I had a similar problem that was handled with SR:#7391990
Most of it was handled in German but here is the essence:
I am using LVcompare since many LV-Versions to compare local files with files kept under SVN on a cloud server.
Starting a project with LV2013 I noticed that I could no longer diff files.
Comparing files on the local computer works fine. Comparing files with previous LV-versions (2011) works as well.
I am using a SSD as drive C: with Windows 7 professional (German) with a limited size.
So I moved the temp dir for LV to a standard harddrive F:
Apparently the different LV programs get that shift mixed up.
One ist storing LVcompare.ini on the C:\Users....
The other is expecting it on F:\Users...
Hope that helps.
Gabi
CLA
- Mark as Read
- Mark as New
- Bookmark
- Permalink
- Report to a Moderator
thanks,now i know how to configure the svn for lv
