- Document History
- Subscribe to RSS Feed
- Mark as New
- Mark as Read
- Bookmark
- Subscribe
- Printer Friendly Page
- Report to a Moderator
- Subscribe to RSS Feed
- Mark as New
- Mark as Read
- Bookmark
- Subscribe
- Printer Friendly Page
- Report to a Moderator
Contestant Info:
Bill Meier, Principal R&D Engineer, Kop-Flex, Inc.
User Group Affiliation:
Washington Area LabVIEW User Group (WALUG)
Location: | National Instruments |
Contact: | Ted Delaplaine |
Meeting Details: | Quarterly meetings, 11:30 a.m. – 1:00 p.m. |
User Group Website: | http://decibel.ni.com/content/groups/nicommidatlantic |
Summary:
We have several rotating test stands we control using LabVIEW code. The main user interface is a desktop PC with touch screen, flat panel LCD screens. This was for ease of operator use and to add a bit of a high tech factor.
While this works great for simple button pushes, I want to provide some dialog boxes that the operator could use to punch in parameters such as speed and torque in a calculator keypad type of interface with buttons large enough that they can use the touch screen. Also, I wanted to provide the means that they could continually nudge up and down whatever was the current value of the control. With these dialogs, the operator should rarely need to touch the keyboard or mouse.
Other factors of concern:
- One test stand has both a high speed side and a low speed side with an approximately 4:1 ratio. Torque between the two sides is the reverse 1:4 ratio. I wanted the operator to be able to set either the high speed side torque or speed, and have the other side’s control automatically updated to match.
- I don’t want the dialog boxes to block the operation of any other code of the main user interface, so they need to be implemented in parallel while loops.
- I want the dialog boxes to recognize the data entry limits of the controls on the front panel, and to handle any out of range data requests appropriately.
- I did not want a user to be able to increase the speed by as much as 10,000 RPM with a single Up/Down button press. So I needed to provide a means to disable those buttons in the UpDown dialog VI.
- There is currently no need for the user to enter any values that are fractional. So a decimal point was not needed on the keypad interface. Likewise, negative values are currently not required.
Function:
To provide a dialog box that is linked to a front panel control so that an operator can enter numeric values using a touch screen LCD monitor. Also provide an alternative dialog box where that remains on screen as long as needed so they can make incremental changes to the linked front panel control.
Steps to execute code:
- Run the Main VI.
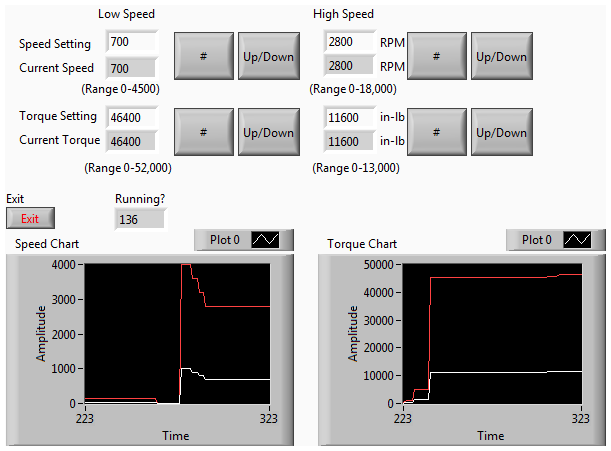
- Since this VI is only to demonstrate the user interface, all real code to interface with the machine has been eliminated. The speed and torque setting controls are wired directly to indicators to show the current values. There are waveform charts to show the values and a small numeric indicator showing the main loop of the VI is not being blocked by the dialog interfaces.
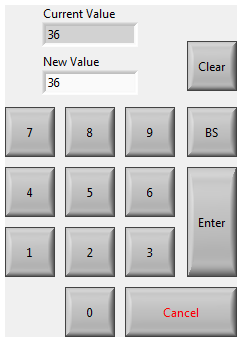
- Click on the # button next to any of the parameters. A calculator keypad pops up allowing the user to enter a number. If a number exceeds the range that is set for the control, a dialog box pops up asking whether to enter the maximum number or to cancel and go back to the dialog box to try again.
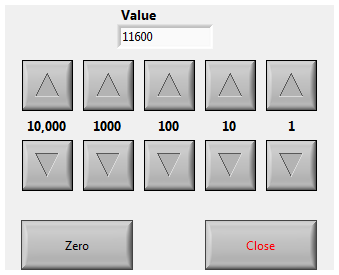
- Click on the Up/Down button next to any of the parameters. The dialog box remains open allowing the user to change the values by 1, 10, 100, 1000, … at a time. When done, close the dialog box.
- When done, hit the X on the window of the main VI or select the Exit button. A dialog box will pop up asking to confirm your choice.
Screenshots:
Main Front Panel:
Number Pad Front Panel:
Up/Down Front Panel:
VI Snippets:
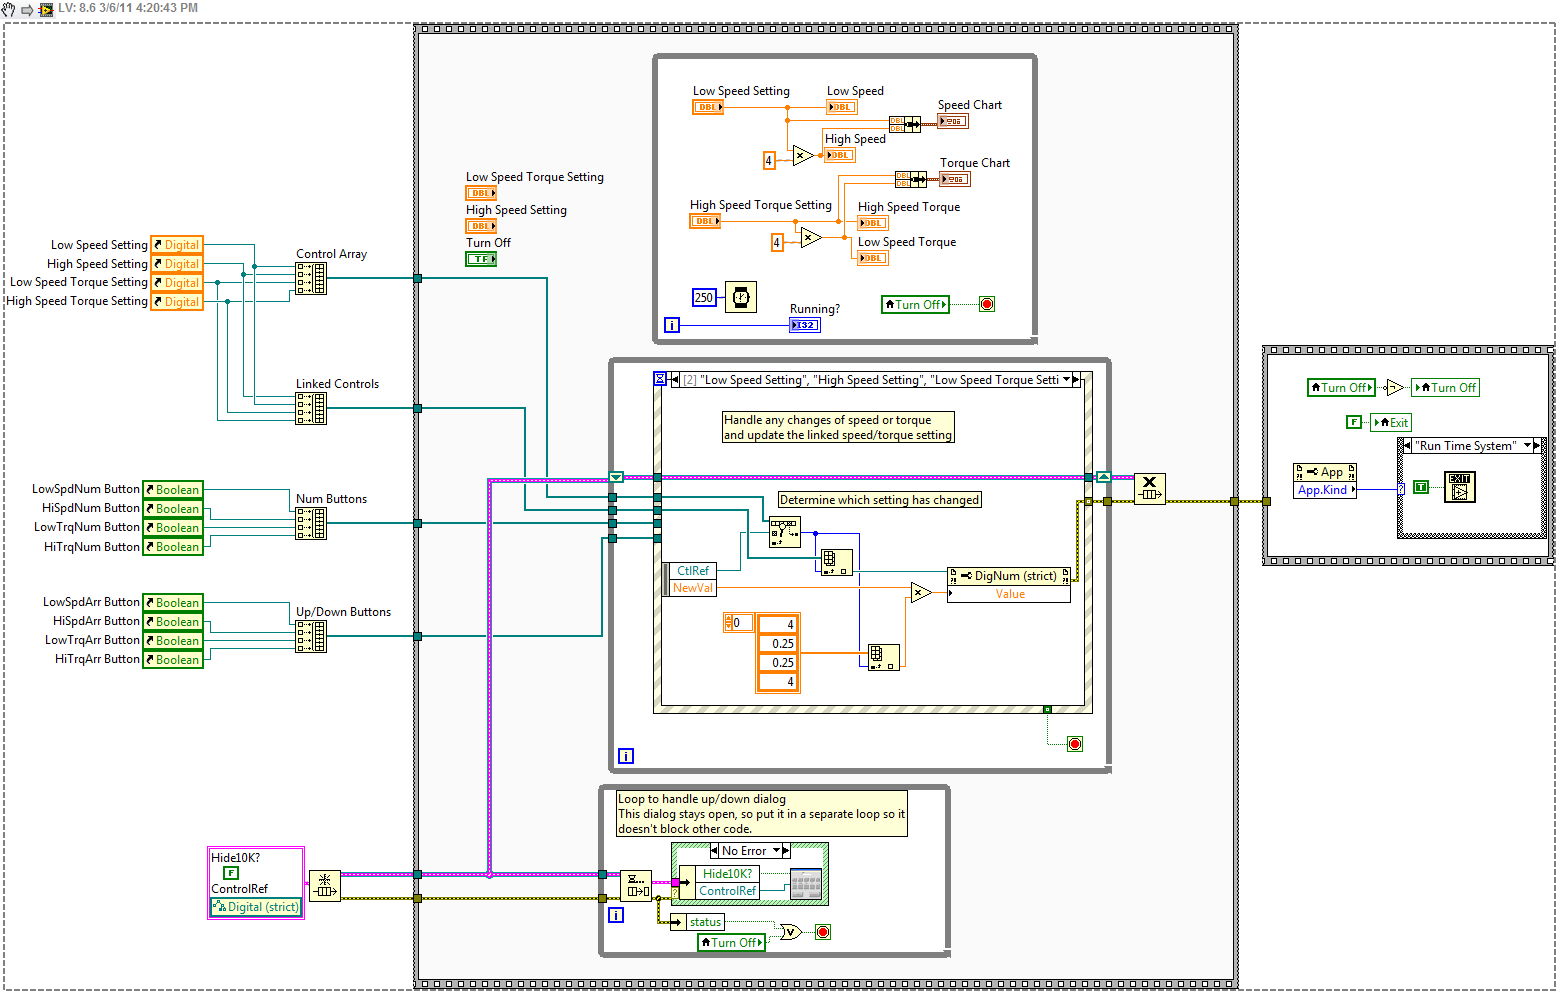
Main Block Diagram:
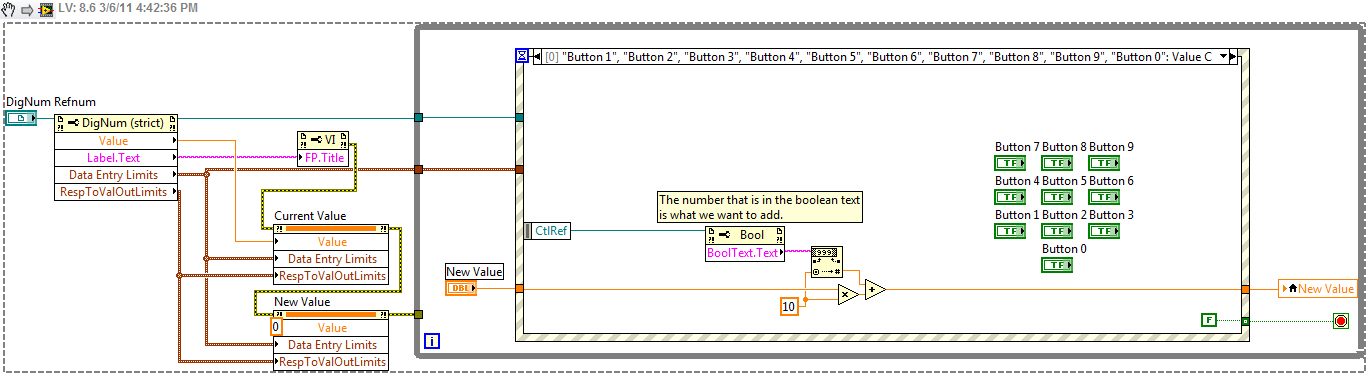
Number Pad Block Diagram:
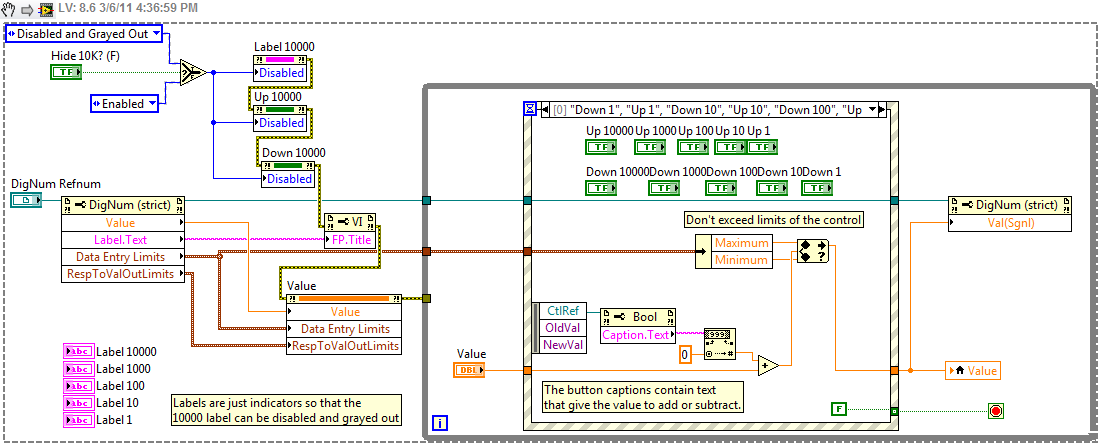
Up/Down Block Diagram:
VI attached below (LabVIEW 8.6)
- Mark as Read
- Mark as New
- Bookmark
- Permalink
- Report to a Moderator
Nice code! Did you run into an instance when you needed this functionality and that's why you coded it up or was it more of a brainstorm then necessity?
- Mark as Read
- Mark as New
- Bookmark
- Permalink
- Report to a Moderator
Thanks Grant.
I basically did need this functionality. It wasn't absolutely necessary to have it, but it by creating it, it gave an extra WOW factor to my applications.
Our company had just invested a lot of money in a new R&D facility that included upgrades to our current machines as well as some new test machines. One of the mandates was to make it a show piece, something that when we showed it to visiting customers they would be impressed. We invested in NI hardware such as the compact Fieldpoint for the control systems and I wrote the code myself. The operator interfaces running on PC 's have front panel displays with images of the particular test stand they are controlling with status indicators matched up to pieces of the machine. Basic Start/Stop/Direction and other On/Off control buttons populate the screen.
I figured what cooler way would there be to start a machine other than touching the button on screen and having it react. So I invested in some relatively inexpensive flat panel LCD screens that also had touchscreen capability.
Then I said, wouldn't it be nice if we could basically hide the mouse and keyboard in a drawer and only use them if absolutely needed. But some of the controls required a typed in input such as the speed or torque setting. How do I do that with a finger that is acting like a mouse. So I created the number pad dialog that looks like a calculator with big enough buttons for a person to touch. Since I needed to do this with more than one numeric input, and each numeric control has its own range limits, I used the techniques in the main VI using control references to determine which control the numberpad dialog acts on.
The number up/down dialog grew from that because sometimes we don't want to enter a specific speed, but want to be able to manually ramp up or down a speed at our own pace. So I created the up/down dialog that remains on screen so that the operator can change the value at their own pace and not have to continually key in a new value.
With these two dialogs, I've used them across 3 different test stands and the operator doesn't need to touch the keyboard.
-Bill
- Mark as Read
- Mark as New
- Bookmark
- Permalink
- Report to a Moderator
Hi RavensFan,
Thanks for the great code. Could you please share about the Hardware used and its Connections?
Thanks a lot in advance
- Mark as Read
- Mark as New
- Bookmark
- Permalink
- Report to a Moderator
We used compact Fieldpoint to read analog sensors and digital inputs, and output to analog outputs and digital outputs for relays. The machines were driven by electric motors with variable frequency drives. The newer versions of those drives can be communicated with using Modbus RTU over RS-485, but I had one older drive that I had to create a driver to match their ASCII protocol and used that over an RS-485 serial line.
