- Document History
- Subscribe to RSS Feed
- Mark as New
- Mark as Read
- Bookmark
- Subscribe
- Printer Friendly Page
- Report to a Moderator
- Subscribe to RSS Feed
- Mark as New
- Mark as Read
- Bookmark
- Subscribe
- Printer Friendly Page
- Report to a Moderator
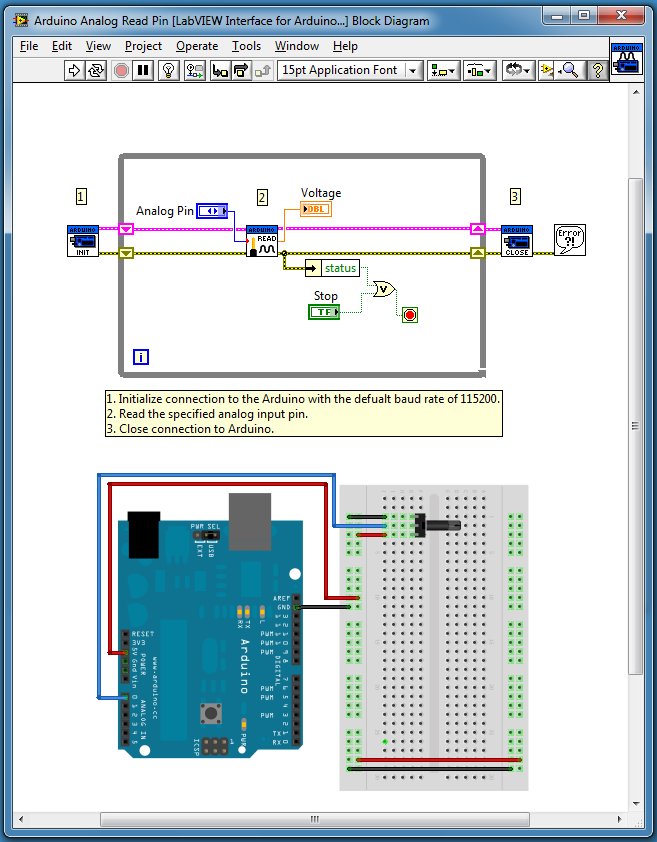
Arduino Example: Analog Read
Before opening this example, make sure to install the LabVIEW Interface for Arduino.
Description:
This example shows how to read an analog input on the Arduino using the LabVIEW Interface for Arduino.
Tutorial:
- Make sure you have installed the LabVIEW Interface for Arduino.
- Open the Analog Read Pin Example VI (search for "Arduino" in the example finder once the toolkit is installed).
- On the front panel, select the Arduino analog pin you want to read.
- Build the circuit schematic shown on the block diagram.
- Connect your Arduino to your PC with a USB cable. Optionally you can specify the COM port associated with your Arduino to the VISA resource terminal of the Init.vi to decrease the time require for LabVIEW to connect to the Arduino.
- Click Run.
- Rotate the potentiometer and watch the gauge and digital display on the front panel update.

- Mark as Read
- Mark as New
- Bookmark
- Permalink
- Report to a Moderator
I encountered an error 5005 while working on this example on my Arduino Mega 1280. In case some of the members got the same error, just follow this steps to fix it.
- Open Analog Read Example VI.
- On the block diagram, create a VI Resource Control and Board Type Control at the input of Arduino INIT vi.
- On the front panel, select the correct COM port and board type ( In my case, I select Mega 2560 since it has the same pin configurations as the Mega 1280). Also select the Arduino analog input pin you want to read. ( analog pin 0 for example ).
- Run the VI.
I test it again on analog input pins 0 - 7 without encountering any errors at all. However, on analog pins 8 - 15 it displayed an error 5000 stating that the pins are not present on the board. To fix it, simply do this steps:
- Open Check For Pin Out Of Range VI block diagram.
- On the "Analog",Default setting of the inner case structure, change the Num Pins constant from 8 to 16.
- Save the changes in the VI. Close it afterwards.
- Open Analog Read Example VI.
- On the front panel, select the correct COM port, board type, and the analog input pin you want to read ( pin 8 for example).
- Run the VI.
After successfully reading from pin 8, I tested the program to read from analog pins 9 - 15 and it works fine.
That's it. I can now read data from analog pins 0 - 15.
- Mark as Read
- Mark as New
- Bookmark
- Permalink
- Report to a Moderator
LT@1R,
We have not had a chance to do any testing with the 1280 so I cannot recreate this issue in house. Is the 1280 listed as an arduino under windows device manager? The Init VI will attempt to auto connect to the first device with a name that contains the work arduino (which the uno and mega 2560 will). It is better to specify the COM port as you suggest for two reasons. First, specifying the COM port to use will greatly reduce the time required to find and connect to the Arduino since you no longer have to populate a list of all VISA resources and scan through them until you find an Arduino (this is what the init VI does when there is nothing wired to the VISA resource input). Second, specifying the COM port allows you to use any Arduino, even if it does show up with the name Arduino in device manager (for example the Duemilanove)
Whenever you get an error code such as '5005' try searching ni.com for the code. You will usually find a Knowledge base article such as this one describing the error.
As for your work around for analog pins 8-15 there is an easier way to accomplish this. On the Init.vi simple specify the board type as Mega 2560. At this point the board type is mainly used to ensure that you are using the correct pins for the board. Since we have not tested the 1280 it is not an option as a board type, but the 2560 is and it also has 15 analog input pins.
I hope this cleared a few things up. Let us know if you have any more questions.
-Sam
LIFA Developer
- Mark as Read
- Mark as New
- Bookmark
- Permalink
- Report to a Moderator
how about connection bluetooth from arduino uno to dasboard labview in android? or put input dasboarad labview from bluetooth?
- Mark as Read
- Mark as New
- Bookmark
- Permalink
- Report to a Moderator
HI!
I tried to make this code on my arduino Uno with a potetiometer. When I try, no problem exept one : the value is ALWAYS around 60- 62 and I don't understand why because when I make a very simple code on the arduinosoftware, it seems to work (value between 0 - 1024).
Can you help me please?
- Mark as Read
- Mark as New
- Bookmark
- Permalink
- Report to a Moderator
HELLO
I wonder if you could make the communication with labview Arduino UNO? Its test before sending look like the hardware in case the Arduino?
I'm not detect the arduino. Have intalei the VI package manager and toolkit for labview arduino. The labview to use is 2010. And arduino uno.
Gives error 5005, 5003, 5002 ...
thank you
Wagner.
- Mark as Read
- Mark as New
- Bookmark
- Permalink
- Report to a Moderator
I asked you how to acquire four analog breads strenuous DUE Arduino in LABVIEW ..
- Mark as Read
- Mark as New
- Bookmark
- Permalink
- Report to a Moderator
Hi how I can saved analog input arsonists in Lancome .thanks
- Mark as Read
- Mark as New
- Bookmark
- Permalink
- Report to a Moderator
Hi how I can save input analog arduino in labview.tanks
- Mark as Read
- Mark as New
- Bookmark
- Permalink
- Report to a Moderator
U can use filel/O functions with out any changes
بتاريخ ٠٩/١٠/٢٠١٦ ١٠:٠٦ ص، جاء من "maryamman" <web.community@ni.com>:
NI Community <https://decibel.ni.com/content/index.jspa>
Arduino Example: Analog Read new comment by maryamman
<https://decibel.ni.com/content/people/maryamman> View all comments on
this document
<https://decibel.ni.com/content/docs/DOC-16067#comment-51596>
