- Document History
- Subscribe to RSS Feed
- Mark as New
- Mark as Read
- Bookmark
- Subscribe
- Printer Friendly Page
- Report to a Moderator
- Subscribe to RSS Feed
- Mark as New
- Mark as Read
- Bookmark
- Subscribe
- Printer Friendly Page
- Report to a Moderator
Before opening this example, make sure to install the LabVIEW Interface for Arduino.
Description:
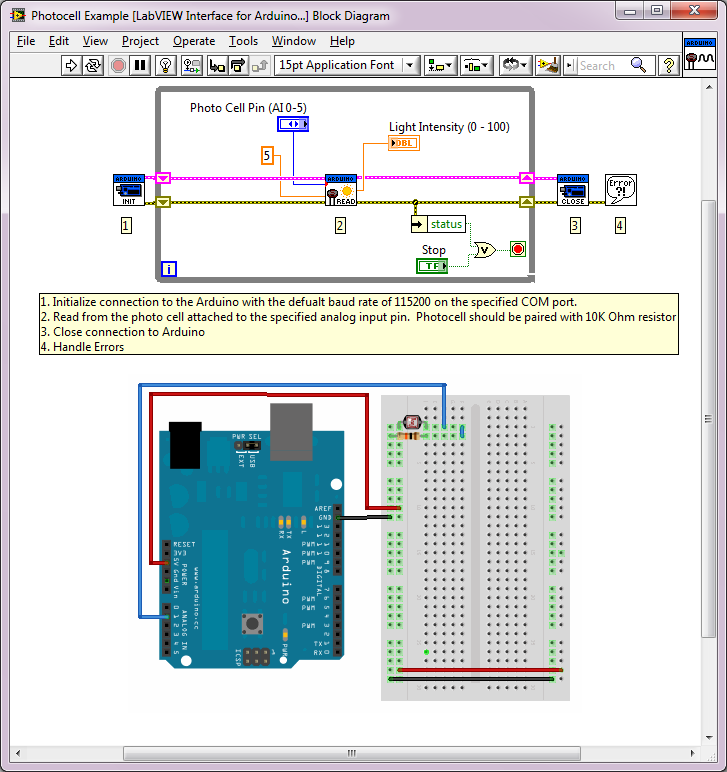
This example shows how to read a photocell on the Arduino using the LabVIEW Interface for Arduino.
Tutorial:
- Make sure you have installed the LabVIEW Interface for Arduino.
- Open the Photocell Example VI (search for "Arduino" in the example finder once the toolkit is installed).
- On the front panel, select the Arduino analog pin connected to the photocell.
- Build the circuit schematic shown on the block diagram.
- Connect your Arduino to your PC with a USB cable. Optionally you can specify the COM port associated with your Arduino to the VISA resource terminal of the Init.vi to decrease the time require for LabVIEW to connect to the Arduino.
- Click Run.
- Vary the amount of light reaching the photocell (cover it with your hand) and watch the gauge and digital display on the front panel update.

- Mark as Read
- Mark as New
- Bookmark
- Permalink
- Report to a Moderator
Hi,
I get error 5002.
How do I check arduino connectivity with LV?
How do I change baud number?
Does it work with LINX?
Thanks,
Nadav.
- Mark as Read
- Mark as New
- Bookmark
- Permalink
- Report to a Moderator
Nothing works with Linx. What a horrible transition from Lifa. Seems the Linx library would have a few more VIs before they stop supporting Lifa.
(This was my own issue due to ignorance of Lifa and Linx)
- Mark as Read
- Mark as New
- Bookmark
- Permalink
- Report to a Moderator
How do you modify this code and circuit to add multiple photocells?
I tried duplicating the existing code from the example and adding a second photocell-resistor loop of the same ground and 5V, plus second analog input. This did not work. Why?
