- Document History
- Subscribe to RSS Feed
- Mark as New
- Mark as Read
- Bookmark
- Subscribe
- Printer Friendly Page
- Report to a Moderator
- Subscribe to RSS Feed
- Mark as New
- Mark as Read
- Bookmark
- Subscribe
- Printer Friendly Page
- Report to a Moderator
This Add-On is deprecated and is no longer updated with new features or bug fixes. Therefore, it is not recommended for use in new projects. A next-generation engine simulation toolkit is available at: NI Engine Simulation Toolkit for NI VeriStand. The new toolkit offers vast improvements to FPGA space utilization, RT performance, and many new features.
NI VeriStand Add-on: Engine Simulation Custom Device
![]()
Overview
The Engine Simulation add-on allows users to test ECUs by simulating an engine. This includes generating cam and crank signals and capturing output events (such as those for fuel injectors and ignition coils).
Instructions for Use
After installing the Engine Simulation add-on, it can be added to a system definition as a custom device. When you add the custom device, you will be prompted to select an FPGA bitfile which contains your engine simulation components. This bitfile can either be one that you have already added to your System Definition in the "Hardware\Chassis\FPGA" section, or you can browse to a bitfile on disk. All available engine components defined in your bitfile will be added to your system definition. Click on the item pages beneath the "Crank and Cams" section and follow the instructions on the page to define your output signals. While running, output signals will be generated based on the value of the "Engine Speed" channel.


Getting Started - Creating and Adding an FPGA
- Install all of the software in the "Add-On Requirements" section below.
- If you want other IO and Engine simulation: Run the NI VeriStand FPGA Project Wizard to create a new FPGA project with the NI VeriStand template and FPGA I/O that you intend to use (see the documentation for the NI VeriStand FPGA-Based I/O Interface Tools for more information).
If you just want engine simulation: Create a new LabVIEW project and add your FPGA target, its IO and a blank FPGA VI to start from. - Open the FPGA VI, go to the block diagram, and drop the palette item "NI VeriStand FPGA Support >> RIO Library >> Custom Device Components >> Engine Simulation >> Engine Simulation Component.vit" onto the block diagram. The contents of the template VI will be placed on the diagram which inlcudes the angle processing unit, a crank generation loop, a cam generation loop with four cams, eight injector measurements, and eight spark measurements.
- Either edit the names of your FPGA I/O in your project to match the names of the I/O in the FPGA VI (For example, change DIO1 to Cam1DigitalOut).
Or click the FPGA I/O nodes in the FPGA VI to change the I/O binding to something valid for your project (For example, change Cam1DigitalOut to DIO1). - If you want other IO and Engine simulation: Customize the FPGA to provide the I/O you desire through the NI VeriStand interface.
If you just want engine simulation: Skip this step - If you want other IO and Engine simulation: Compile the FPGA and Modify the XML to define the data going through the NI VeriStand interface (see the documentation for the NI VeriStand FPGA-Based I/O Interface Tools for more information).
If you just want engine simulation: Compile the FPGA - If you want other IO and Engine simulation: Add the FPGA to the NI VeriStand System Definition in the FPGA category.
If you just want engine simulation: Skip this step - Add the Engine Simulation custom device to the NI VeriStand System Definition.
- If you want other IO and Engine simulation: Select the RIO# in the drop down box of the FPGA you just added to the system definition in step 8.
If you just want engine simulation: Browse to the bitfile on disk. - Configure the Engine Simulation custom device as needed.
FPGA Modification and Customization
When configuring the Engine Simulation Custom Device, it parses the provided FPGA bitfile and looks for the following five component types:
- Angle Processing Unit Loop
- N Teeth M Missing Simulation Loop(s) - typically for Crank signals
- Fully Custom Simulation Loop(s) - typically for Cam signals
- ECU Event Loop(s) - typically for fuel injectors and ignition coils
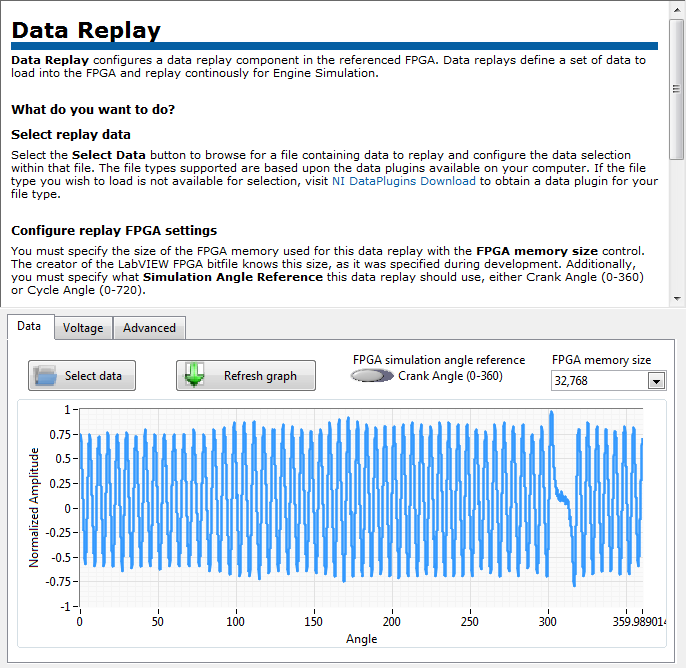
- Data Replay Loop(s) - for replaying data captured in a data file like VR sensor data
In order to be recognized as a valid engine simulation bitfile, the Angle Processing Loop is required to be present. All other components are optional. In order for components to be recognized, the relevant controls and indicators must be named appropriately. The general form for the name of controls and indicators (except data replay, which uses a different format) are:
<Component Type>.<Component Name>.<Sub-Component Name>.<Parameter Name>
<Component Type>: The type of the component. This will be either "APU", "NTeeth", "FullyCustomTeeth", or "ECUEvent"
<Component Name>: The desired name for the component which shows up in the NI VeriStand configuration tree. Examples: "Crank", "Cams", "FI 1", "IC 1", etc...
<Sub-Component Name>: The desired name for the sub-component. This is currently only used for the "FullyCustomTeeth" component type.
<Parameter Name>: The name of the parameter. Each parameter has a different function. See the documentation for the Automotive Engine Simulation (AES) Library for HIL for more information.
All controls and indicators will have a <Component Type> and <Parameter Name>. The component type determines whether a <Component Name> and <Sub-Component Name> are required (see below).
Angle Processing Unit Loop - Required
Required Controls / Indicators:
- Control (U64) - APU.Degrees per Tick
- Control (Boolean) - APU.Reset
Optional Controls / Indicators:
- Indicator (U64) - APU.Crank Angle
- Indicator (U64) - APU.Cycle Angle
N Teeth M Missing Simulation Loop(s) - Optional
Required Controls / Indicators:
- Control (Boolean) - NTeeth.<Component Name>.TopDeadCenter High?
- Control (U64) - NTeeth.<Component Name>.Degrees High Pulse
- Control (U64) - NTeeth.<Component Name>.Degrees Low Pulse
- Control (U8) - NTeeth.<Component Name>.Num Teeth Miss
- Control (U64) - NTeeth.<Component Name>.Missing Teeth Offset
Optional Controls / Indicators:
- Control (U64) - NTeeth.<Component Name>.TDC Offset
- Control (Boolean) - NTeeth.<Component Name>.CycleAngle
Fully Custom Simulation Loop(s) - Optional
Required Controls / Indicators:
- Control (U8) - FullyCustomTeeth.<Component Name>.Num Angles
- Control (U8) - FullyCustomTeeth.<Component Name>.Num Profiles
- Control (Boolean) - FullyCustomTeeth.<Component Name>.<Sub-Component Name>.First Rising?
- Control (U64) - FullyCustomTeeth.<Component Name>.Data
- Control (Boolean) - FullyCustomTeeth.<Component Name>.Toggle
Optional Controls / Indicators:
- Control (U64) - FullyCustomTeeth.<Component Name>.<Sub-Component Name>.Offset
- Control (Boolean) - FullyCustomTeeth.<Component Name>.<Sub-Component Name>.CycleAngle
- DMA FIFO (U64) - FullyCustomTeeth.<Component Name>.Angles FIFO - deprecated
Notes: At least one Sub-Component must be defined. The DMA FIFO was previously used to load angles, but has been deprecated to conserve DMA resources. You either need a memory loading loop with "Data" and "Toggle" controls (recommended), or a DMA "Angles FIFO" (not recommended).
ECU Event Loop(s) - Optional
Required Controls / Indicators:
- None
Optional Controls / Indicators:
- Indicator (U32) - ECUEvent.<Component Name>.Time Duration
- Indicator (U64) - ECUEvent.<Component Name>.Start Angle
- Indicator (U64) - ECUEvent.<Component Name>.End Angle
- Indicator (U64) - ECUEvent.<Component Name>.Angle Duration
Note: At least one optional indicator is required for a component to be detected.
Data Replay Loop(s) - Optional
Required Controls / Indicators:
- Control (U32) - DataReplay.UpdateRate.<Loop Name>
Data Replay(s) - Optional
Required Controls / Indicators:
- Control (U64 , FXP signed 47,-4) - DataReplay.RPMThreshold.<Loop Name>.<Replay Name>.<Number>
- Control (U32, FXP 18,7) - DataReplay.AngleToAddress.<Loop Name>.<Replay Name>.<Number>
- Control (U32, FXP unsigned 18,12) - DataReplay.VScaleSlope.<Loop Name>.<Replay Name>.<Number>
- Control (U32, FXP signed 18, 3) - DataReplay.VScaleIntercept.<Loop Name>.<Replay Name>.<Number>
- Control (Bool) - DataReplay.CycleAngle?.<Loop Name>.<Replay Name>.<Number>
- Control (Bool) - DataReplay.ReverseNegate?.<Loop Name>.<Replay Name>.<Number>
Optionl Controls / Indicators:
- Control (U64) - DataReplay.Offset.<Loop Name>.<Replay Name>.<Number>
Note: Each replay loop needs a unique name for the loop, and replays inside it need unique names and numbers. The number matches the memory you will be loading in the Data Replay Load Loop's case structure. See examples.
Data Replay Load Loop - 1 Required if any Data Replays present
Required Controls / Indicators:
- Control (I16 array, any size) - DataReplay.Data
- Control (Bool) - DataReplay.Toggle - bool
- Control (I8) - DataReplay.Select - i8
- Control (Bool) - DataReplay.LoadDone - bool
- Control (U16) - DataReplay.LoadOffset - U16
Installing the Engine Simulation Custom Device
To install the Engine Simulation add-on, , unzip the attached .zip file and follow the instructions in the included "readme.txt".
Add-on Requirements to Run the Engine Simulation Custom Device
Software
This device was created for use with NI VeriStand 2011 or later. To use this custom device you must have the following software installed:
- NI VeriStand 2011 or later
- NI-RIO 4.0 or later
For creating or modifying the FPGA personalities needed for this custom device:
- LabVIEW 2011 or later
- LabVIEW FPGA 2011 or later
- NI VeriStand FPGA-Based I/O Interface Tools (recommended, install first)
- Automotive Engine Simulation (AES) Library for HIL (install second)
Hardware
This add-on requires the following hardware.
- An FPGA device connected to the real-time test system (ex. PXI R series board, CompactRIO backplane, etc...)
Add-on Requirements to Modify the Engine Simulation Custom Device
- LabVIEW 2011 or later
- LabVIEW FPGA 2011 or later
- NI-RIO 4.0 or later
- LabVIEW FPGA Advanced Interface Tools
- NI VeriStand FPGA-Based I/O Interface Tools (install first)
- Automotive Engine Simulation (AES) Library for HIL (install second)
Known Issues
- You cannot change the linked FPGA bitfile after adding the custom device. So if you picked a NIVS FPGA device when adding this custom device, renaming that bitfile or fpgaconfig file will cause this add-on to break.
- The embedded help content might be blocked by default by Windows resulting in blank white pages inside system explorer. Workaround: navigate to the installation directory of the engine simulation custom device, right click Engine Simulation.chm and select properties -> unblock
- Installing the NI VeriStand FPGA-Based I/O Interface Tools will remove the Automotive Engine Simulation (AES) Library for HIL so you must install the AES library second.
Version History
3.10
- Mutation required, open existing system definitions, save, and close
- Added support for bitfiles compiled using the new AES 2.7 library which allows the custom device to select on each fully custom teeth or n-m generation if its referencing cycle or crank angle. Those loops can now have a .CycleAngle boolean control to select between the two angles. See example or new AES templates (dropped from palette) for example. The control name is now documented on this page as well.
- Fixed issue in install instructions readme.txt
3.9
- Mutation required, open existing system definitions, save, and close
- Added support for bitfiles compiled using the new AES 2.6 library which adds VVT offset for data replay.
- Improved real time performance by 30-45%
- Added ability to override voltage settings of data replay at run time
- Fixed that the cycle or crank angle toggle for fully custom teeth generation did nothing. Fully custom was always generated with respect to cycle angle
- Error 1026 should no longer be seen when clicking around in the custom device pages in NI VeriStand 2013
- Version number of the custom device is now displayed on the main page
- Removed the useless ES Delta T status channel (it was always 1 and didn’t really mean anything to users)
3.8
- Added support for bitfiles compiled using the new AES 2.5 library: Data Replay for easy replay of captured crank/cam VR sensor or hall effect sensor data & configurable acceleration rate on RPM setpoint changes
- Use any data plugin (ni.com/dataplugins) to load your replay data
- Examples are revamped and a seperate download. They include hall and VR examples with and without single point IO included with the engine simulation.
- The FPGA examples zip file now includes an example CSV file containing crank VR sensor data, however you can always capture your own data with NI VeriStand's high speed DAQ logging capability.
- Added the ability to specify the FPGA loop rate of your event loops on a global or per event basis, therefore the time duration channel value will be correct if your using an SCTL for your event loop or if you use a while loop
- Fixed that the custom device was not reporting run time initialization errors
- The "add XXX" toolbar buttons and right click menus no longer list items already present in the system definition in the available components list
- Improved the responsiveness of the pages inside system explorer
- Removed some incorrect help information from the main page
- Upgraded source dependencies to AES 2.5
3.7
- Execution performance has been increased by over 50%
- Source now depends on the latest version (6/18/2013) of the LabVIEW FPGA Advanced Interface Tools
3.6
- Minor internal changes to the build process. Only noticable if you're using the source. (Source now builds into the "Built"directory instead of into the NI VeriStand directory directly, and VxWorks build is in the \c\ dir)
3.5
- Fixed a serious bug that caused this device to not function when run on a windows target
- Added an error code status channel and error code information is now printed to console
- Improved install instructions
3.3
- Updated to be compatible with the changes made in AES 2.4. Still backwards compatible with bitfiles compiled previous versions of AES, but new bitfiles should be compiled with AES 2.4 for better operation (see AES 2.4 change list)
- Engine sim FPGA example project updated with changes made in AES 2.4
- Fixed an issue where fully custom teeth generation would be incorrect if using crank angle (0-360) and angle transition values were input as negatives (-100, -200, etc)
3.2
- The included example bitfile now uses the updated templates from AES 2.3
- The custom device now properly supports using either Cycle Angle (0-720) or Crank Angle (0-360) with either N teeth M missing generation (usually crank) or Fully Custom generation (usually Cam). This was introduced in earlier versions of the AES library but not correctly documented until v2.3 of AES, and not supported with the custom device until now. Use the check boxes on the pages of the custom device to specify which angle reference you used in the FPGA bitfile for your waveform generations.
- Angles can now be imported and exported to/from file for fully custom teeth
3.1
- Added example FPGA project
- Custom device now supports loading and using FPGA bitfiles that do not use DMA FIFOs, which was introduced in v2.2 of the AES library
3.0
- Upgraded to 2011
- Fixed several bitfile pathing issues
- Added images for all buttons
Support and Contact
This add-on is provided as open-source software. If it does not meet your exact specification, you are encouraged to modify the source code to meet your needs. It is not officially supported by National Instruments.
National Instruments does not support this code or guarantee its quality in any way. THIS EXAMPLE PROGRAM IS PROVIDED "AS IS" WITHOUT WARRANTY OF ANY KIND AND SUBJECT TO CERTAIN RESTRICTIONS AS MORE SPECIFICALLY SET FORTH IN NI.COM'S TERMS OF USE (http://ni.com/legal/termsofuse/unitedstates/us/).
Download This Add-On
See attached files. It includes the custom device, an example bitfile, and source.
NI VeriStand 2010 (Legacy):
Engine Simulation custom device - v1.2
This Add-On is deprecated and is no longer updated with new features or bug fixes. Therefore, it is not recommended for use in new projects. A next-generation engine simulation toolkit is available at: NI Engine Simulation Toolkit for NI VeriStand. The new toolkit offers vast improvements to FPGA space utilization, RT performance, and many new features.
