- Document History
- Subscribe to RSS Feed
- Mark as New
- Mark as Read
- Bookmark
- Subscribe
- Printer Friendly Page
- Report to a Moderator
- Subscribe to RSS Feed
- Mark as New
- Mark as Read
- Bookmark
- Subscribe
- Printer Friendly Page
- Report to a Moderator
LabWindows/CVI Tip: Generate Documentation for your Functions
Improve reusability of your code and simplify your next code review with Tooltips and Help Files
Did you know CVI can generate prototype tooltips and help files for your source code? Simplify your next code review by providing an xml or html Help File to illustrate the hierarchy of functions and their descriptions. Adding tooltips make your code easier to understand and re-use.
Section 1: Tooltips
Section 2: Help Files
Section 1: Tooltips
What are Tooltips and how do you use them?
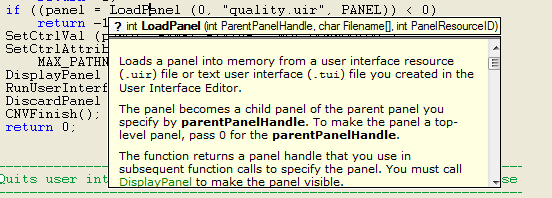
Tooltips give you on-the-fly information about a function and its parameters as you write code. CVI Tooltips go beyond showing you the prototype and provide a description of the function and each of its parameters. By enabling the Show function prototype and struct/union fields while typing option in Options » Editor Preferences, LabWindows/CVI will show the prototype of the function when you type the open parenthesis '(' after a function name as well as struct members when you type '.' or '- >' after a variable name as seen below.

To see the prototype for an already written function, place your cursor on the function and select Edit»Show Protoype or press < Ctrl-Shift-Space >. The next step is to see the Tooltip Help. Once the prototype tooltip is open, you can click the '?' or press < F1 > to view a description of the function and each parameter as seen below.
How to generate CVI Tags for your own functions
If you'd like your function documentation to be available from the prototype tooltip there are a number of tags that CVI can generate and place immediately above your function. Place your cursor before a function definition and select Edit » Insert Construct » Function Documentation Tags or press <Ctrl-Shift-G> to insert the ///HIFN, ///HIPAR and ///HIRET template comment tags automatically. LabWindows/CVI customizes the tags for the function and then all you need to do is fill in the content and compile your code. Below is an example of template that is generated by CVI.
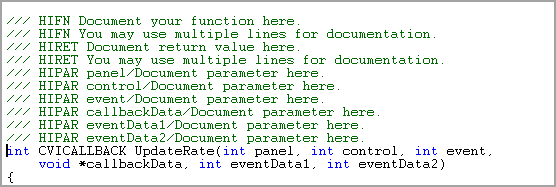
For an example of this, open "samples\networkvariable\quality\nvquality.cws". Before most functions, you can see triple-slash (///) tags, such as HIFN and HIPAR. These tags tell the CVI compiler to include the corresponding documentation in the browse information. For explaination and examples of each tag type, refer to the CVI Help Topic: Documentation Tags for Source Code.
Generate your own Standard Documentation using Macros
If instead of using the HIFN and HIPAR tags, you'd like to have your own standard documentation -- something like this, for example:
//************************************************
// Function: < MyFunc >
// Description:
//
//************************************************
I would suggest recording a macro that you can use to insert this template with a single keystroke. Attached below is an example macro that you can import into CVI. Download the attachment, then click Tools » Source Code Macros » Manage and then click Load to load the macro. Double-click on the macro to assign it a shortcut key. Note that without the ///HIFN tags, CVI will not recognize your custom documentation and the descriptions will not appear in the tooltip description.
-
macro.ini (1 kb)*
Section 2: Help Files
What are Help Files and why do you use them?
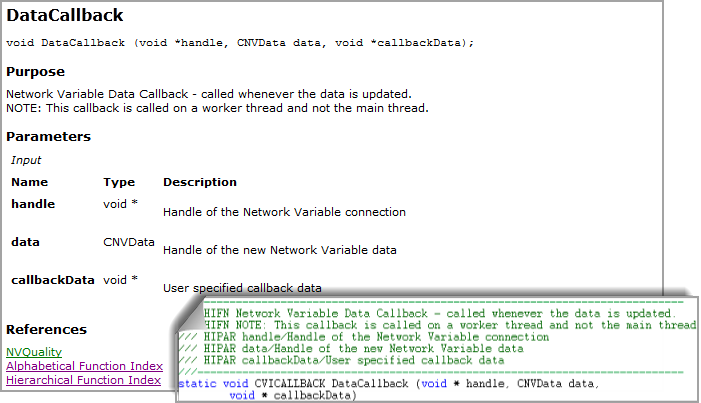
Now that you have inserted the CVI comment tags for your functions, you can have CVI generate help documentation for your code into .html or .xml files. These get placed into your project directory and are great way to demonstrate the hierarchy and capability of your code for the purpose of sharing, code review or simply to document for future use. Below is an example of a html Help file created for the NVQuality example. All the function and parameter descriptions can be access by clicking through the functions in the list.
How to Generate Help Files for your code
First you need to generate CVI Tags for your functions and fill in the descriptive content as mentioned above. Once this is done, go to Build » Target Settings and select a file type in the Generate help from source feild as seen below. For more information, see the CVI Help Topic: Generating Help Files.The next time you build the project, LabWindows/CVI genereates the designated files and places them in the directory next to the project file in a folder labeled cvicomments.projectname.


Did you find this tip useful? Rate this document or add a comment below.
If you give this a try, share your experience! Add a comment below.
- Mark as Read
- Mark as New
- Bookmark
- Permalink
- Report to a Moderator
The three links with .png images do nothing when clicked and return a "not autorized" error if opened in a new window
Proud to use LW/CVI from 3.1 on.
My contributions to the Developer Community
________________________________________
If I have helped you, why not giving me a kudos?
- Mark as Read
- Mark as New
- Bookmark
- Permalink
- Report to a Moderator
Thanks Roberto, I could not see the problem here probably because I am seeing a slightly different version. I have re-added the images, could you let me know if this fixed the issue? If not, I have another idea 🙂
- Mark as Read
- Mark as New
- Bookmark
- Permalink
- Report to a Moderator
Hi Anna, the problem isn't fixed, it still exists.
- Mark as Read
- Mark as New
- Bookmark
- Permalink
- Report to a Moderator
Thanks ReneF! Sorry about the technical issues, it should be fixed now, let me know if all the images are rendering correctly.
- Mark as Read
- Mark as New
- Bookmark
- Permalink
- Report to a Moderator
Hi Anna, now it works correctly. Thanks!
- Mark as Read
- Mark as New
- Bookmark
- Permalink
- Report to a Moderator
Hi Anna,
I've seen the attachment file, but I don't know the meanings of "Key = 69376", could you please give an explanation? Thanks.
David
- Mark as Read
- Mark as New
- Bookmark
- Permalink
- Report to a Moderator
It corresponds to the key that happened to be associated with that macro when it was recorded: Shift-F1. It's not very important, since the instructions suggest that you modify it after you import the macro into CVI.
In case you're wondering why 69376:
Shift-F1 = (VAL_SHIFT_MODIFIER | VAL_F1_VKEY) = 0x00010F00 = 69376 (from userint.h)
