Turn on suggestions
Auto-suggest helps you quickly narrow down your search results by suggesting possible matches as you type.
Showing results for
Document Options
- Document History
- Subscribe to RSS Feed
- Mark as New
- Mark as Read
- Bookmark
- Subscribe
- Printer Friendly Page
- Report to a Moderator
Document options
- Subscribe to RSS Feed
- Mark as New
- Mark as Read
- Bookmark
- Subscribe
- Printer Friendly Page
- Report to a Moderator
Before opening this example, make sure to install the LabVIEW Interface for Arduino.
Description:
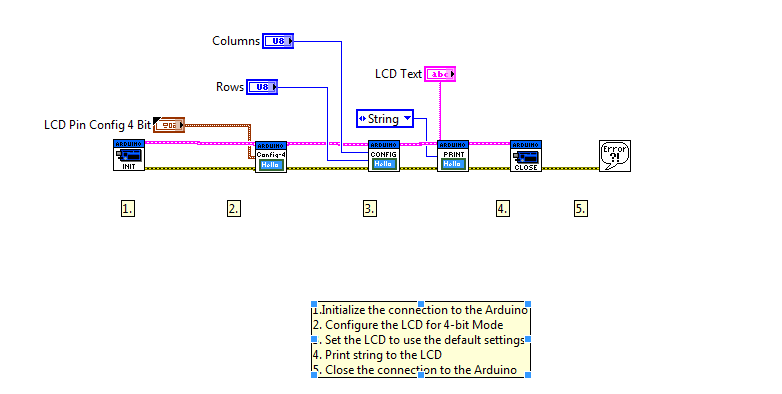
This example shows how to write text to an LCD using 4-wire mode on the Arduino
Tutorial:
- Make sure you have installed the LabVIEW Interface for Arduino.
- Open the Arduino Hello World 4-bit Example VI (search for "Arduino" in the example finder once the toolkit is installed).
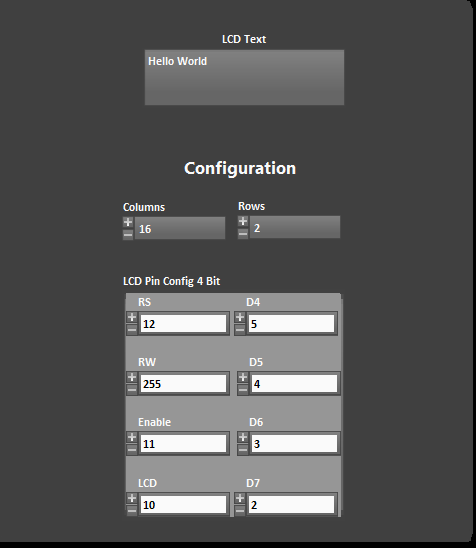
- On the front panel, select the text to write to the LCD, the number of rows and columns to use for the display, and the configuration of the LCD. The LCD configuration depends on the wiring of the LCD to the Arduino. The default configuration matches the wiring shown on the block diagram.
- Connect your Arduino to your PC with a USB cable. Optionally you can specify the COM port associated with your Arduino to the VISA resource terminal of the Init.vi to decrease the time require for LabVIEW to connect to the Arduino.
- Click Run.
- The LCD Text in the field will be written to the LCD and then the VI will stop.
Kevin Fort
Principal Software Engineer
NI
Principal Software Engineer
NI
Labels:
Comments
Options
- Mark as Read
- Mark as New
- Bookmark
- Permalink
- Report to a Moderator
07-11-2013
02:06 AM
hello i make the bouth tutorials of LCD but i cant write in the second row only in the first one
you have a solution?
Options
- Mark as Read
- Mark as New
- Bookmark
- Permalink
- Report to a Moderator
03-31-2016
05:35 PM
in lcd set cursor make row and column indicator not constant
Options
- Mark as Read
- Mark as New
- Bookmark
- Permalink
- Report to a Moderator
11-14-2016
03:58 AM
hi all
How can I use it nokia 5110 lcd?
this lcd --> http://www.robotistan.com/nokia-5110-ekrani-84x48-grafik-lcd
84x48 graphical lcd
