Please note that the content contained in this document is out-of-date for the current competition season. Please feel free to use it as a reference moving forward.
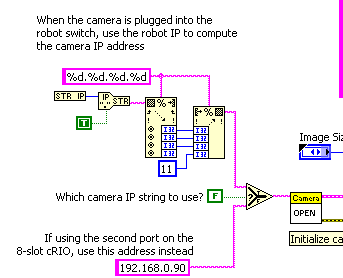
Overview: The default robot code for FRC 2012 is set up for the case where the Axis camera is plugged into the robot radio. If you have a FRC I cRIO it is still possible to use the Axis Camera by connecting it to the second ethernet port but some changes must be made to the code. These steps are outlined below.
Steps:
- Set your PC NIC to 192.168.0.6 - subnet mask 255.255.255.0
- Plug you camera into your PC and run Setup Axis Camera Tool - choose '8-slot Ethernet port 2’
- Plug the camera into Ethernet port 2 on the cRIO
- Change PC NIC to 10.xx.yy.6 and connect Ethernet from it to the radio
- Create your robot project with the correct IP address - 10.xx.yy.2
- In Begin.vi change the Boolean constant wired to the Select function from T to F
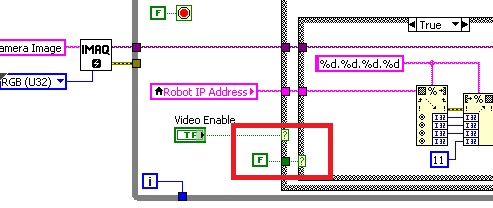
7. In Vision Processing.vi make some room to the right of the Camera MJPG Loop VI and add the Camera Send Images 2 PC VI next to it. Wire up the CameraDevRef terminal. Now the image data will get sent out on port 1180.
8. Create a dashboard project (the default dashboard won't work)
9. On the diagram of Dashboard Main.vi, the second loop from the top is the camera loop. Change the Boolean constant wired to the inner Case Structure from T to F.
10. Build the Dashboard project and copy the created Dashboard.exe to \Program Files\FRC Dashboard
