Design Considerations in LabVIEW
Overview
A well-designed LabVIEW application is essential to maximizing efficiency when it comes to software development and maintenance. This document introduces basic constructs, design patterns, and architectures related specifically to software design in LabVIEW. This content is not comprehensive, but rather provides a helpful starting point with some of the most common LabVIEW software design elements. Follow the links throughout the document for more detailed information.
Contents
Basic Constructs
Each of the following sections describes a common construct used in LabVIEW programming for accomplishing a specific task. Being familiar with these basic constructs will help you more easily recognize and understand their use within a LabVIEW application.
Type Definitions
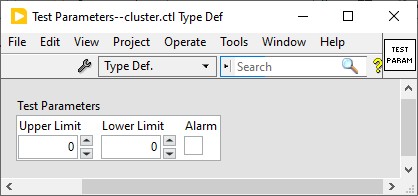
Type definitions (often abbreviated as “typedefs”) allow you to specify a data type that will be consistently defined across your entire application. For example, here is a cluster type definition:
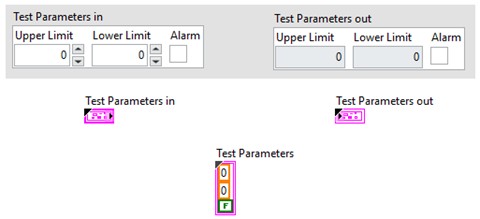
When you drop this typedef on a front panel or a block diagram, it will appear as a cluster, but with a black triangle in the upper left corner on its terminals and constants:
Typedefs are extremely useful in defining consistent types across your application. To illustrate this, notice what happens if we add a new parameter (in this case, a configuration path) to the typedef:
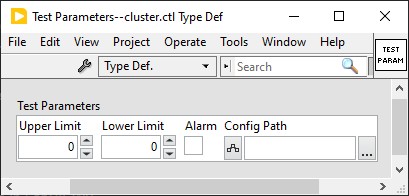
By modifying the typedef in a single location (the source typedef .ctl file), this change is automatically propagated across the entire application:
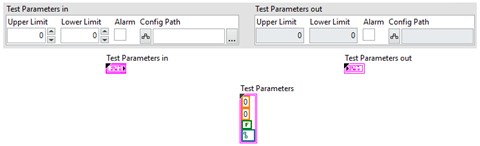
If the cluster were not a typedef, then every instance of the cluster (on front panels and block diagrams) across your entire application would need to be updated manually. With rare exception, you should typedef all clusters and enums that you create while writing your LabVIEW applications.
By using typedefs, you improve the maintainability of your code by single-sourcing shared data types.
Additional Resources
Event Structure
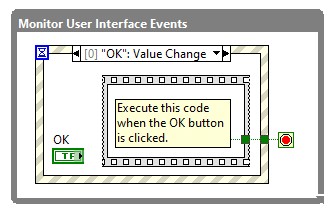
The Event structure provides the ability to respond to user interface events and programmatic events on a LabVIEW block diagram. For example, you can register for an event diagram to execute whenever a front panel control value changes. You can also register for events that are generated programmatically on a block diagram with the Generate User Event function.
An Event structure is usually placed inside a While Loop so the code can respond to multiple events throughout code execution. Configure the Event structure to have different frames for the different events you want to detect. Each event frame contains the handling code that executes whenever that event occurs.
Additional Resources
- Choosing How the Event Structure Monitors For Events – LabVIEW Documentation
- Handle Keyboard Events in Event Structures in LabVIEW
- Event-Driven Programming in LabVIEW
Explore the following projects that ship with LabVIEW for several examples illustrating user interface events and programmatic events:
- <LabVIEW 20xx>\examples\Structures\Event Structure\Event Structure.lvproj
- <LabVIEW 20xx>\examples\Dialog and User Interface\Events\Events.lvproj
Functional Global Variable
The functional global variable (also known as an “FGV”, “LabVIEW 2 Style global”, or “Action Engine”) is a data storage mechanism. The FGV stores data in an uninitialized shift register or an uninitialized feedback node and allows you to access that data anywhere (i.e., “globally”) within an application. The block diagram of a basic FGV VI is shown below and contains Data in and Data out, along with an Operation enum with two actions ("Set" and "Get"):
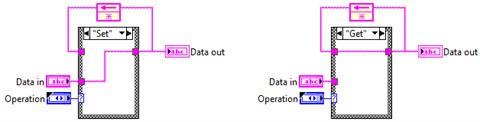
The functionality provided by this simple get/set FGV is equivalent to using a global variable. In practice, your FGV will likely perform additional functions besides “set” and “get”.
You can use the FGV to store references and perform more sophisticated operations. For example, observe the File I/O FGV below (which illustrates the use of an uninitialized shift register instead of a feedback node). This FGV stores the file reference between successive calls and performs several different actions (Open, Read, Write and Close) within a single VI.
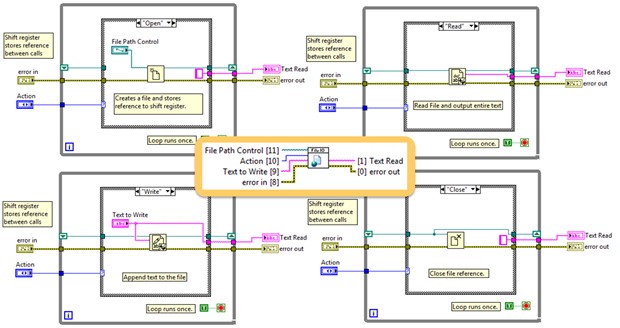
Note that FGVs are just as susceptible to race conditions as global variables. As a general rule, you should avoid writing to global data in more than one place in your code.
Additional Resources
Subpanels
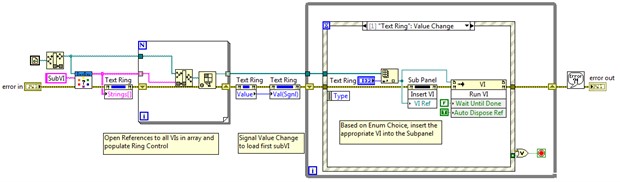
A subpanel is a front panel control that can display the front panel of another VI. Using a subpanel allows you to design a dynamic user interface in which you can swap out whole sections of your UI by specifying a different VI to display in the subpanel. The subpanel also encourages modular application development, where logical groupings of front panel items can be contained within separate VIs. With this design, you can modify individual VIs that are displayed within subpanels without changing the code of other display VIs or of the main application VI.
The example below scans a folder for plugin VIs and populates a text ring with those plugins. When you select an item in the text ring, the corresponding plugin VI is inserted into the subpanel in the main VI. This construct allows you to add new plugin VIs on disk without making any changes to the main VI.
Additional Resources
Run the following example that ships with LabVIEW to experiment more with subpanels:
- <LabVIEW 20xx>\examples\Controls and Indicators\Containers\Multiple VIs in a Subpanel.vi
Reentrant VIs
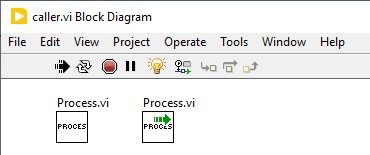
By default, VIs in LabVIEW are non-reentrant. This simply means that only one instance of a VI can be running at a time. So in the following diagram, one of the subVI instances of ‘Process.vi’ must wait until the other one finishes.
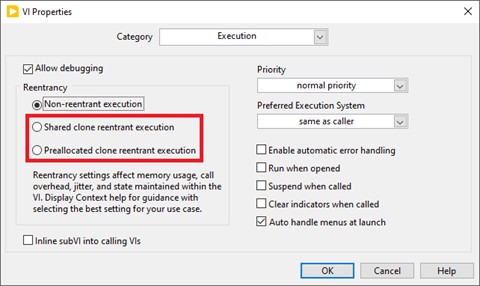
If you want multiple instances of a VI to be able to run in parallel, you must make the VI reentrant. To do this, go to File > VI Properties > Execution and change the ‘Reentrancy’ setting to either Shared clone reentrant execution or Preallocated clone reentrant execution.
Once you change a VI to be reentrant, multiple instances can run in parallel:

Consider making your VIs reentrant in the following scenarios:
- Multiple instances of the same VI should run in parallel to improve application performance
- Multiple instances of the same VI front panels need to be displayed for sophisticated user interface displays
Note that Functional Global Variables are almost always going to be non-reentrant because they maintain global state data that your entire application needs to share.
Additional Resources
- Differences Between Reentrant, Template, and Dynamic VIs
- Reentrant and Non-Reentrant SubVIs Comparison in LabVIEW FPGA
Run the following example that ships with LabVIEW to experiment with reentrant VIs:
- <LabVIEW 20xx>\examples\Performance\VI Properties\Reentrant VI Execution.vi
Asynchronous Processes
Most of the time you call a VI from another VI, you will use a regular subVI call. When calling a subVI, the calling diagram must wait until the subVI has finished executing before it can proceed. This is an example of a synchronous call.
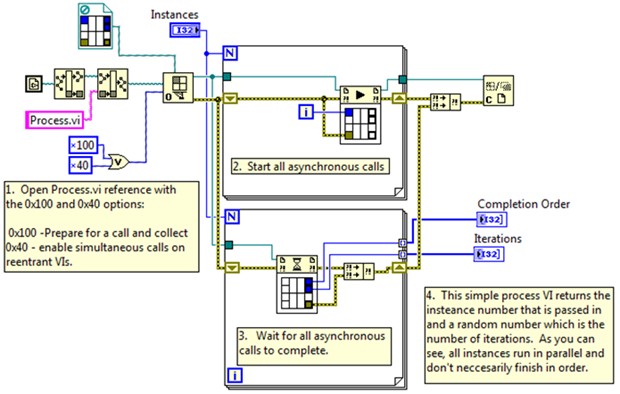
However, in some situations, an application may require you to launch a subVI, but proceed with the calling VI’s execution while the subVI continues to execute. This is an example of an asynchronous call. With asynchronous VI calls, you can dynamically run any number of VIs in parallel. Furthermore, the use of reentrant VIs allows you to spawn an arbitrary number of instances of the same VI and let them run asynchronously.
In the example below, the calling VI calls multiple instances of the reentrant Process.vi asynchronously. Each VI runs independently and returns data to the calling VI whenever it has finished. The calling VI can execute other block diagram code in parallel and not wait on the Process VI instances to finish.
Additional Resources
- Can I Asynchronously Call a VI in LabVIEW Real Time?
- Wait On Asynchronous Call Node – LabVIEW Documentation
Explore the following project that ships with LabVIEW for several examples illustrating more details about Asynchronous VI calls:
- <LabVIEW 20xx>\examples\Application Control\VI Server\Asynchronous Call By Reference\Asynchronous Call By Reference.lvproj
Object Oriented Programming
Object-oriented programming is facilitated in LabVIEW via LabVIEW classes. LabVIEW object-oriented programming uses concepts from other object-oriented programming languages such as C++ and Java, including class structure, encapsulation, and inheritance. You can use these concepts to create code that is easier to maintain and modify without affecting other sections of code within the application. There are many object-oriented design patterns that can be applied to LabVIEW. These are described in the Applying Common Object-Oriented (OO) Design Patterns to LabVIEW document.
Additional Resources
- On-demand Courses are available for learning more about Object-Oriented Design and Programming in LabVIEW
- LabVIEW Object-Oriented Programming FAQ
- LabVIEW Object-Oriented Programming: The Decisions Behind the Design
- NI Community: LabVIEW Object Oriented Programming – Car Example
Explore the projects in the following folder that ships with LabVIEW for several examples illustrating the basics of programming with LabVIEW classes:
- <LabVIEW 20xx>\examples\Object-Oriented Programming
Design Patterns
A design pattern is a theoretical mechanism to execute synchronous or asynchronous code. Most real-world architectures (see section below) utilize one or more design patterns as part of their core execution mechanism. Understanding the behavior of the design patterns in this section can help you better understand the behavior of more complex architectures built upon these design patterns.
State Machine
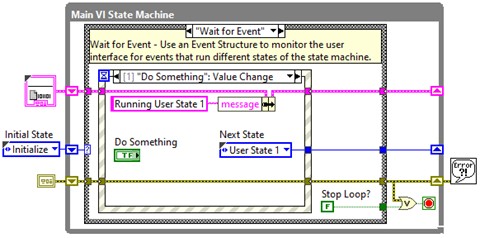
A state machine is the LabVIEW block diagram implementation of a state diagram or flow chart. A given “state” will have block diagram logic to determine the next state to execute. Some state machines are driven by a user interface, in which user input or block diagram logic can determine which state will execute next.
A basic LabVIEW state machine consists of these primary components:
- A typedef enum containing the name of each state of the state machine
- A case structure which contains code to be executed for each state and transition code to determine the next state in the sequence
- A while loop which allows the state machine to continuously execute multiple states
- A shift register which specifies which state will execute on the next iteration of the loop
- (optional) A ‘Wait for Event’ state containing an Event structure for handling user interface events
Additional Resources
Explore the following project that ships with LabVIEW to learn more about state machines:
- <LabVIEW 20xx>\examples\Design Patterns\State Machine\State Machine.lvproj
Create your own state machine-based project in LabVIEW with the Simple State Machine project template; navigate to the LabVIEW File menu >> Create Project >> Simple State Machine. You can modify this template as a starting point for your own application.
Producer/Consumer
The Producer/Consumer design pattern illustrates how to use a queue to share data between multiple loops running at different rates. The loop that contains an Enqueue Element function is the “producer”, and the loop that contains a Dequeue Element function is the “consumer”. The use of a queue ensures that data is not lost if the loops are running at different rates.
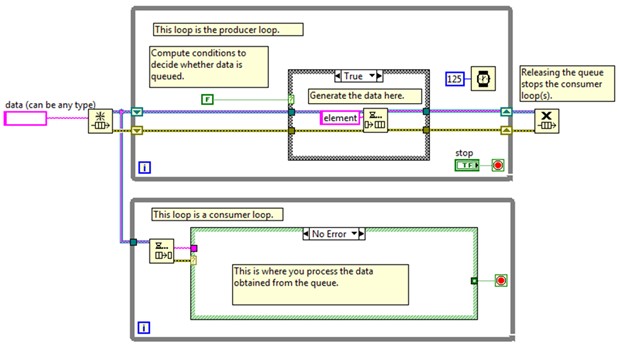
One thing to keep in mind about the producer/consumer design pattern is that it is largely theoretical. In practice you will rarely see the fundamental producer/consumer pattern in real-world code. Instead, you are much more likely to see the Queued Message Handler.
Additional Resources
Run the following example that ships with LabVIEW to learn more about the use of queues to share data between loops:
- <LabVIEW 20xx>\examples\Synchronization\Queue\Queue Overflow and Underflow.vi
Queued Message Handler
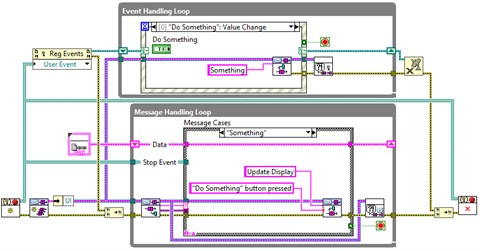
The Queued Message Handler (QMH) is an implementation of the producer/consumer design pattern that also includes an event structure for both user interface and programmatic event generation. The Event Handling Loop (EHL) contains an event structure that enqueues (produces) messages for the Message Handling Loop (MHL), which dequeues (consumes) them. The MHL can also generate messages for itself as required. The “messages” in this case are clusters containing a string (which drives the case structure in the MHL) and a variant, which can contain message-specific data of any type. In the QMH, the MHL can also communicate back to the EHL with User Events.
Additional Resources
Explore the following project that ships with LabVIEW to learn more about the QMH:
- <LabVIEW 20xx>\examples\Design Patterns\Queued Message Handler\Queued Message Handler Fundamentals.lvproj
Create your own QMH-based project in LabVIEW with the Queued Message Handler project template; navigate to the LabVIEW File menu >> Create Project… >> Queued Message Handler.
Architectures
For a large LabVIEW application to be extensible and maintainable, it must be well architected.
Imagine a theoretical LabVIEW application that tests a device. There will be code for configuring the application, connecting to the device, taking measurements, displaying data, logging data, handling error conditions, and potentially many more functions.
If all the described functionality of this application resides on the same LabVIEW block diagram, it will be impossible to develop, test, and debug the features of the application in isolation. For example, if there’s a problem in the logging code, there’s no way to debug just the logging without running the entire application. Additionally, making a change to the logging code could inadvertently affect some other part of the application since it all resides within the same VI.
Each of the functions described above would be better suited as an asynchronous process, where each function is modular and can be developed, tested, and debugged independently. A robust communication mechanism between the processes would also be required.
A structured approach to implementing LabVIEW code to facilitate this kind of modular asynchronous design is called an architecture. Some LabVIEW teams develop their own architectures. This can be a difficult task, as there are many considerations, pitfalls, and caveats associated with developing the code infrastructure and messaging required to implement a successful asynchronous LabVIEW application. Additionally, the amount of boilerplate code required to implement a robust framework necessitates sufficient tooling within the framework to automate repetitive tasks (to help developers avoid making mistakes when attempting to manually program framework-level code themselves).
Thankfully, this hard work has already been done by multiple entities (both inside and outside NI) who offer their consumer-grade architectures to the LabVIEW community. Two of the most popular LabVIEW architectures in use today are Actor Framework and DQMH.
Actor Framework
Actor Framework (AF) is an architecture supported by NI that ships with LabVIEW. It is an object-oriented implementation of the queued message handler (QMH). Instead of message-handling loop frames in a case structure and Enqueue Element functions, message classes provide ‘Do’ method VIs to execute specific code inside an Actor Core VI.
The class-based design of AF provides an extensible framework for implementing child actors that inherit the behavior of parent actors, which is not possible with the standard case structure-based QMH approach. Additionally, all core framework functionality (initialization, messaging, error response, etc.) can be augmented or overridden in a given actor by virtue of the framework’s object-oriented design.
Additional Resources
Explore the following project that ships with LabVIEW to learn more about Actor Framework:
- <LabVIEW 20xx>\examples\Design Patterns\Actor Framework\Actor Framework Fundamentals.lvproj
Create your own AF-based project in LabVIEW with the Actor Framework project template; navigate to the LabVIEW File menu >> Create Project… >> Actor Framework.
Note that success with the Actor Framework is predicated upon a strong foundational knowledge of object-oriented programming, along with adequate instruction and understanding of the framework itself. There are numerous AF training resources available. Some of the most popular include:
- NI Instructor-led Course: Actor-Oriented Design in LabVIEW – Customer Education Course
- External: Actor Framework Basics - Online tutorial by Moore Good Ideas, Inc.
When you begin using AF architecture in your own applications, you can interact with other users in Actor Framework – NI Community User Group to ask questions and discuss best practices with other programmers.
DQMH
The Delacor Queued Message Handler (DQMH®) utilizes a similar mechanism as the standard QMH for communication within a given process (or “Module”), but communication between asynchronous modules takes place with User Events. DQMH is not an object-oriented architecture, although it does employ LabVIEW classes for some minor components of the framework.
DQMH is a 3rd-party architecture developed and maintained by the DQMH Consortium. The primary goal of the original DQMH design team was to provide a free framework to the LabVIEW community that is accessible to CLAD/CLD-level developers.
You can install DQMH using VI Package Manger.
Additional Resources:
Once the DQMH package is installed, you can explore the following project to learn more:
- <LabVIEW 20xx>\examples\DQMH Consortium\DQMH Fundamentals - Thermal Chamber\DQMH Fundamentals – Thermal Chamber.lvproj
There are myriad training resources available for DQMH. When you begin using DQMH architecture in your own applications, you can interact with other users in DQMH Consortium Toolkits – NI Community User Group to ask questions and discuss best practices with other programmers.
DQMH® is a registered trademark of the DQMH Consortium, LLC.
Other LabVIEW Architectures
AF and DQMH are the world’s most popular LabVIEW architectures, but they are by no means the only ones. Additional architectures available to the LabVIEW community include: