From 11:00 PM CST Friday, May 9th - 3:00 PM CST Saturday, May 10th, ni.com will undergo system upgrades that may result in temporary service interruption.
We appreciate your patience as we improve our online experience.
From 11:00 PM CST Friday, May 9th - 3:00 PM CST Saturday, May 10th, ni.com will undergo system upgrades that may result in temporary service interruption.
We appreciate your patience as we improve our online experience.
!!! IMPORTANT: THIS ADD-ON IS DEPRECATED. PLEASE CONSIDER NI VeriStand Add-On: FPGA XML Builder Node FOR NEW APPLICATIONS
Overview
This document explains how to use the Veristand FPGA Configuration Tool (VCE) to create/modify XML configuration files (.fpgaconfig) that required by Veristand to load FPGA devices into the system definition file.
VCE is a graphical editor that allows to manipulate .fpgaconfig files. This documento shows its basic features together with a step-by-step example; besides thatm, you should read also the following document that provides an overview about how to use FPGA targets (e.g. cRIO, R-series) inside NI Veristand:
Creating a Custom FPGA Bitfile
FPGA Configuration file for NI Veristand are XML-based files with .fpgaconfig extension that are used to import an FPGA Device (e.g. CompactRIO chassis, PXI R-Series) into the System Explorer. Such files contain the following information:
Refer to Creating a Custom FPGA Configuration File for more information about the structure and the contents of .fpgaconfig files. The Veristand FPGA Configuration Editor provides a GUI for easily creating and modifying such files without being forced to edit them manually using, for example, a text editor.
Categories are used to create the section/channel hierarchy that you see inside the System Definition Explorer. The fpgaconfig file we loaded in the example contains the following categories:

Figure 1: Category hierarchy represented inside the vCE.
The first column is the name of the category while the second column represents the type. For the list supported category types, refer to Creating a Custom FPGA Bitfile topic on the Veristand Online help.Categories will appear as sections and sub-sections inside the System Explorer:
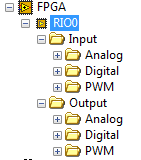 Figure 2: The same category hierarchy shown in figure 1 as it appears inside the System Explorer. Channels like Analog and PWM out are also represented.
By right clicking on one Categories item or one of the existing Category item, you can do one of the operations shown below:

Figure 3: Removing a Category item from the vCE hierarchy
Packets and Channels are the items that tell Veristand about the data provided by FPGA and vice versa.
The following picture shows the representation of packets and channels in the FPGA and in the vCE window:

Figure 4: Representation of packets and channels. A: The FPGA VI acquires 4 AI channels from the 9215; each channel is a 32-bit wide fixed point. B: Channels are packed into two U64 packets. C: packets are shown as items in the fpgaconfig file, respectively packet 7 and 8
For creating a new packet, right-click on DMA_Read or DMA_Write items and select Add -> Packet. You can also duplicate existing packets and all their sub-items by right clicking the Packet item and selecting Duplicate
When creating a new packet or channel, it will be placed as the first children on the list of the DMA_Read or DMA_Write parent item:
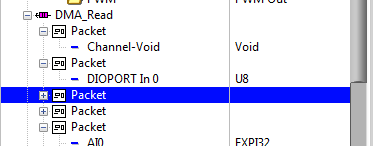
Figure 5: Highlight of a newly created packet inside cVE.
If you want to move the packet up and down, select the packet and then click Ctrl + Up or Down arrow to move the item up or down respectively:

Figure 6: New packet moved down by pressing Ctrl+Down Arrow
This operation can be done with channels and categories as well.
As a simple example, we use NI cRIO-9082 reconfigurable controller equipped with the following C-series modules:
To interface these I/O modules with the NI Veristand Engine, there are two options:
The last option gives you more flexibility due to the features of LV FPGA (e.g I/O customization, high-speed processign and control): however, it requires you to program an FPGA VI and interface it with the NI Veristand Engine by means of some constraints due to the machanism that the Veristand Engine uses to exchange data. The best way to develop an FPGA VI that follows such constraints is to start from the template code provided by this tool: NI VeriStand FPGA-Based I/O Interface Tools
To complete the following example, close LabVIEW and install NI VeriStand FPGA-Based I/O Interface Tools on your computer.
Once you installed the NI VeriStand FPGA-Based I/O Interface Tools, launch the LabVIEW Getting Started Window and select Create Project... and then choose NI Veristand FPGA Project:

Figure 7: Template Project Option inside LabVIEW Project Creation Wizard
Select the first option, CompactRIO Reconfigurable Embedded System:
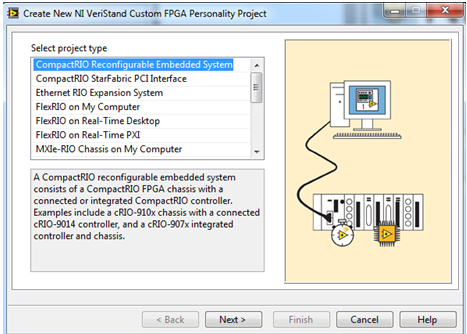
Figure 8: Selection Prompt for the desired FPGA Hardware Type
Then locate your existing CompactRIO or create a new system; for the example described in this document we use a NI-9082. Once the configuration steps are completed, we should have a LabVIEW project similar to the one illustrated below:
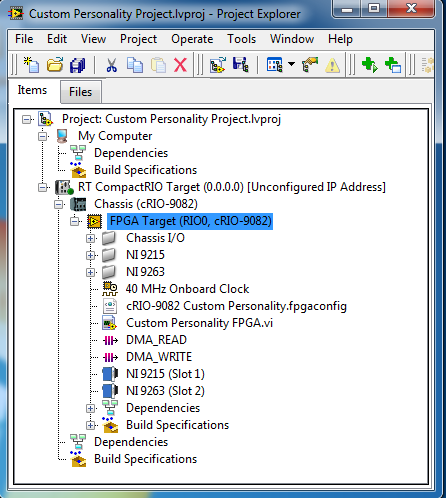
Figure 9: Snippet of the LabVIEW Project generated by the Veristand FPGA Project Template Wizard. C-series module list can be different depending on the hardware you are using. In this case we’re using an analog input (9215) and an analog output (9263) module.
Open the <Your Project Name> FPGA.vi and remove the code that is not necessary for the hardware we have in our example. The final aspect of the Block diagram should be similar to the one shown in fig. 10:
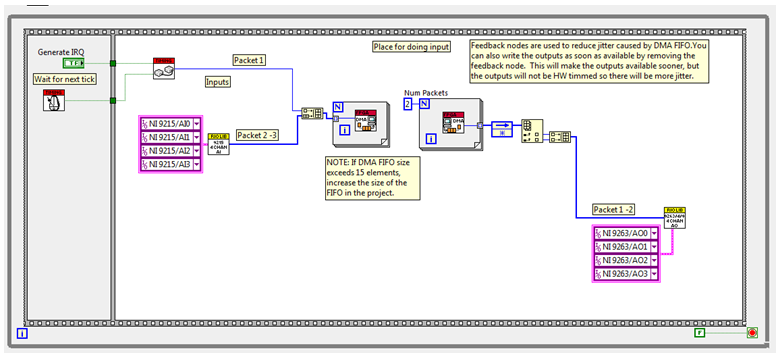
Figure 10: Modified version of the FPGA VI: in the example we need only to access 4 AI channels from a 9215 and 4 AO from the 9263.
The LabVIEW Project generated before should include an FPGA configuration file called <cRIO Model (e.g cRIO-9082)><Project Name>.fpgaconfig. We’re going to use the VCE to modify it in order to include only the necessary packets.
Open the Veristand FPGA Configuration Editor by selecting Tools -> Veristand FPGA Configuration Editor from the LabVIEW Project menu. Then load the template fpgaconfig file and follow the steps listed below:
 Figure 11: Content of the .fpgaconfig required by the example. Only packets related to 9215 (analog input) and 9263 (analog output) are included.
2. If not present, add the bitfile name in the Bitfile control shown below:

Figure 12: Bitfile String Control where to insert the bitfile name associated with the fpcaconfig file.
!!!IMPORTANT: Compile the FPGA VI before loading the .fpgaconfig in the System Explorer.
Once you checked all these steps, you can upload the FPGA target inside Veristand. For additional information about how to load FPGA devices into the System Explorer, please refer the topic FPGA on the Veristand Online help.
To use the Veristand FPGA Configuration Editor add-on, unzip the and run the vCE_xxx-zip installer.
All attempts have been made to provide an add-on comptible with the NI VeriStand shipping examples. The nature of some add-ons requires additional software or hardware to function.
This device was created for use with NI VeriStand 2013 and later. To use this add-on you must have the following software installed:
If you want to modify the source code, you must install the following add-on:
This add-on is provided as open-source software. If it does not meet your exact specification, you are encouraged to modify the source code to meet your needs. It is not officially supported by National Instruments.
If you encounter a problem with this add-on, or if you have suggestions for a future revision, please post to the forum for this add-on Veristand FPGA Configuration Editor (VCE) - Feedback. You must use this feedback forum for support. Do not call National Instruments for support for this add-on.
National Instruments does not support this code or guarantee its quality in any way. THIS EXAMPLE PROGRAM IS PROVIDED "AS IS" WITHOUT WARRANTY OF ANY KIND AND SUBJECT TO CERTAIN RESTRICTIONS AS MORE SPECIFICALLY SET FORTH IN NI.COM'S TERMS OF USE (http://ni.com/legal/termsofuse/unitedstates/us/).
