Splash screen dialog library
- Subscribe to RSS Feed
- Mark as New
- Mark as Read
- Bookmark
- Subscribe
- Printer Friendly Page
- Report to a Moderator
Code and Documents
Attachment
Description
Splash screen dialog library for implementing splash screen to your project. All you have to do, is to insert splash_main.vi from the library at the begging of while loop in your main project VI and wire dialog and text cluster data to splash main icon. One library for all your project, no adding jpeg or png to splash front panel or picture ring control.
How the code is working
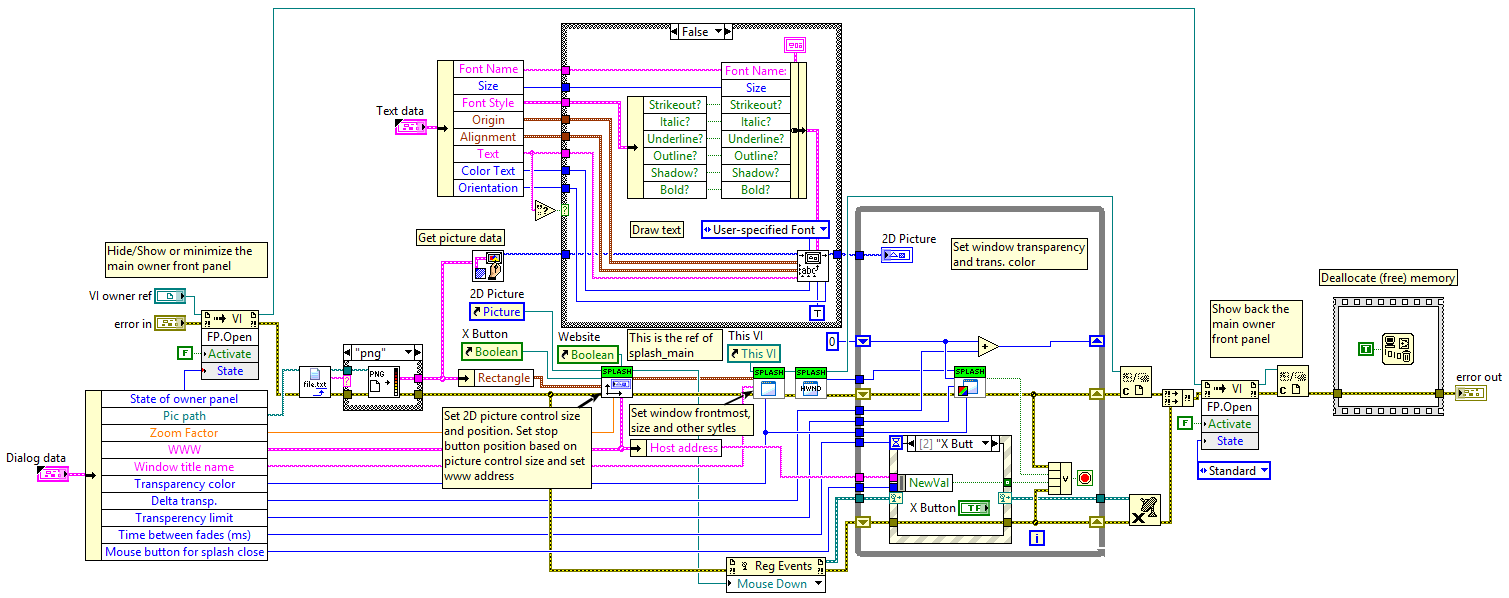
First the code hide (or not or minimize) the main VI, based on the State of owner panel selection. Then read jpeg (or png, bmp), get it's size, modify 2D picture control and also front panel to the jpeg size, also draw text at desire position (text data cluster), and finally load picture data into 2D pic control. We also set the position of close (X) button and modify www button (set host address)
At the same time the code set WS_EX_LAYERED style to the front panel. And here is a trick. First the front panel color is set to a desire color and then we use that color to set transparency color. That means we do not need only PNG file, but also jpg or bmp to set transparency to the window.
In splash main VI while loop we change transparency from 0 to maximum (dialog data cluster) by delta trans. step . We also use event structure to control, when stop button is pressed or maximum transparency is reached. We also monitor www button to open host address in default web browser. And finally, by clicking left or other mouse button, the splash can also be closed.
And the end, we close all references and free (deallocate) labview memory. That means the main project VI use no more memory from splash library.
splash_main vi
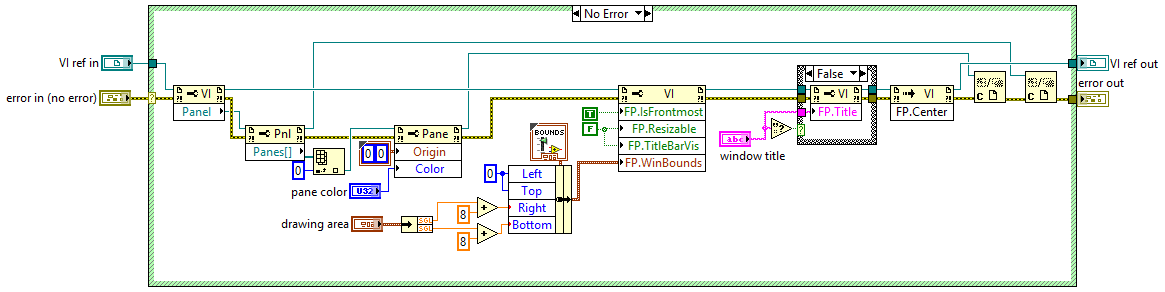
modify front panel
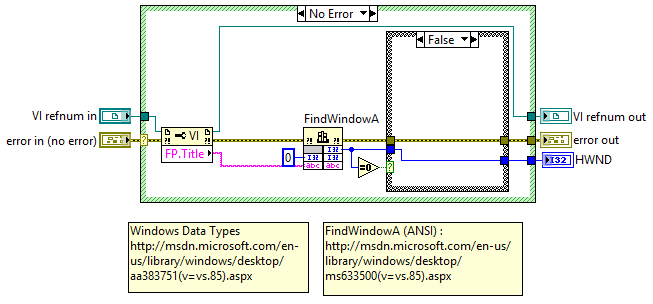
find the splash font panel handle and set exlayer attribute

Here is an example, how to implement splash library. Only insert splash_main and set text and dialog data cluster in your main project VI. Change file type png to jpg and observe the result.
(in exemple vi it is possible that you have to load (relink) again splash_main.vi from the library)

And the result is... Tra la la ...

Steps to Implement or Execute Code
- in your main VI before while loop insert splash_main.vi from the library
- wire error out from splash icon to while loop (to set process order)
- create text and dialog cluster constant (no need to create controls)
- set text in text cluster, desire font name and size, font style (bold, italic, ...), text color, position and orientation
- set dialog cluster: in picture path type only file name with type (relative path), splash window title name, zoom factor, delta trans, and max. transparency, time between fades in ms, transparency color, main owner vi status, mouse button for splash close and www address button data
Maybe future implementation:
- progress bar
- fading process: from 0 to max. transparency or from max. to 0
Requirements
You need GPower Error & Warning library (install with VIPM) to open the library. If you do not want to intall gpower, then you have to replace custom errors with labview error vis.
From the older LabVIEW version, you have to compile to your version library.
Comment
Thanks to Swatts's Groovy Splash Screen and Maks Ridgley's Splash Screen Effect to show same ideas. See how they done.
Example code from the Example Code Exchange in the NI Community is licensed with the MIT license.
