Let's brush the dust off your myRIO's Analog Output channels and start making some sound!
In this example, we'll cover a lot of the fundamentals of how to generate acoustic-frequency square waves using an FPGA.
The exercises provided are based on FPGA4Fun.com's Music Box tutorial series, and will be an especially useful exercise for those of you who are experienced in targeting FPGAs with traditional hardware description languages (HDLs) such as Verilog or VHDL. Each exercise offers a side-by-side comparison between FPGA4Fun's Verilog example code and the corresponding LabVIEW block diagram. Similarly, if you've ever wondered just how a computer generates sound, here's your chance to find out!
Expect lots of information on how to define your own custom digital counters, simple Fixed Point (FXP) mathematics, FPGA Derived Clocks, Single Cycled Timed Loops using combinatorial logic, how to write to the myRIO's DACs, and even a little music theory. It sounds fairly intense, but a lot of what we'll be looking at is straight forward, and most importantly it's fun.
So, grab your headphones, and let's get started!
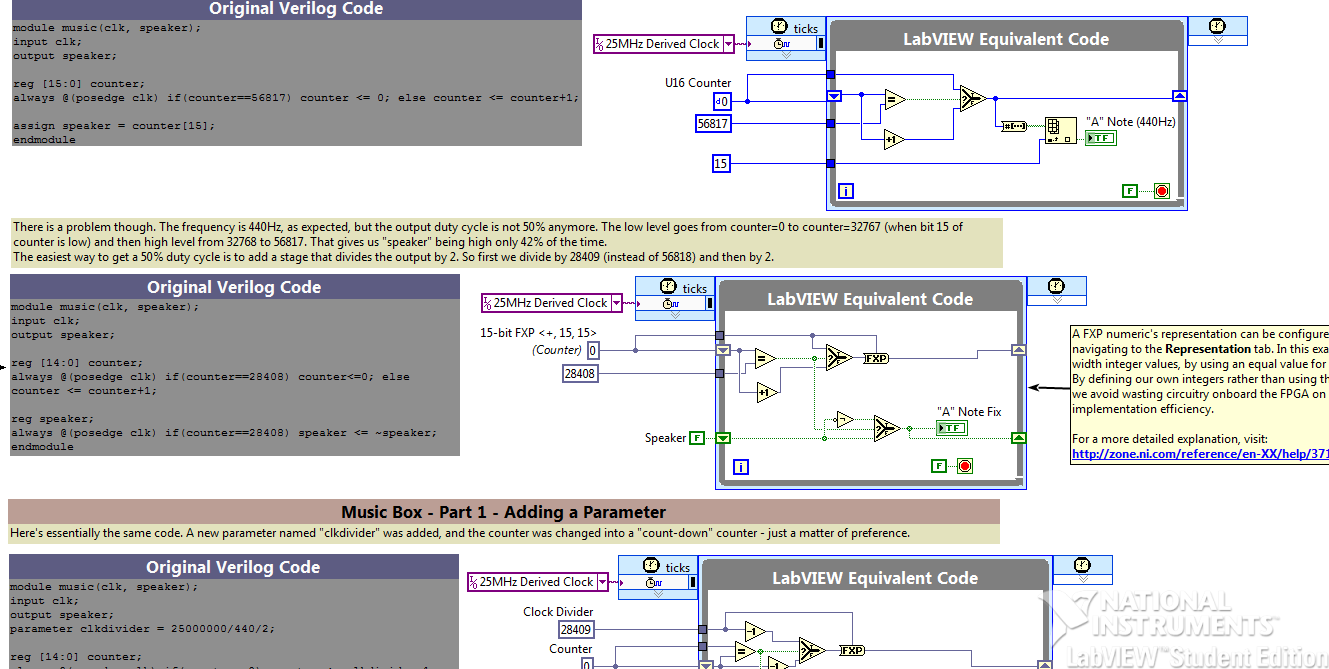
Figure 1: myRIO Music Box's FPGA Top Level Block Diagram.
Instructions:
- Download the attached .zip file 'myRIO Music Box.zip'. Unzip it and open up 'myRIO Music Box.lvlps', which is a LabVIEW Project. (This example was created using LabVIEW 2013, so you're going to need this version of LabVIEW or higher. If you don't have this version, feel free to comment below and I'll be happy to downgrade the files for you.)
- Connect to your myRIO. Here's a tutorial if you're new at all to that process.
- Expand the myRIO Chassis within the Project Explorer, then the FPGA Target. Then double click on 'FPGA Top Level.vi'.
- Run the VI. If it's your first time running, you'll need to wait a little for the FPGA code to compile. This is a pretty lengthy process, so you'd better go make a cup of coffee or something. In fact don't. Coffee is bad for you, man. You should make a smoothie instead. Or go jogging.
- Once the VI is compiled, it'll run on your myRIO automatically. Try enabling/disabling sound, adjusting the volume, and listening to the different sounds made by each exercise. Then switch to the Block Diagram (Ctrl+E) to see how it's all been done!
