From Friday, April 19th (11:00 PM CDT) through Saturday, April 20th (2:00 PM CDT), 2024, ni.com will undergo system upgrades that may result in temporary service interruption.
We appreciate your patience as we improve our online experience.
From Friday, April 19th (11:00 PM CDT) through Saturday, April 20th (2:00 PM CDT), 2024, ni.com will undergo system upgrades that may result in temporary service interruption.
We appreciate your patience as we improve our online experience.
Overview
MyTracker is a colour based motion tracking system, utilising a USB Web Camera mounted on a pan/tilt mechanism and powered by a myRIO. It can be used both for tracking of coloured objects and has a manual mode which effectively makes it a remotely controlled spy camera as it also streams video back over Wi-Fi.
The myTracker can very well be used for automatic camera positioning or security applications greatly reducing the need of a human operator. Additionally, the project is a great tool to learn about image processing, wireless data streaming, servo control and challenges associated with colour identification in varying light conditions as well as camera movement.
The project objectives were:
- To learn machine vision concepts
- To produce an automated system
![]()
Method
After trying to identify colours by their RGB or HSV values the final solution was to use the already built in LabVIEW Vis IMAQ ColorLearn and IMAQ ColorMatch. The ColorLearn VI takes a ROI and builds a histogram for the colour distribution inside it, that distribution is then used by IMAQ ColorMatch VI to determine whether a ROI is similar to the template ROI obtained previously.
This method was not exactly made for tracking objects so to adapt these functions to the myTracker – the video feed had to be divided into 81 rectangles representing different ROIs in this case. The servos would adjust the orientation of the camera based on the rectangles that matched the template ROI. In the following screen capture, the image is divided, scores are obtained that are above 500 and the position is shown in the Boolean array.
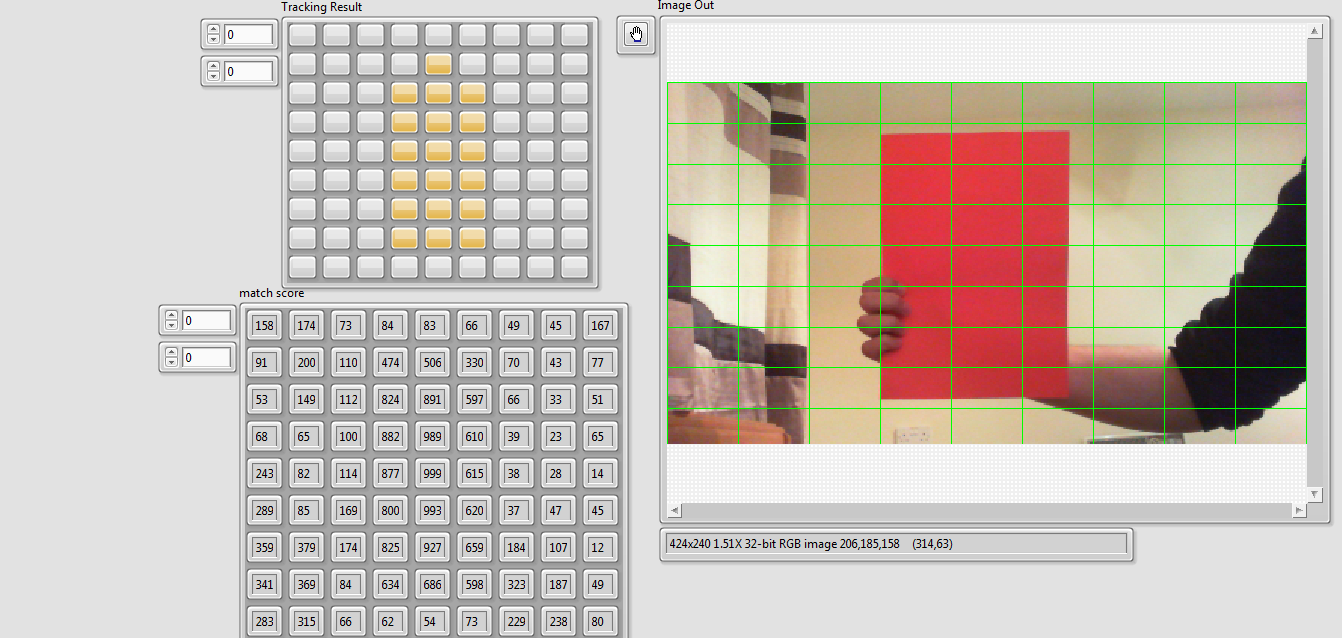
This method proved to be robust as now there were a number of pixels that were being compared to a pixel distribution instead of a pixel against pixel, just as in statistics – a more accurate guess can be made if the sample is large. This means that the precision of the tracking algorithm is dependant from the resolution of the acquired image. Furthermore, if the colour that is being tracked only takes up half a rectangle – it gets a low score and might not be detected as only half of the ROI has the right colour. For this kind of situation the match score reduces if an object is not present up to a certain level and increases to the user defined one when an object is detected.
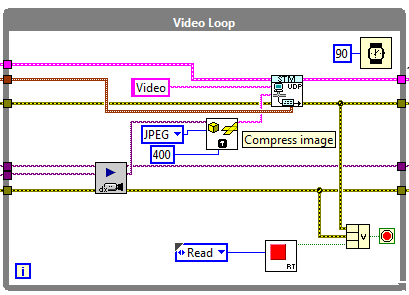
The video is streamed by using UDP because it does not wait for confirmation that data has been received and decreases the latency greatly in comparison to, for example, network streams. The acquired images on the myRIO are compressed before being sent as the video quality is more important for the colour tracking part than the User Interface.
MyTracker also has a manual mode, where the servo values for the camera are updated based on the position of the mouse cursor. For this reason, keyboard shortcuts of Num 1, Num 2 and Num 3 are used to switch between Tracking, Manual and Idle states. User input is transmitted via Network Streams as it is important to not loose commands. Additionally, too smoothen the servo movements an Easing algorithm was used.
Hardware
NI myRIO-1900
PT Pan/Tilt Camera Platform
2x 9g Servo
Microsoft LifeCam HD-3000
Software
- LabVIEW 2014
- LabVIEW 2014 myRIO toolkit
- IMAQdx drivers
- STM Library
Code
![]()

Steps to Implement or Execute Code
1. Download project
2. Go to NI MAX and find the myRIO under Remote Systems
3. In the network settings tab configure the myRIO to connect to a nearby network
4. Obtain the wireless IP address of the myRIO
5. Update the IP address of the myRIO in the project to be the wireless one – can now disconnect usb cable
6. Update the Target IP address field on the Host VI
7. Run RT.VI and then run Host.VI
Executable version to come.
About the Developer
My name is Marius Umbrasas and I am Mechatronics & Robotics student at the University of Sheffield and I am currently doing a placement year at National Instruments.
Great post with a clear description. Thanks for providing the code!.
Regards
Jack Hamilton
Thank you for the positive feedback!
Kind Regards
Hi,
in your project, the STM Read Message, STM Write Message, STM Get Connection scripts seem to be missing.
Can you kindly provide these for completion?
Thank you
Hi Peter,
In the Software section above I listed the software I used in order to develop my code. That is where I put a hyperlink to the STM library which contains the files you are currently missing.
Just in case you cannot access the hyperlink, here is the link:
Hope that helps!
Hi i´m checking your code... great job!... but i have some issues about the color tracking
it seems like you´re using an state machine to determine which process do you want to run, but y you have an state called "color probe" and i dont know which event starts it.
By another hand i probed your code as you published, and the color probe state never starts
When i run the code, Idle state runs well, manual state runs well too, but tracking state does not moves the motors.
Regards
Marius,
I would offer to NOT externally reference any libraries such as the STM. I've been coding in LV for 30 yrs and there are lots to broken project that relied on external toolkits that: change, have locked diagrams (which means they cannot be updated to newer versions of labview) are updated and not compatiable with the older versions of the toolkit.
It may seem trivial...but trust me it's a major issue.
Regards
Jack Hamilton
hi .
can you send
@MariusU wrote:
Overview
MyTracker is a colour based motion tracking system, utilising a USB Web Camera mounted on a pan/tilt mechanism and powered by a myRIO. It can be used both for tracking of coloured objects and has a manual mode which effectively makes it a remotely controlled spy camera as it also streams video back over Wi-Fi.
The myTracker can very well be used for automatic camera positioning or security applications greatly reducing the need of a human operator. Additionally, the project is a great tool to learn about image processing, wireless data streaming, servo control and challenges associated with colour identification in varying light conditions as well as camera movement.
The project objectives were:- To learn machine vision concepts
- To produce an automated system
Method
After trying to identify colours by their RGB or HSV values the final solution was to use the already built in LabVIEW Vis IMAQ ColorLearn and IMAQ ColorMatch. The ColorLearn VI takes a ROI and builds a histogram for the colour distribution inside it, that distribution is then used by IMAQ ColorMatch VI to determine whether a ROI is similar to the template ROI obtained previously.
This method was not exactly made for tracking objects so to adapt these functions to the myTracker – the video feed had to be divided into 81 rectangles representing different ROIs in this case. The servos would adjust the orientation of the camera based on the rectangles that matched the template ROI. In the following screen capture, the image is divided, scores are obtained that are above 500 and the position is shown in the Boolean array.
This method proved to be robust as now there were a number of pixels that were being compared to a pixel distribution instead of a pixel against pixel, just as in statistics – a more accurate guess can be made if the sample is large. This means that the precision of the tracking algorithm is dependant from the resolution of the acquired image. Furthermore, if the colour that is being tracked only takes up half a rectangle – it gets a low score and might not be detected as only half of the ROI has the right colour. For this kind of situation the match score reduces if an object is not present up to a certain level and increases to the user defined one when an object is detected.
The video is streamed by using UDP because it does not wait for confirmation that data has been received and decreases the latency greatly in comparison to, for example, network streams. The acquired images on the myRIO are compressed before being sent as the video quality is more important for the colour tracking part than the User Interface.
MyTracker also has a manual mode, where the servo values for the camera are updated based on the position of the mouse cursor. For this reason, keyboard shortcuts of Num 1, Num 2 and Num 3 are used to switch between Tracking, Manual and Idle states. User input is transmitted via Network Streams as it is important to not loose commands. Additionally, too smoothen the servo movements an Easing algorithm was used.
Hardware
NI myRIO-1900
PT Pan/Tilt Camera Platform
2x 9g Servo
Microsoft LifeCam HD-3000
Software
- LabVIEW 2014
- LabVIEW 2014 myRIO toolkit
- IMAQdx drivers
- STM Library
Code
Steps to Implement or Execute Code
1. Download project
2. Go to NI MAX and find the myRIO under Remote Systems
3. In the network settings tab configure the myRIO to connect to a nearby network
4. Obtain the wireless IP address of the myRIO
5. Update the IP address of the myRIO in the project to be the wireless one – can now disconnect usb cable
6. Update the Target IP address field on the Host VI
7. Run RT.VI and then run Host.VI
Executable version to come.
About the Developer
My name is Marius Umbrasas and I am Mechatronics & Robotics student at the University of Sheffield and I am currently doing a placement year at National Instruments.
me Documents or helping material related to this project.my email is qasimwarraich968@gmail.com.thanks
