- Document History
- Subscribe to RSS Feed
- Mark as New
- Mark as Read
- Bookmark
- Subscribe
- Printer Friendly Page
- Report to a Moderator
- Subscribe to RSS Feed
- Mark as New
- Mark as Read
- Bookmark
- Subscribe
- Printer Friendly Page
- Report to a Moderator
Getting Started Series | Hosting Web Service on a Real-Time Controller
________________________________________
Overview
This tutorial will guide you through web service setup on a real-time controller. We will use Web Service to publish cRIO-9067 CPU and memory usage directly from the controller. Tutorial is split into two sections. First section will go over required software necessary to run Web Services on the controller and second section will cover actual programing.
________________________________________
Prerequisites
This tutorial assumes you have some experience with LabVIEW Web Services HTML/JavaScript code and cRIO controllers.
Similarly, we will not go too much in depth on building RT executables as this topic is covered in numerous articles linked below.
Web Service Tutorials:
https://decibel.ni.com/content/docs/DOC-41659
https://decibel.ni.com/content/docs/DOC-42223
https://decibel.ni.com/content/docs/DOC-41453
https://decibel.ni.com/content/docs/DOC-41151
Real-Time Executable:
Building and Deploying a Stand-Alone Real-Time Application (Real-Time Module)
Deploying a LabVIEW Real-Time Startup Executable Without the LabVIEW Development Environment
Minimum software required:
- LabVIEW 2011
- LabVIEW Real-Time Module 2011
- NI-RIO 4.0
*This tutorial was prepared using LabVIEW 2014, LabVIEW Real-Time Module 2014 and NI-RIO 14.5.
________________________________________
Procedure
Setting up RT controller
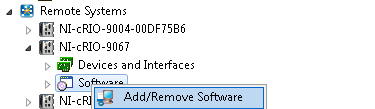
Install controller’s software via NI-MAX. Go to NI-MAX and find controller under Remote Systems. Right click on Software tab to bring up Install/Remove Software menu.
Select NI CompactRIO xx.x from the list and click Next. You should see a window similar to one below. In this window select following software:
- NI Application Web Server
- Network Variable Engine
- Variable Web Service
- NI System Configuration
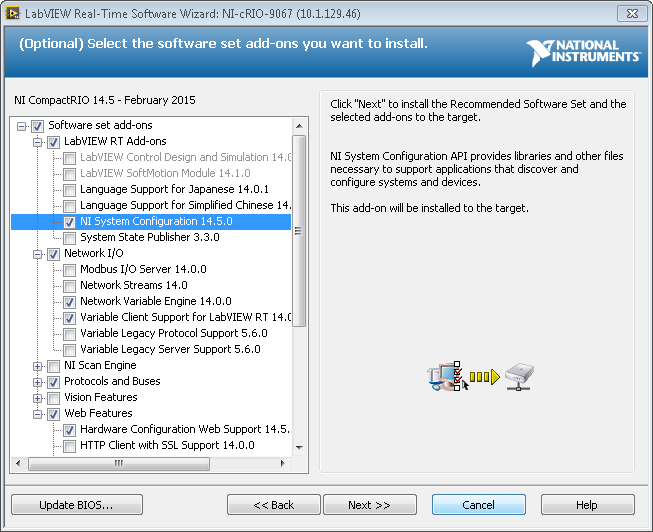
Click Next to finalize your selection and begin installation. After successful installation controller will restart and you are ready to move on to the programing section.
Programing
Real-time VI
In the first section of programing we will develop RT VI which will programmatically monitor controller’s CPU and memory usage. This information will be then written into shared variables. Shared variables will be used as a transportation medium to transfer information from VI to Web Service’s get method.
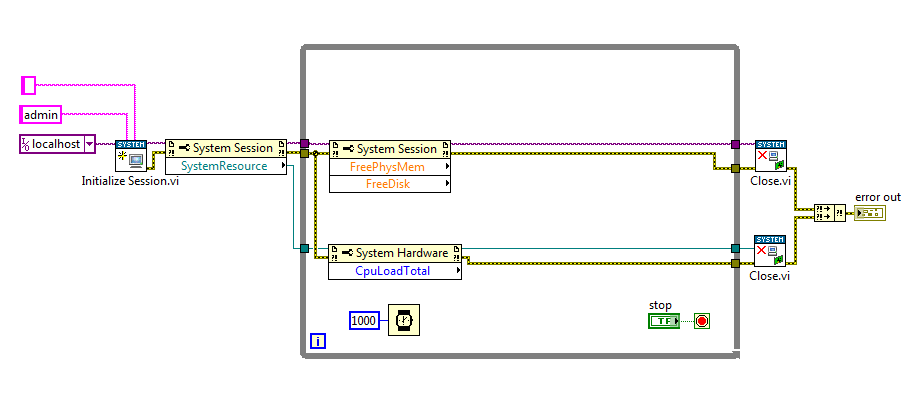
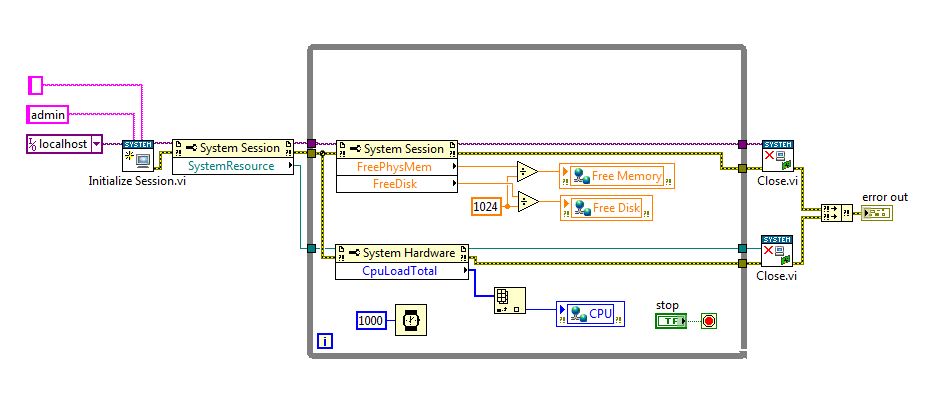
Let’s create a VI which will programmatically acquire controller’s resources. We will use System Configuration VIs found under Real-Time >> RT Utilities>> System Configuration palette. Drop Initialize Session.vi followed by property node set to get SystemResource reference. Inside while loop drop system and hardware property nodes in order to acess FreePhysMem, FreeDisk and CPU. Your block diagram should resemble picture below.
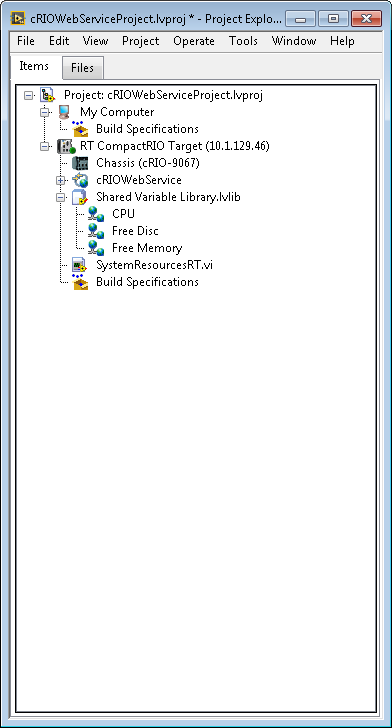
We will now setup shared variables to transfer memory, disk and CPU data to Web Service’s method vi. First right click on the controller and create new library. Let’s call this library Shared Variable Library. Right click on the newly created shared library and create shared variable (New>>Shared Variable) for free memory, free disc and CPU. Keep in mind to select appropriate data type for each shared variable. In our cause double for memory and disk, integer for the CPU. Your LabVIEW project should resemble picture below:
Drag newly created shared variables into the SystemResourcesRT.vi and wire appropriate inputs to each shared variable. Note, you might need to right click on shared variable to change Access Mode to Write. After you are done, complete block diagram of SystemResourcesRT.vi should look like this.
At this point we are done building SystemResourcesRT.vi. You can test it's functionality by replacing shared vaiables with indicators and running the code. Don't forget to set target to localhost and enter username and password. Username is admin and passwork is 'blank' by default.
Web Service
Let’s move on to creating a Web Service. Building Web Service for RT controller is no different than building a Web Service for Windows OS. Visit following tutorial for detailed tutorial on Web Services
https://decibel.ni.com/content/docs/DOC-41659
In LabVIEW project right click on the controller and go to New >> Web Service.Lets call it a ‘cRIO Web Service’. Add public folder by right clicking on cRIO Web Service. Create folder called js inside the public folder and with new file called home.js. Next create file called home.html and place it in the public folder. Your LabVIEW Project should resemble picture below.

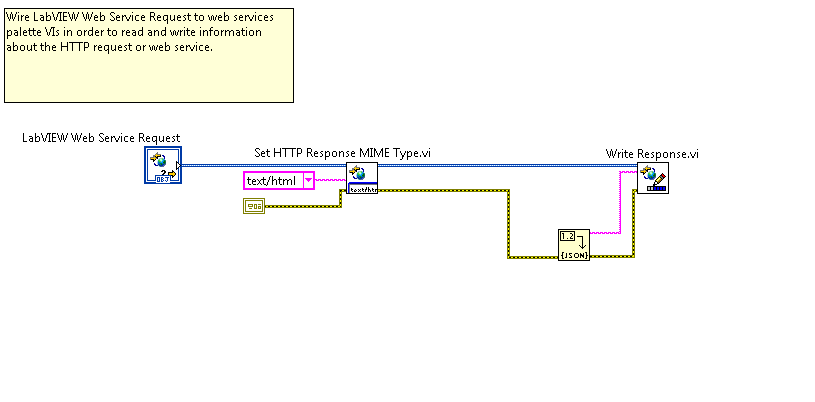
Right click on Web Resources folder under Web Service and create new VI, called it SystemResourcesWEB.vi. This is a web service method VI. This VI is responsible for pushing data to the Web Service. Open the block diagram of this VI and drop Set HTTP Response MIME type.vi, Flatten to JSON.vi and Write Response.vi. Your block diagram should resemble figure below.
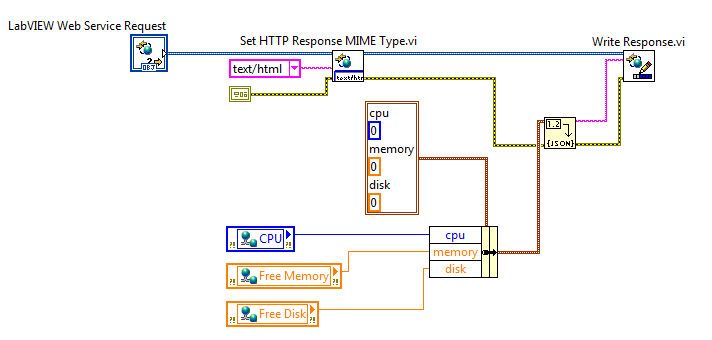
Now we will bring data into the SystemResourcesWEB.vi using shared variables created earlier. Click and drag CPU, memory and disk shared variables from LabVIEW library into the block diagram of SystemResorcesWEB.vi. Next bundle shared variable outputs into a cluster. Pay close attention on how you are going to label cluster constants as these will become JSON keys. We will discuss keys in later section of this tutorial. Your finished SystemResourcesWEB.vi should look like this.
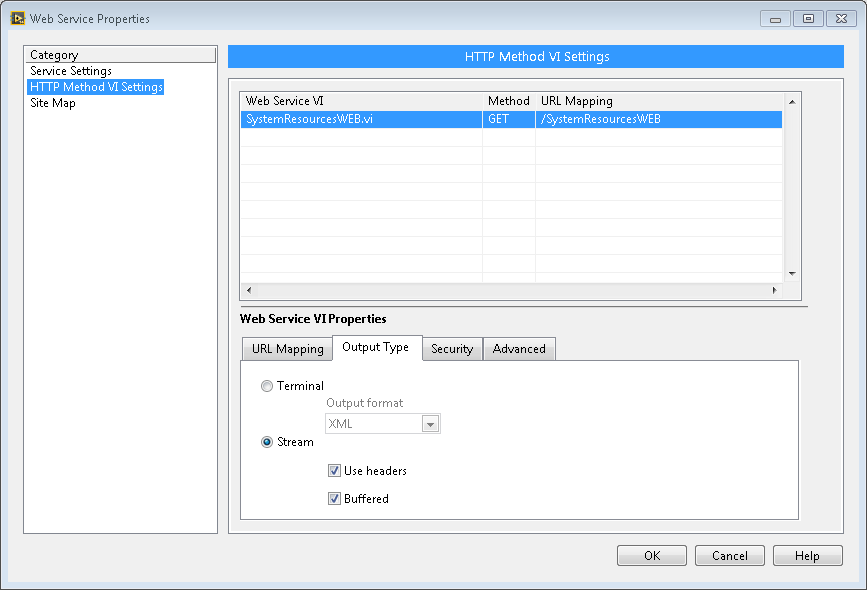
Lastly, right click on Web Service and go to Properties. Click on HTTP Method VI Settings and Output Type tab. Set VI method to Stream as seen in picture below. After you are done, click OK.
Java Script and HTML code.
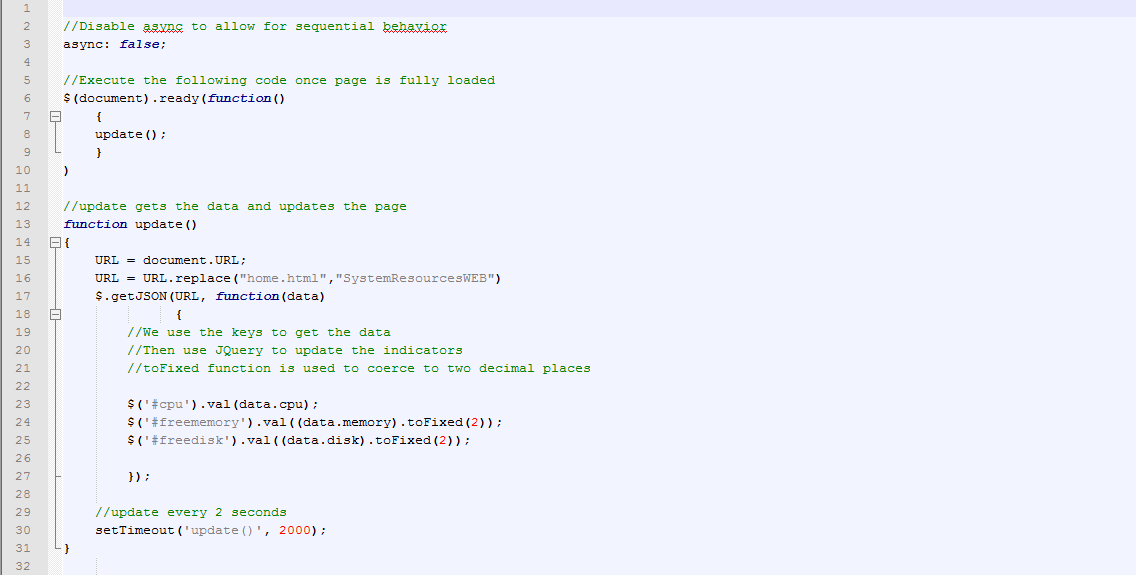
Below is a JavaScript code which will go into home.js file we created earlier. This JavaScript code is responsible for grabbing JSON objects which are actually elements of the cluster inside the SystemResourcesWEB method VI. See JavaScript code comments for further explanation.
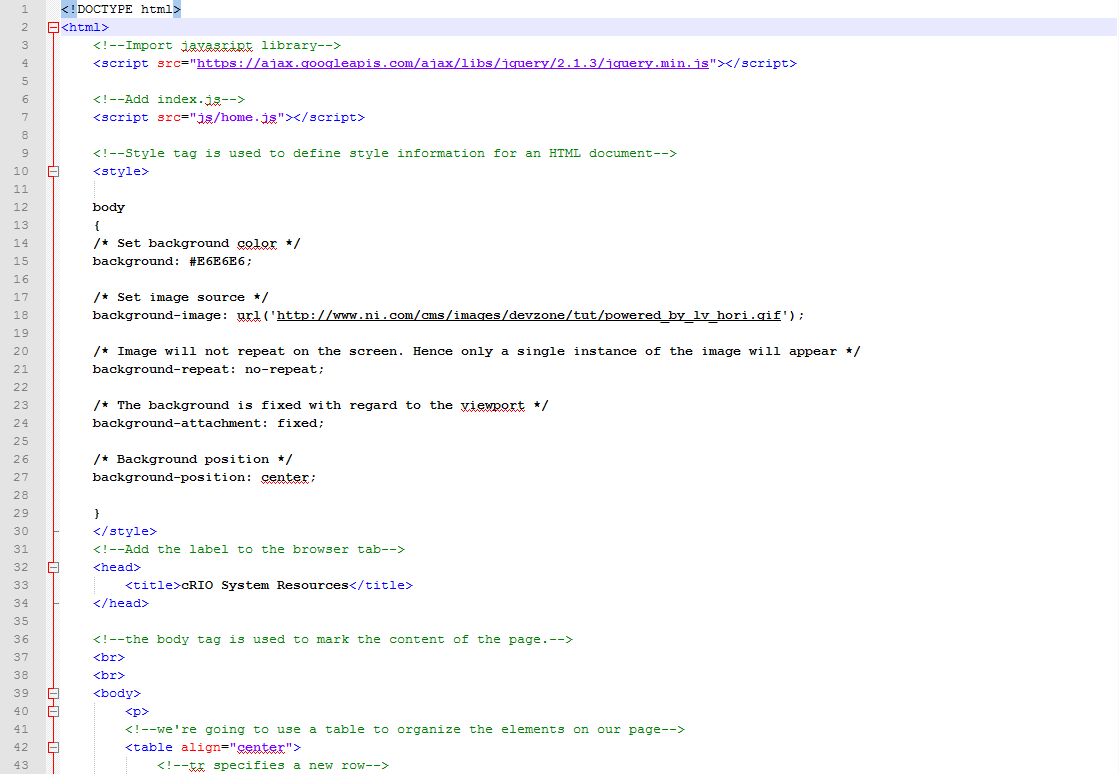
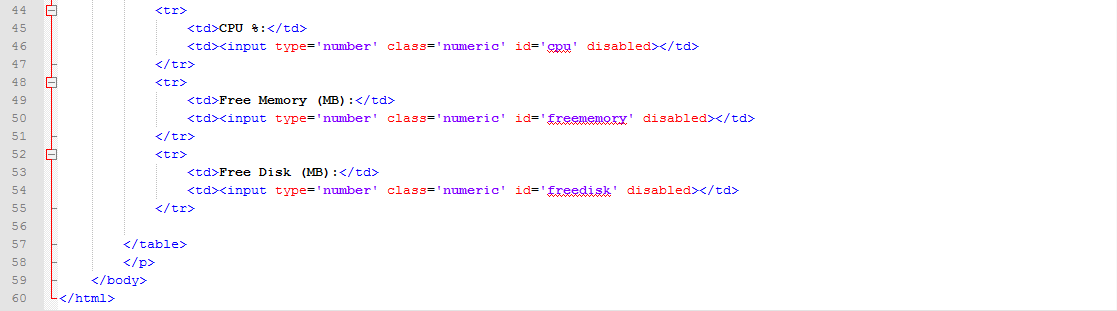
HTML code below will go into home.html file. This code is responsible the visual aspect the website. HTML code includes some basic formatting functions such as background color, table formatting and custom logo. See HTML code comments for further explanation.
You are now ready to run the Web Service. Right click on Web Service, go to Publication Web Service and click Publish. Your Web Service is now published on the controller. Right click on home.html icon in LabVIEW project and click on the Show Public URL… . Paste obtained URL to your browser and run SystemResourcesRT.vi to start feeding memory, disk and CPU information to Web Services method VI.
Building RT Executable with a Web Service
One of the advantages of real-time controllers is that it can run headlessly without the Windows OS host. This is accomplished by building a startup executable which starts and runs automatically on the controller boot up.
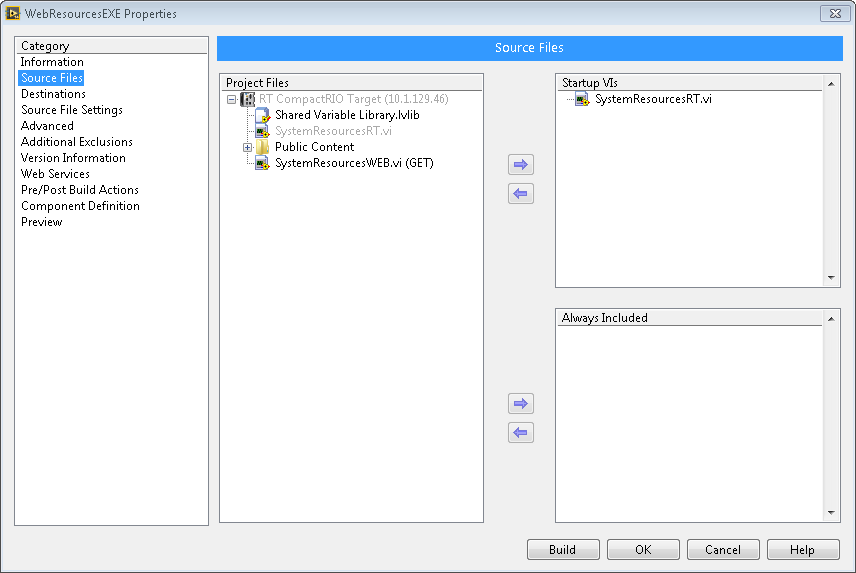
In LabVIEW project right click Build Specifications then New >> Real-time Application. Give name to the exe in Information Category, for example SystemResourcesEXE. Then go to Source Files category and add SystemResourcesRT.vi to StartUp VIs window.
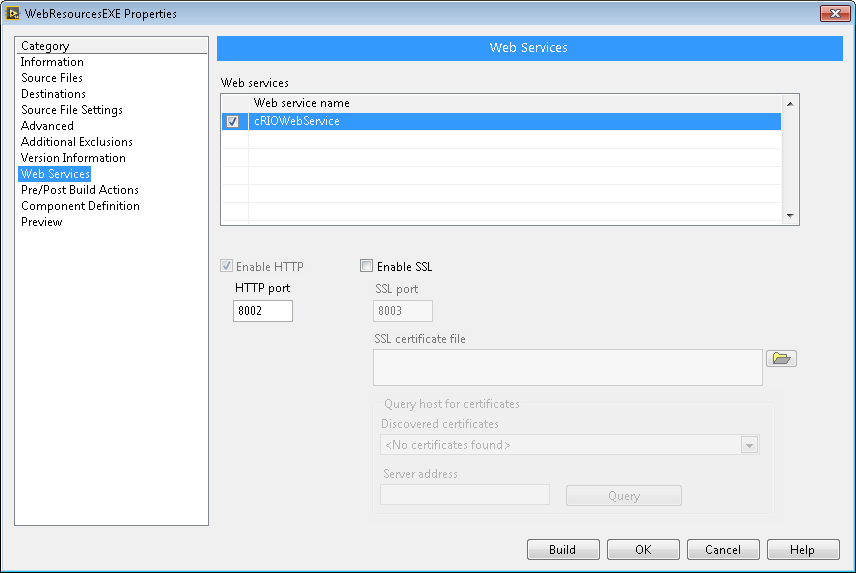
Next, click on Web Services category and check the Web Service name we created in this tutorial. Notice this is also where you can change the HTTP port. By default HTTP port is 8002.
Lastly, click on the Build button to build an exe.
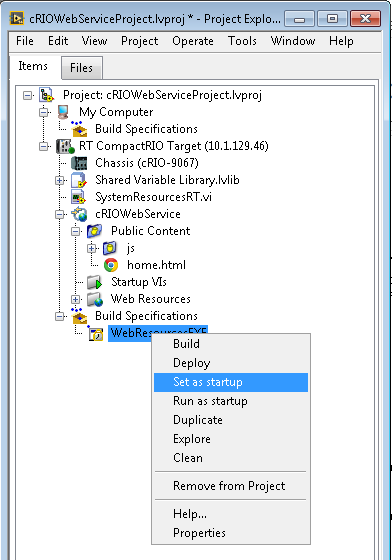
As a final step, set exe as startup and run as startup as shown in image below.
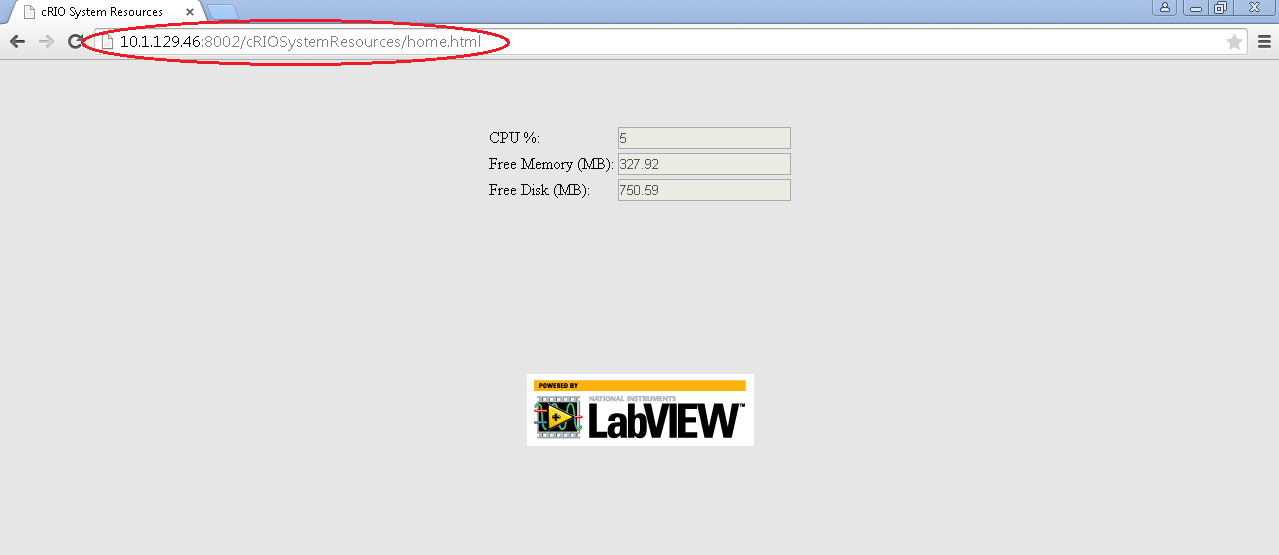
Controller will reboot and start the application. Navigate to your Web Service URL to view the page. To recap, you can obtain Web Service’s URL by right clicking on home.html in LabVIEW project. The URL should be in form of "controllers IP address:HTTP Port/WebServiceName/HtmlFileName.html". In this tutorial the URL is '10.1.129.46:8002/cRIOSystemResources/home.hmt'. Nothe that HTTP posrt changs from 8080 to 8002 when application is in form of executable.
This concludes the tutorial. Please see the attachment for the complete code that was composed in this tutorial.
- Mark as Read
- Mark as New
- Bookmark
- Permalink
- Report to a Moderator
- Mark as Read
- Mark as New
- Bookmark
- Permalink
- Report to a Moderator
- Mark as Read
- Mark as New
- Bookmark
- Permalink
- Report to a Moderator
Found a few inconsistencies that may help others:
[1] Set HTTP Response MIME Type.vi input is "text/html", yet in the attached example is "text/JSON"
[2] Bundle is 'Bundle by Name'
[3] I am getting an error -67301 out of the MIME Type.vi
(using LabvIEW 2020 32 bit f1 on cRIO 9048)
On googling this error, comments predominantly relate to legacy HTTP vi's and doesn't appear to be applicable to this implementation example.
[4] I had to use port 8080 not 8002, as the WEB.vi must use the same port as the HTML + javascript
UPDATE:
now working
I fixed my -67301 from the MIME Type vi by deleting the *WEB.vi and starting over !
I only discovered this by attempting the "AddTwo" WebServer NI example - which worked first go, and the only difference between the two projects is that in the Shared Variable example I might have done a rename of the *WEB.vi i.
