Stitch Images Together in LabVIEW with Vision Development Module
- Subscribe to RSS Feed
- Mark as New
- Mark as Read
- Bookmark
- Subscribe
- Printer Friendly Page
- Report to a Moderator
Products and Environment
This section reflects the products and operating system used to create the example.To download NI software, including the products shown below, visit ni.com/downloads.
- Vision Development Module
- LabVIEW
Software
Code and Documents
Attachment
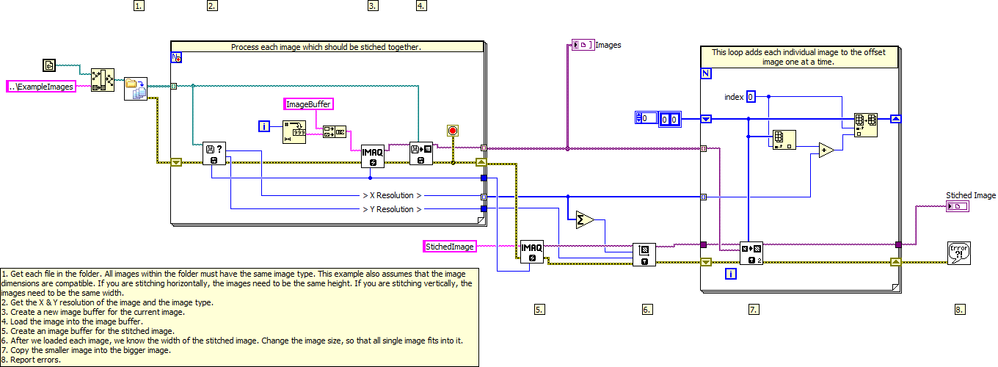
This example demonstrates how to stitch an arbitrary number of images into a big image.
Description
You can use LabVIEW and the NI Vision Development Module to stitch an arbitrary number of images together into one image. There is no predefined VI to do this, but it is not too complicated.
I've have created a VI that demonstrates how to do this. I have made it general so that you can stitch as many images together as you want. Basically, you look at the resolution of each image in the direction that you want to stitch, and sum them. For example, if I want to stitch two images together in the horizontal direction, I should add their X resolutions. You can get this information using the IMAQGetImageSize VI.
Then you should create a destination image, and set its size to the dimensions that you calculated. Ideally, you should have two images of same Y dimension if you are stitching horizontally (same X dimension if you are stitching vertically). You can use the IMAQ SetImageSize VI to preset the image to be the size of the stitched image. Then, you can use IMAQ ImagetoImage to put the image data from each of the original images into the desination image.
Requirements
Software
- LabVIEW Base Development System 2012 (or compatible)
- NI Vision Development Module 2012 (or compatible)
- If running in a Real-Time context, you will need the LabVIEW Real-Time Module 2012 (or compatible)
Hardware
- No hardware is necessary to use this example VI
Steps to Implement or Execute Code
- Download and open the attached ZIP-file
- Open and run the VI
Additional Information or References


Example code from the Example Code Exchange in the NI Community is licensed with the MIT license.
- Mark as Read
- Mark as New
- Bookmark
- Permalink
- Report to a Moderator
In this program how does the offset array works??
- Mark as Read
- Mark as New
- Bookmark
- Permalink
- Report to a Moderator
Hi DIP_y,
I am using IMAQ (Image Acquisition VIs) to manipulate the images. There is no Offset Array in the example rather, I take two images of the same size. I sum their dimensions in the direction that I want to stitch them in. For example, if I want to stitch the together horizontally, I sum their horizontal dimensions. Then I create an empty image of that size. Then I copy the first image into the left half of the new image by using an offset of 0, and I copy the second image into the right half of the image by using an offset of the horizonal dimension of the first image. I hope this helps! Thanks for posting.
WesP
- Mark as Read
- Mark as New
- Bookmark
- Permalink
- Report to a Moderator
Wes,
I'm trying to modify your example to display 4 images (2 horiz. and 2 vert.) and I'm not getting the result I expect. I've tried a couple of ways and I get blank images in pos 2 and 3 ( using the format 1,2
3,4)
I know this has to do with the x,y offset but my modifications don't work like I think they should. Can you advise me on the modifications needed to do 2x and 2y please. Thanks!!
- Mark as Read
- Mark as New
- Bookmark
- Permalink
- Report to a Moderator
Hi tes45,
In my example above, I basically did the following. I took two images of the same dimensions. I created a blank third image that would be stitched image in the end. Since I stitched horizontally in the example, I copied the first image into the destination image with zero X offset. I copied the second image into the destination with an X offset equal to the X dimension of the first image. If you wanted to do this vertically, use a Y offset instead of an X offset. To do a 2x2 image, I would first create your destination image of size (X1+X2)x(Y1+Y2). Then create two for loops. In the inside for loop, increment the X offset. In the outside while loop, increment the Y offset (or vice versa). Think about the following example:
You have four images, all 640x480, and you want to arrange them in a destination image so that Image A is in the upper left, Image B in the upper right, Image C in the lower left, and Image D in the lower right. First create a destination image of 1280x960. Then go to your nested for loops. Both should be set to iterate twice (the inside loop will actually iterate 4 times--twice per iteration of the outside loop). Let the outiside loop handle the Y offset, and the inside loop handle the X offset. In the first iteration of the outside loop, the Y offset is zero. In the second, the offset is 480. In the first iteration of the inside loop the offset is zero. In the second, it is 640. This should take care of it for you. Let me know if you have any other questions about it.
- Mark as Read
- Mark as New
- Bookmark
- Permalink
- Report to a Moderator
Wes,
Thanks for your response. I will give it a go and let you knwo how things work out.
- Mark as Read
- Mark as New
- Bookmark
- Permalink
- Report to a Moderator
How to stitch 2D array of images?
