- Document History
- Subscribe to RSS Feed
- Mark as New
- Mark as Read
- Bookmark
- Subscribe
- Printer Friendly Page
- Report to a Moderator
- Subscribe to RSS Feed
- Mark as New
- Mark as Read
- Bookmark
- Subscribe
- Printer Friendly Page
- Report to a Moderator
Example: Using the DAQmx API on NI Linux Real-Time Systems
Overview
This code demonstrates the use of the DAQmx API and was written specifically for cDAQ controllers running NI Linux Real-Time. Specifically, the code implements a number of DAQmx features, including:
- Analog Tasks
- Digital Tasks
- Hardware-timed synchronization
- Start triggering
- Logging
Note: This code does not outline best practices for maintaining real-time system behavior, which requires consideration of topics such as priority assignment and the avoidance of page faults. For more information on these topics, review the PREEMPT_RT Patch Wiki - HOWTO: Build an RT-Application.
This code was built specifically for a cDAQ-9134 Real-Time target, and relies on 3 C-Series modules: two NI-9211s in slots 1 and 2, and one NI-9401 in slot 3. Additionally, this code relies on two J-type thermocouples, connected to each of the NI-9211 thermocouple modules respectively.
To terminate code, increase temperature read by thermocouple to 34 degrees Celsius or higher.
Description
While this code requires the hardware configuration outlined above, it should be useful as a starting point for most DAQmx-based C/C++ development on NI Linux RT.
Note: For the most up-to-date C/C++ Tutorials for NI Linux Real-Time, visit ni.com/info and enter the Info Code NILRTCrossCompile.
Using DAQmx with Eclipse - Windows Host
- First, download the C/C++ Development Tools for NI Linux Real-Time, Eclipse Edition 2014.
- Follow the Getting Started guide to set up Eclipse and the environment.
- Create a C/C++ Project, and then do the following:
- Right-click on the project and select Properties
- In the left-hand bar, navigate to C/C++ Build
- For Builder Type, select Internal builder
- If you get the error, "Program "make" not found in PATH", do the following to resolve:
- Right-click on the project and go to Properties
- In the left-hand bar, navigate to C/C++ Build->Toolchain Editor
- Change current builder to CDT Internal Builder
- If you get the error, "Program "g++" not found in PATH", or, "Program "gcc" not found in PATH", do the following to resolve:
- Right-click on the project and go to Properties
- In the left-hand bar, navigate to C/C++ General->Preprocessor Include Paths
- Click the Restore Defaults button
- If this does not work, do the following:
- Right-click on the project and go to Properties
- In the left-hand bar, navigate to C/C++ Build->Environment
- Select the PATH variable, and click the Edit button.
- Add the file path for the location of the gcc/g++ tools, followed by a semicolon. For the cDAQ-9134, these are located at:
- C:\Program Files (x86)\National Instruments\Eclipse\14.0\x64\sysroots\i686-nilrtsdk-mingw32\usr\bin\x86_64-nilrt-linux
- To declare and reference DAQmx functions, you need to specify the location of the DAQmx header file:
- Right-click on the project and select Properties
- In the left-hand bar, navigate to C/C++ General->Paths and Symbols
- In the Includes tab, click the Add button
- Click the File System button to navigate to the directory containing the header file, which on a standard installation will be located at:
- C:\Program Files (x86)\National Instruments\Shared\ExternalCompilerSupport\C\include

- C:\Program Files (x86)\National Instruments\Shared\ExternalCompilerSupport\C\include
- We also need to provide the linker with information about where to find the DAQmx libraries. The library file for DAQmx 15.0.1 is included in the linked Eclipse project files for convenience.
- Copy the library file (libnidaqmx.so) to your Eclipse project directory.
- Right-click on the project and go to Properties
- In the left-hand bar, navigate to C/C++ Build->Settings
- In the Tool Settings tab, go to Cross GCC Linker->Libraries
- Navigate to Cross GCC Linker->Miscellaneous
- Under the Libraries (-l) window add the library called nidaqmx
- Under the Library search path (-L) add "${workspace_loc:/${ProjName}}"

- Copy the library file (libnidaqmx.so) to your Eclipse project directory.
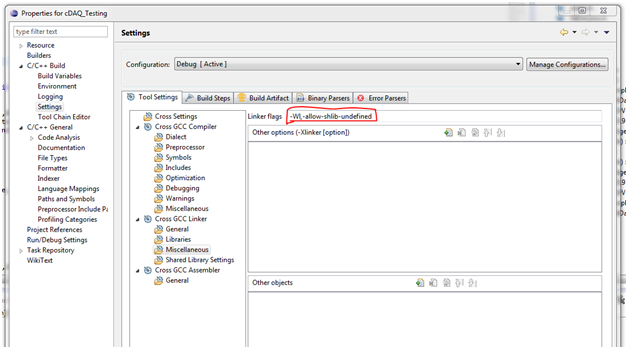
- Finally, we have to allow Eclipse to resolve nidaqmx's dependencies by allowing undefined symbols in shared libraries.
- Right-click on the project and go to Properties
- In the left-hand bar, navigate to C/C++ Build->Settings
- Navigate to Cross GCC Linker->Miscellaneous
- Under the linker flag options, put -Wl,-allow-shlib-undefined as shown:
- Now, you can build the project and test it using a Remote Application Run configuration. You should see console output similar to that in the image below. For information on how to configure the code to run on a remote target, see the Getting Started guide.
.png)
Requirements
Software
Required:
C/C++ Development Tools for NI Linux Real-Time, Eclipse Edition 2014
NI-DAQmx 15.0.1
Hardware
Hardware used for this example:
NI-cDAQ 9134
NI-9211 (x2)
NI-9401
- Mark as Read
- Mark as New
- Bookmark
- Permalink
- Report to a Moderator
This is great. The only issue I'm having is that it is looking for a bunch of other libraries used by libnidaqmx.so when I try to compile, such as libnidmxfu.so.1 and libnimdbgu.so.1. Any ideas? Where did you find the libnidaqmx.so library?
Thanks
- Mark as Read
- Mark as New
- Bookmark
- Permalink
- Report to a Moderator
This is perfect, exactly what I was looking for. The only problem that I have is that I would like it to be revised for the latest version of Eclipse and the NIDAQmx library.
I have the 2017 version of Eclipse and 17.1 NIDAQmx. I am getting "undefined reference" errors but the advice in step 6 above does not seem to be fixing them
- Mark as Read
- Mark as New
- Bookmark
- Permalink
- Report to a Moderator
Update to my previous comment. I was able to fix the "undefined reference" errors. In my case the library file was in a folder C:\Program Files (x86)\National Instruments\RT Images\NI-DAQmx\17.1.0\linux-x64 and the file was called libnidaqmx.17.1.0. I had to copy the file to my project folder and then remove the ".17.1.0" from the end of the file. After that the program did build just fine
