Raspberry Pi 3, LINX 3.0 and WebSockets
- Subscribe to RSS Feed
- Mark as New
- Mark as Read
- Bookmark
- Subscribe
- Printer Friendly Page
- Report to a Moderator
In April 2016, MakerHub announced that they have released LINX 3.0 which supports creating and deploying LabVIEW code to the Raspberry Pi 2/3 and the BeagleBone Black. This was too good of an announcement to let it slip past without me having a play...so I decided to create a very simple headless DAQ system with a browser-based user interface.
Hardware
I had one of the original Raspberry Pis from when they first came out but never really found a use for it. I had bought a Gertboard to go with it - it's a PCB that connects to the Raspberry Pi's GPIO header and breaks out of the functionality into a bunch of useful stuff such as 2x Analogue Inputs, 2x Analogue Outputs, LEDs, buttons, a motor driver and an Arduino IDE compatible Atmega 328. You simply use 0.1" patch cables to connect the GPIO to the various headers to connect it up to the different functionality on the board. What could be better to test the new Raspberry Pi 3 + LINX 3.0 combo!
The LINX toolkit that allows you to run/deploy LabVIEW code only works with the Raspberry Pi 2 & 3. The 2 & 3 are very similar but the 3 has on-board WiFi and Bluetooth (and maybe a faster processor?!).
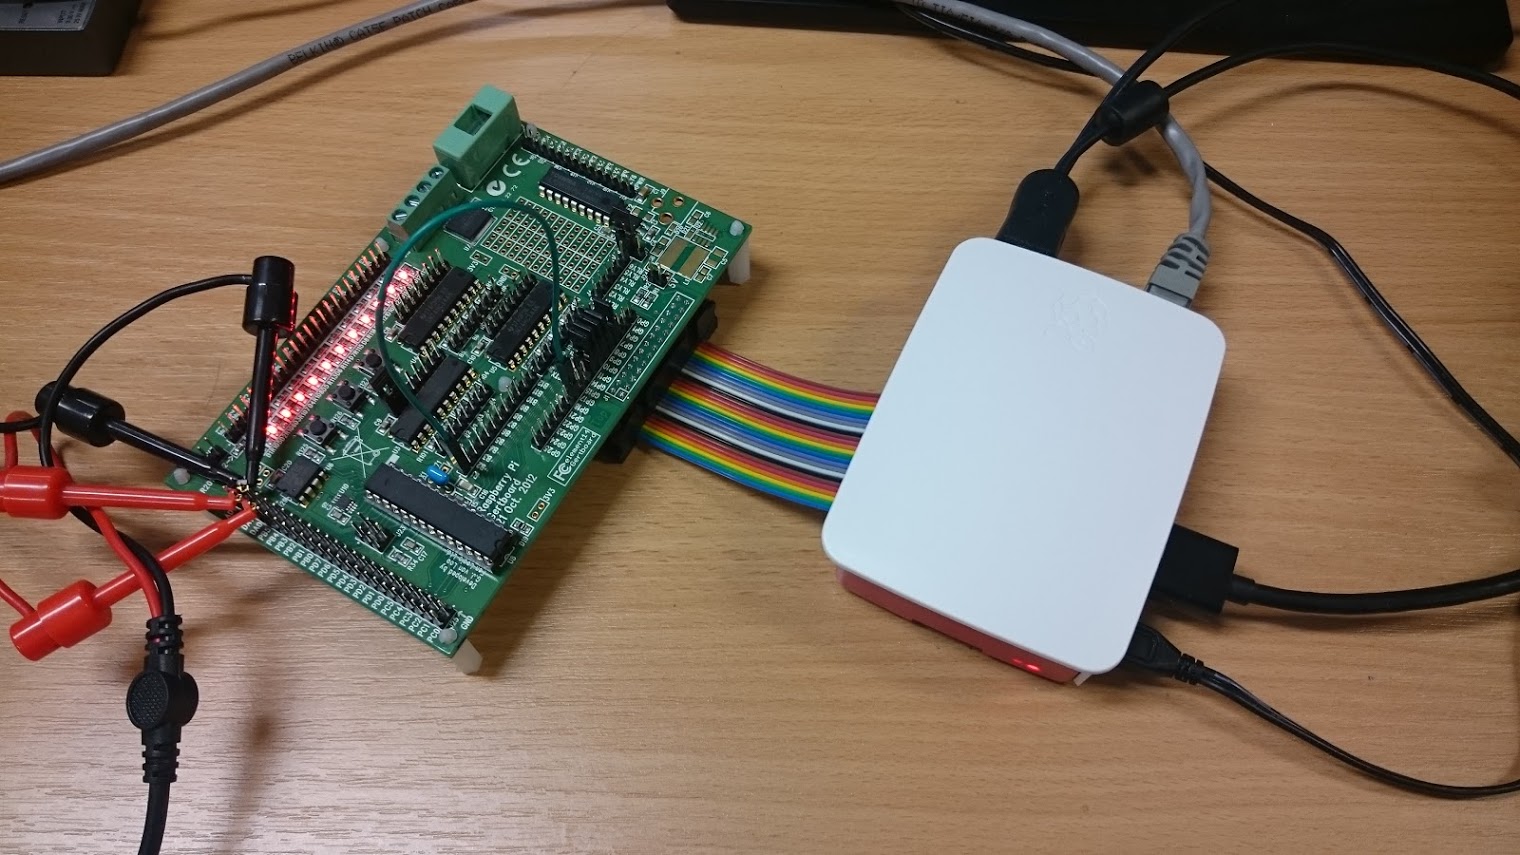
(Pi & Gertboard. Just off-screen - an NI Virtual Bench for debugging/scoping/function-generating)
Setup & Configuration
Setting up the RPi to be able to use it with LabVIEW was pretty straightforward. Install the latest LINX toolkit from VI Package Manager and then go to 'Tools'->'LINX'->'Target Configuration' in LabVIEW (it only supports 2014 SP1), enter the IP, username/password of your RPi and connect - it then walks you through the steps to install the LabVIEW Runtime Engine onto the Pi - I had a couple of minor teething issues but despite getting a couple of errors, the installation completed successfully.
Here's the configuration utility:
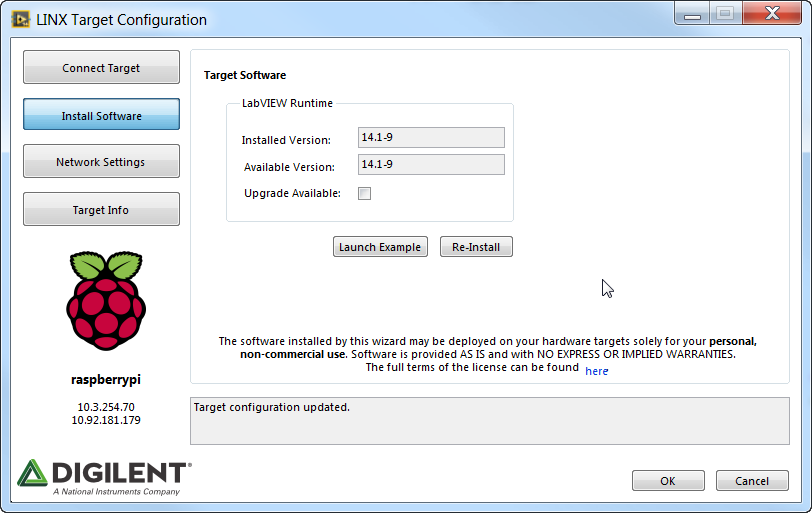
(Neat! Note the message about personal, non-commercial use. This was a little personal project for me to see what it's capable of... I hope a commercial license is in the pipeline somewhere.)
Once configured, you can then add the Raspberry Pi as a Target in a LabVIEW project - just like you would a myRIO or CompactRIO:

(It even has the Raspberry Pi icon!!)
Software
The ADC and DAC chips on the Gertboard share an SPI bus which was pretty easy to get working with some help from the device datasheets to understand the commands you need to send.
For example, to read from the ADC (a Microchip MCP3002) looks like this:
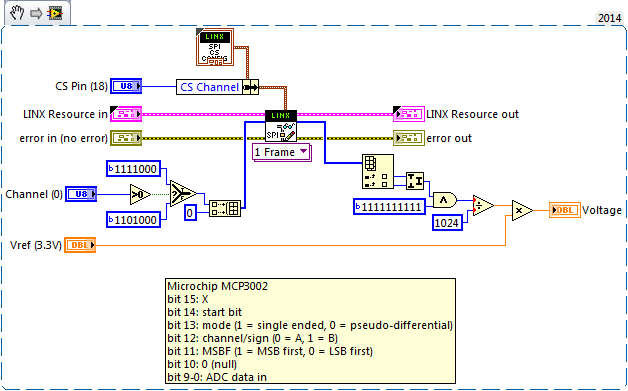
Digital Pin Read/Writes are even easier - you just need to know the GPIO header pin number (which isn't quite the same as the GPIO numbers that you find on the RPi documentation.
User Interface
For the user interface, I am using my WebSockets library to send/receive commands to the LabVIEW code running on the RPi from a web-page. LabVIEW on RPi doesn't yet support Web Services, but I'm sure there are other web servers that can serve the page to clients from the RPi.
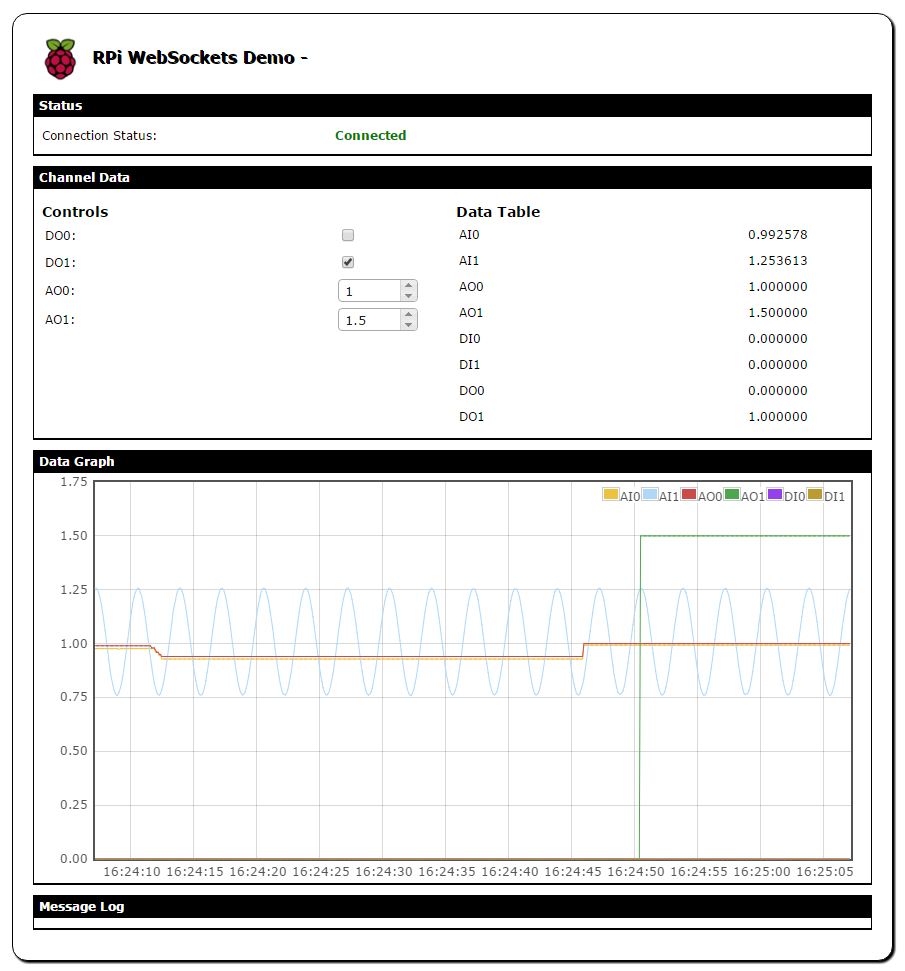
The UI allows you to control the outputs (2xDAC, 2xDO) and view the live values from the ADC/DI channels. I keep a one-minute buffer of history data (acquired at 10Hz) on the RPi which gets sent to update the graph plot.
Conclusion
The ability to be able to write/run/deploy LabVIEW code to the Raspberry Pi is a pretty massive announcement - but it's currently only available for personal/non-commercial use. For the maker/student community - this is a really great announcement as you can use LabVIEW with some seriously low-cost hardware. Of course, the support for the RPi is very new so it has a few small teething issues but things like Digital IO, SPI and networking work just great. The Pi only really has Digital IO, so I think to get the most out of it you need to use it with some sort of breakout board with SPI/UART communications.
Example code from the Example Code Exchange in the NI Community is licensed with the MIT license.
- Mark as Read
- Mark as New
- Bookmark
- Permalink
- Report to a Moderator
Hi !
I can find pretty much eveything I was wondering in this post ! Just one question : is it possible to display a front panel on the Raspebrry touch screen ? Can't find any information about it.
Thx
- Mark as Read
- Mark as New
- Bookmark
- Permalink
- Report to a Moderator
No, it is not possible - the LabVIEW code runs as a process in the background on the Raspberry Pi (like it does on cRIO targets) and it doesn't support front panels. You would need to either create a linux application that communicates with the LabVIEW code (e.g. via TCP/UDP) or do as I have done and create a web-based user interface.
- Mark as Read
- Mark as New
- Bookmark
- Permalink
- Report to a Moderator
That's unfortunate ! As LV offer a great flexible front panel that would have been perfect. I guess you have to make another panel in another language if you both use a linux app or web-based use interface ?!
In my application where I want a cheap and simple system with an embedded display and a remote control, maybe LV (or the Raspberry PI ?) are not the wiser choices ?
- Mark as Read
- Mark as New
- Bookmark
- Permalink
- Report to a Moderator
Could you please have a linnk to your Labview code? I know how to generate the code to read from the ADC, but do not know just how to setup the user interface by using the WebSockets library that you talk about.
Thank you
- Mark as Read
- Mark as New
- Bookmark
- Permalink
- Report to a Moderator
Hi there,
I'm trying to do pretty much the same but I'm only interested in the raw analogue inputs. I'm using the RPi along with the Custard Pi 2 and when I try to use the SPI read Vi all I keep getting is:
Error 5005 occurred at:
Possible reason(s):
The specified Digital Output channel (24) is not available on the . This device does not support Digital Output.
I just don't know how to handle this... and when I try to use the SPI configuration device I get the same error saying that this device does not support SPI. But the Pi does support SPI!!
Any advice? I would really appreciate some help here
Thanks
- Mark as Read
- Mark as New
- Bookmark
- Permalink
- Report to a Moderator
HI,
I am trying to connect using Wifi onboard of pi3 . However I cant find how to do this . Even If i Did, I lose the wifi once the ethernet is removed. Basically I am trying to mount on a mobile robot.
Thanks,
Bharath
Bharath Kumar
- Mark as Read
- Mark as New
- Bookmark
- Permalink
- Report to a Moderator

If anyone is having trouble running the example code (SingleConnection.vi); delete the pictured code
Studying for CLA.
LabVIEW, inherit from social media habits!
- Mark as Read
- Mark as New
- Bookmark
- Permalink
- Report to a Moderator
This is an incredible contribution to the Engineering community. You definitely went above and beyond to get this out there. I was able to complete the task I have been pondering up throughout the last 6 months today.
Now I can't give you Champion status, and since I don't know if it's actually possible to even vote; All I can do is this..
*sudo soul swaps Howie Mandel and Slaps golden buzzer*
Consider this my nomination of Sam_Sharp for LabVIEW Champion! ![]()
Thanks again
Studying for CLA.
LabVIEW, inherit from social media habits!
- Mark as Read
- Mark as New
- Bookmark
- Permalink
- Report to a Moderator
How to install Labview Run-Time Engine on Raspberry Pi?
- Mark as Read
- Mark as New
- Bookmark
- Permalink
- Report to a Moderator
I agree with CDuck, this is an excellent contribution! So a big THANK YOU for your work!
I'm struggling following your instructions with the same issue as camilogonzalez, I cannot deploy any vi at all, there is always this error saying "LMH-LINX.lvlib:Local IO.lvlib:Load Device Channels.vi loaded with errors on the target and was closed."
Can someone help? Any help is appreciated!

- Mark as Read
- Mark as New
- Bookmark
- Permalink
- Report to a Moderator
I would like to do the same project as you, ie write to the DAC read the ADC and read BUF channels 1 to 12.
Could I have your files :
connection handler.lvlib
gertboard.lvlib
Shared Components.lvlib
Websocket Server.lvlib
WebSockets Demo Main.vi
And maybe your help, thanks
