From Friday, April 19th (11:00 PM CDT) through Saturday, April 20th (2:00 PM CDT), 2024, ni.com will undergo system upgrades that may result in temporary service interruption.
We appreciate your patience as we improve our online experience.
From Friday, April 19th (11:00 PM CDT) through Saturday, April 20th (2:00 PM CDT), 2024, ni.com will undergo system upgrades that may result in temporary service interruption.
We appreciate your patience as we improve our online experience.
09-12-2009 07:35 AM
Introduction
Hello once again!! Here I am writing another tutorial for this great linux users-community. In this time I must say that it had been easier doing the manual because the number of members of this community has grown up and the number of posts and discussions too. In this case only I had to gather all information of several posts. It´s a pity that the level of members of linux-user is higher and higher BUT my level of English is the same of last time. I apologize for it.
Steps to Complete
REQUIREMENTS
At the first place I must say that the manual is adequate for a distro with these properties:
Ubuntu 8.04
Kernel: 2.6.24-24-generic [# uname -r]
gcc version: gcc (GCC) 4.2.4 (Ubuntu 4.2.4-1ubuntu3) [# gcc --version]
cpu i386
SOME ESSENTIAL UBUNTU PACKAGES
Right after it, it's the moment to install several packages included in ubuntu repository which are necessary:
# apt-get install linux-headers-2.6.24-24-generic
# apt-get install alien
On the other hand I recommend to install libosmesa6 and libosmesa6-dev but using sinaptic.
To finish, remenber change bash to sh
# cd /bin
# ln -s bash sh
NIKAL 1.10 INSTALLATION
Now it's the moment to download nikal 1.10 , like it's a ISO you need to mount and after it copy the files to other place. I'm going to create all folders that I need in my Desktop (Escritorio in spanish).
# mkdir /home/vicente/Escritorio/tmp
# mount -o loop NIKAL110.iso /home/vicente/Escriorio/tmp
# mkdir nikal
# cp -R /home/vicente/Escritorio/tmp/ /home/vicente/Escritorio/nikal/
# chmod -R 777 /home/vicente/Escritorio/nikal/
# umount /home/vicente/Escritorio/tmp/
# cd /home/vicente/Escritorio/nikal/tmp
Ok now we must unpackage nikal-1.10.0f0.tar.gz to do it I prefer to use the gnome environment, open a navigator, go to
/home/vicente/Escritorio/nikal/tmp and click with secondary mouse button on nikal-1.10.0f0.tar.gz and click extract here.
# cd /home/vicente/Escritorio/nikal/tmp/nikal-1.10.0f0/rpms
With alien we will change *.rpm to *.deb. With dkpg command we will install the deb package.
# alien nikali-1.10.0-f0.noarch.rpm --scripts
# dpkg -i nikali_1.10.0-f0_all.deb
If there is something different in this tutorial from my previous one it is the fact that, some packages are going to create a scripts named *InstallerUtility.sh. where * is the name of package installed. We must find and execute these scripts after each dpkg.
# cd /usr/local/natinst/nikal/bin
# . nikaliInstallerUtility.sh
# nikaliPostInstall
# ./updateNIDrivers
Reboot? yes
After it, check it that module nikal is working:
# modprobe nikal
NI488.2 INSTALLATION
The next step is to install NI488.2, first download NI-488.2-beta-2.5 and follow the same steps that we follow with nikal, remember unpackage NI-488.2-beta-2.5.1b1.tar.gz.
# cd /home/vicente/Escritorio/NI4882/NI-488.2-beta-2.5.1b1
# ./INSTALL --nodeps
After to install using the method ./INSTALL --nodeps it appears errors post installation. At this moment if you check it nikal you will find that nikal isn't working. Don't worry follow these steps:
# cd /home/vicente/Escritorio/nikal/tmp/nikal-1.10.0f0/rpms
# dpkg -P nikali
# dpkg -i nikali_1.10.0-f0_all.deb
# cd /usr/local/natinst/nikal/bin
# . nikaliInstallerUtility.sh
# nikaliPostInstall
# ./updateNIDrivers
Reboot? yes
Right after it, you can check it that you have installed nikal, nipalk, gpibrtk and a new demon nipal.
# modprobe nikal
# modprobe nipalk
# modprobe gpibprtk
# /etc/init.d/nipal restart (appears a error but nipal is working)
I know that it is a pretty peculiar method (even for a human beings) but works. For example if you have a PCI/GPIB card you can test it writting up this
# gpibtsw
In my case I find this:

VISA 4.5.0 INSTALLATION
Ok now Visa 4.5. You must download Visa 4.5.1 mount, copy, umount and unpackage nivisa-4.5.0f0.tar.gz (if you prefer 'tar zxvf nivisa-4.5.1f0.tar.gz'), like nikal package. After it we must change packages .rpm to .deb. To do it follow these steps:
# mkdir /home/vicente/Escritorio/kk
# mount -o loop NI-VISA-4.5.1.iso /home/vicente/Escriorio/kk
# mkdir visa451
# cp -R /home/vicente/Escritorio/kk/ /home/vicente/Escritorio/visa451/
# chmod -R 777 /home/vicente/Escritorio/visa451/
# umount /home/vicente/Escritorio/kk/
# cd /home/vicente/Escritorio/visa451/kk
# tar zxvf nivisa-4.5.1f0.tar.gz
Be carefull with the path used, PLEASE We will use a installation-script and it's necessary that you must create the folders with the same names.
# mkdir nivisa-4.5.1
# cd rpms
# rm nipalki-2.4.0-f0.x86_64.rpm
# rm nivisak-4.5.1-f0.x86_64.rpm
# alien -k --scripts *.rpm
# cd ..
# cp rpm/*.deb nivisa-4.5.1/
Ok, the user Wimpie has made a fantastic installation-script to install nivisa, the community has to be thankful for his/her contribution.
(If you have tried to install visa by other way without success and you want to follow our method please, first run Wimpie's uninstall_visa.sh attached in this tutorial. you can run the script from any path. )
Download the script install_visa.sh attached below and copy it at /home/vicente/Escritorio/visa451/kk , change the path in your case, but install_visa.sh must be at folder /home/'name-user'/Desktop/visa451/kk, I hope don't lost me in translation. Run the script and cross your fingers
root@vicente-desktop:/home/vicente/Escritorio/visa451/kk# ./install_visa
Right after it, you must run updateNIDrivers.
# cd /usr/local/natinst/nikal/bin
# ./updateNIDrivers
reboot? yes
Several new kernel modules have to be installed or updating:
NI-KAL successfully updated.
nipalk.ko successfully updated.
NiViPciK.ko successfully updated.
niorbk.ko successfully updated.
nidimk.ko successfully updated.
NiViPxiK.ko successfully updated.
nipxirmk.ko successfully updated.
Now go to a Shell and write down:
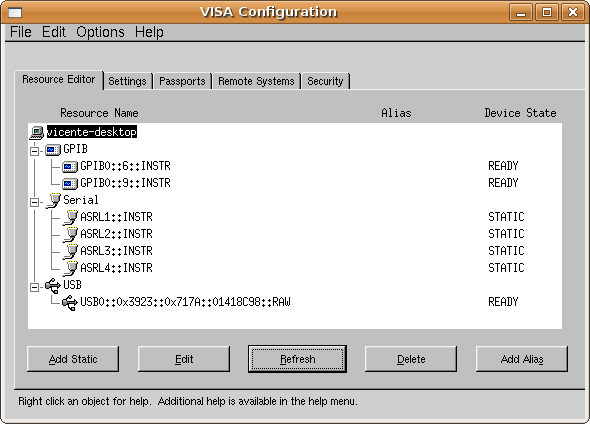
# visaconf
If you have a PCI/GPIB card you will find something like this:

PyViSA INSTALLATION
First you need download PyVisa (PyVISA-1.3-1.noarch.rpm) after it and before to install PyVISA we must install one package from repositories:
apt-get install python-ctypes
Ok, change *.rpm to *.deb and install:
# alien -k --scripts *.rpm
# dpkg -i pyvisa_1.3-1_all.deb
Ok, now you can run this example to test your PCI/GPIB card (Instrument with gpib address 9):
PRUEBA.PY:
import pyvisa.vpp43 as vpp43
vpp43.visa_library.load_library("/usr/local/vxipnp/linux/bin/libvisa.so.7")
from visa import *
my_instrument = instrument("GPIB0::9::INSTR")
my_instrument.write("*IDN?")
print my_instrument.read()
In my case after running the script I find this:
root@vicente-desktop:/home/vicente/Escritorio/pyvisa# python prueba.py
HEWLETT-PACKARD,34970A,0,3-1-2
NIdaqmxBase INSTALLATION
Download NIdaqMXBase 3.3.0 it is a ISO file, you need mount and copy the files (see NIKAL installation). After you mount the ISO, go to folder nidaqmxbase and change the packages .rpm to .deb with this command:
# alien -k --scripts *.rpm
Right after it copy the Wimpie's script install_daqmx attached below at the same folder where you has generated the .deb packages. To finish execute the script and one again cross your fingers (very important):
# ./install_daqmx
Ok now run updateNIDrivers
# cd /usr/local/natinst/nikal/bin
# ./updateNIDrivers
So, It is the moment to probe our usb devices, for example NI-USB 6008.
root@vicente-desktop:/usr/local/natinst/nidaqmxbase/bin# lsdaq
--------------------------------
Detecting National Instruments DAQ Devices
Found the following DAQ Devices:
NI USB-6008: "Dev1" (USB0::0x3923::0x717A::01418C98::RAW)
--------------------------------
And if you go to visaconf you will find something like this:
WARNING:
If you find after do it # lsdaq this error:
root@vicente-desktop:/home/vicente# lsdaq
--------------------------------
Detecting National Instruments DAQ Devices
Found the following DAQ Devices:
Device Error: incompatible firmware. Serial Number: 01418C98
Execute <NI-DAQmx Base directory>/bin/FWUpdate to update.
you must go to folder /usr/local/natinst/nidaqmxbase and execute the script FWUpdate to update the firmware.
# cd /usr/local/natinst/nidaqmxbase
# ./FWUpdate
Let go to test now the device NI-cDAQ-9172 :
to be continued
Additional Notes
Today (11-29-2009) it is been one month and two weeks since my VI to trace I-V curves of photovoltaic modules started to run. In this time we have collected about 10.000 I-V curves (one curve each 2 minutes during solar hours) and the system has been working continuously during that days. I must say that I have not had any kind of problem after starting up, there aren't incomprehensible messages from Windows OS, I haven't a slowly PC after 44 days of working ...the windows users know what I mean. In my case for my monitoring system, I can say that the change has been worthwhile.
PC: Intel core duo, 1GB Ram, 1 PCI-GPIB card
Datalogger: agilent 34970A with daq and actuators cards using GPIB port.
Power supply: Kepco BOP 36-12M with GPIB port
Thanks for your help.
09-16-2009 04:02 PM
Hi ,
I was abel to finally install ni488.2 drivers, though the steps mentioned above helped a ,lot but there were stills ome issues, I had to manually creat the softlink for nipalk and after that
gpibtsw dd work correctly,
thanks a lot fo rthe help i just hope I am able to installe visa correctly
09-22-2009 12:16 PM
Hey Vicente,
Thanks for the tutorial! I haven't tried it myself but I did notice that there was a bit of a misunderstanding about the *installerUtility.sh files and how they are used.
Each NI rpm file currently installs a file called <rpmBaseName>InstallerUtility.sh These files are essentially libraries of functions. They should each provide a functions called <rpmBaseName>PostInstall, <rpmBaseName>PreUninstall, and <rpmBaseName>PostUninstall. These functions should be run pre/post installing/uninstalling the rpm.
Since these files are designed as "libraries" you can not simply execute the file for example ./nikaliInstallerUtility.sh doesn't actually do anything. Instead you must "source" the file to run it in the context of your current shell. You can do this in two possible ways, if your shell is bash you can run "source nikaliInstallerUtility.sh", however the "source" keyword is bash specific so the more general way to source a file is to run ". nikaliInstallerUtility.sh". Note the leading ". " which is easy to miss. Sourcing a shell script runs the script in the context of your current shell making all functions and variables provided by that script available in your shell and to future commands you may run.
Once you have sourced the shell script you can they call the functions within that shell script on the command like for example "nikaliPostInstall" to execute the nikali post install steps for the nikali rpm. Some of the <rpmBaseName>InstallerUtility.sh scripts depend on variables and functions provided by the other scripts so you must run them in a specific order. I'm not positive of the required order at the moment, but it should be: nikali, nipalki, nipali, and then everything else.
Shawn Bohrer
National Instruments
09-25-2009 04:21 AM
Hi Shawn
09-25-2009 09:38 AM
I think just running updateNIDrivers will work for NI-KAL, but updateNIDrivers does expect the <rpmBaseName>PostInstall step to be run for the rest of the kernel rpms. I did already make some minor fixes to your instructions, so you may not need to update them.
10-06-2009 05:26 PM
Hi,
I got as far as installing NI488.2 on a clean install of Ubuntu 8.04, but gpibtsw doesn't see my GPIB-USB-HS. Does this approach not work with that device?
Regards,
Roger
10-16-2009 05:54 PM
Hi Roger_b
Sorry for my delay to give you a answer. I suppose that you has already seen the comment about this problem by Shawn. The problem is the kernel version that you are using. I don't know which is the kernel version of Ubuntu 7.10 but if it is less than 2.6.25 you may follow my old manual. I understand that this solution does not like you but my knowledge in linux are insufficient to attack your problem.
Regards
03-03-2010 08:27 PM
I got the GPIB explorer working on Kubuntu 8.04 after a lot of trial and error. I'm a linux newbie, so if I can get through this, anybody can. I kept track of what I did, essentially following the tutorial above. There were problems, however, that required some deviation from Vicente's outline. My procedure is shown here, with terminal commands prefaced with the $ character.
Determine what kernel you have by running
$ uname -r
Mine returned 2.6.24-26-generic, which I then placed in the following command
$ sudo apt-get install linux-headers-2.6.24-26-generic
If you don't have alien, get it now
$ sudo apt-get install alien
Following the tutorial, I did:
$ cd /bin
$ ln -s bash sh
The next step is installing the nikal module. I downloaded the version 1.10 iso image as above, but chose to burn an install CD instead of mounting it on the hard disk as described in the tutorial. I ejected the CD, put it back in, mounted it, and saw that there was an ./INSTALL script ready to go. Do NOT take this shortcut because it will lead to a dead end! You've got to convert those .rpm scripts with alien. I copied the CD contents to the desktop and unzipped nikal-1.10.0f0.tar.gz. Browse to the rpms folder where you'll find nikali-1.10.0-f0.noarch.rpm. Then I executed the following four commands:
$ sudo alien --scripts nikali-1.10.0-f0.noarch.rpm
$ sudo dpkg -i nikali_1.10.0-1_all.deb
$ cd /usr/local/natinst/nikal/bin
$ . nikaliInstallerUtility.sh
There are 3 caveats. 1) When running alien I had to add the --scripts modifier; 2) My converted .deb file has a different name than in the tutorial; 3) Running the installer script as source requires a blank space between the . and first character. If you have a high aspect ratio on your monitor you may not see that space. It is crucial!
I was expecting to see nikaliPostInstall appear at this point, but could not find it. So I went directly to
$ sudo ./updateNIDrivers
When asked to reboot, I entered yes.
After reboot, I did
$ sudo modprobe nikal
A blank return at the command prompt means the module is there OK. Next is the NI488.2 install. Following the tutorial, download the tar.gz file, unzip it, browse to find the INSTALL script and run it
$ sudo ./INSTALL --nodeps
This script generated errors and I was instructed to run ./updateNIDrivers after reboot. I got the reboot query and entered yes. Immediately on reboot, I did:
$ cd /usr/local/natinst/nikal/bin
$ sudo ./updateNIDrivers
which did not make the system happy:
ERROR: make of nikal kernel module failed, not installing kernel module. updateNIDrivers should be called again after fixing the problem.
In addition,
$ sudo modprobe nikal
shows that nikal is missing. Running the update script here was almost certainly a mistake, but absence of the nikal module is exactly what the tutorial indicates will happen. So I went back to Vincente's procedure. Browse back into the rpms folder that was used in the nikal install and do this:
$ sudo dpkg -P nikali
$ sudo dpkg -i nikali_1.10.0-1_all.deb
$ cd /usr/local/natinst/nikal/bin
$ . nikaliInstallerUtility.sh
Again, I emphasize that my .deb file is named differently than in the tutorial and note the critical space after the period in the last command. You should get a query to reboot a third time, so enter yes. After reboot, run modprobe to verify that the three modules nikal, nipalk, and gpibprtk are there.
You can now access the various NI GPIB utilities as well as Labview, from this directory:
$ cd /usr/local/bin
mike
10-23-2010 08:48 PM
I am having problem with this.
$ sudo alien --scripts nikali-1.10.0-f0.noarch.rpm
$ sudo dpkg -i nikali_1.10.0-1_all.deb
$ cd /usr/local/natinst/nikal/bin
$ . nikaliInstallerUtility.sh
I get the following ERROR:
cat: /etc/natinst/nikal/nikal.dir: No such file or directory
what is going on here?
Any help.
Thanks,
D
05-21-2012 01:33 PM
I am running into issues regarding the version of the Linux Kernel. When installing Nikal and running the command as in the above procedure $ ./updateNIDrivers I get the following error message:
********************************* ERROR ***********************************
ERROR: 3.0 kernels are not supported!
Running a 2.4.x or 2.6.x kernel is required to continue this installation.
********************************** ERROR ************************************
I also get this error when installing NI-488.2. Has anyone successfully completed this procedure using a 3.0 kernel or does anyone know of a way around this issue?
I am running kernel version 3.0.0-17-generic on Ubuntu 4.6.1
Thanks,
Dan
