- Subscribe to RSS Feed
- Mark Topic as New
- Mark Topic as Read
- Float this Topic for Current User
- Bookmark
- Subscribe
- Mute
- Printer Friendly Page
Arduino and Dallas DS1820 (one-wire)
Solved!06-02-2011 02:36 AM
- Mark as New
- Bookmark
- Subscribe
- Mute
- Subscribe to RSS Feed
- Permalink
- Report to a Moderator
Hi everybody,
I'm trying to use LabView to read a Dallas DS18B20 one-wire temperature sensor connected to the Arduino. I found this video on youtube: http://www.youtube.com/watch?v=SM_c0cN-Kgs&feature=player_embedded
He did exactly the same thing, I want to do. At the end of the video you can see the LabView diagram. There's an element called "one wire read".
But I can't find this anywhere. Does anybody have an idea?
Thanks and regards,
Chris
(using LabView 2010)
Solved! Go to Solution.
06-02-2011 10:54 AM
- Mark as New
- Bookmark
- Subscribe
- Mute
- Subscribe to RSS Feed
- Permalink
- Report to a Moderator
In the video, Seth mentions that VI is a custom one that he created to handle the one-wire device. I think someone at NI should post that code here somewhere.
06-02-2011 05:12 PM
- Mark as New
- Bookmark
- Subscribe
- Mute
- Subscribe to RSS Feed
- Permalink
- Report to a Moderator
Chrislee,
I'll ping Seth and see if I can get his code. This will likely be included in future version of the toolkit.
-Sam
LIFA Developer
06-03-2011 01:03 PM
- Mark as New
- Bookmark
- Subscribe
- Mute
- Subscribe to RSS Feed
- Permalink
- Report to a Moderator
Hello Chrislee,
I'll post a walkthrough of what I did to modify the toolkit and firmware to support OneWire measurements. It's reasonably simple, but I want to give a decent description in case you want more features.
Principal Test Engineer | National Instruments
Certified LabVIEW Architect
Certified TestStand Architect
06-05-2011 09:41 AM
- Mark as New
- Bookmark
- Subscribe
- Mute
- Subscribe to RSS Feed
- Permalink
- Report to a Moderator
Hi everybody,
thanks for your answers and efforts.
@Seth: It would really be grat, if you could post the code (thanks for that!!!).
@Sammy: I think, making this code part of the toolkit would be very reasonable, since (as much as I know) the DS sensors are very popular in the Arduino community.
06-06-2011 11:01 AM
- Mark as New
- Bookmark
- Subscribe
- Mute
- Subscribe to RSS Feed
- Permalink
- Report to a Moderator
So, in order to add support for new code, there's two things you have to do. The first is to modify the firmware to include the code (in this case, I used the example OneWire code from here but I modified it to remove the check for sensor typed, etc. since I knew which type of sensor I had.) The second is to create or modify a .vi to return the data from the device to LabVIEW.
Changes to Firmware
In my case, since I only planned to read the temperature once on command and not try to address a bunch of sensors at once, I created a static function that handled all the OneWire communication.
To start, I modified LVIFA_Base.pde and added this after #include <Servo.h>:
#inclue <OneWire.h>
Then I modified LabVIEWInterface.pde with the following:
#include <Wire.h>
#include <SPI.h>
#include <LiquidCrystal.h>
#include <OneWire.h>
And then at the end of the case structure:
case 0x1E: // OneWire Read
OneWire_Read()
break;
I choose to wrap the OneWire code as a function to make the case structure a bit cleaner. So, at the bottom I defined the function:
void OneWire_Read()
{
OneWire ds(2); // Create a OneWire Object "ds" on pin 2. Hard coding for now, because I can't declare this in a case.
byte OneWireData[9]; // Defining stuff for the added OneWire function because I'm getting irritated with trying to make this fit into a case or function.
int Fract, Whole, Tc_100, SignBit, TReading;
// Start the Conversion
ds.reset(); // Reset the OneWire bus in preparation for communication
ds.skip(); // Skip addressing, since there is only one sensor
ds.write(0x44); // Send 44, the conversion command
// Wait for the Conversion
delay(1000); // Wait for the conversion to complete
// Read back the data
ds.reset(); // Reset the OneWire bus in preparation for communication
ds.skip(); // Skip addressing, since there is only one sensor
ds.write(0xBE); // Send the "Read Scratchpad" command
for ( byte i = 0; i < 9; i++) {
OneWireData = ds.read(); // Read the 9 bytes into data[]
}
// Scale the data
TReading = (OneWireData[1] << 😎 + OneWireData[0];
SignBit = TReading & 0x8000; // Mask out all but the MSB
if (SignBit) // If the MSB is negative, take the Two's Compliment to make the reading negative
{
TReading = (TReading ^ 0xffff) + 1; // 2's comp
}
Tc_100 = (6 * TReading) + TReading / 4; // Scale by the sensitivity (0.0625°C per bit) and 100
Whole = Tc_100 / 100; // Split out the whole number portion of the reading
Fract = Tc_100 % 100; // Split out the fractional portion of the reading
// Return the data serially
if (SignBit) { // If the reading is negative, print a negative sign
Serial.print("-");
}
Serial.print(Whole); // Print the whole number portion and a decimal
Serial.print(".");
if (Fract < 10) { // if the fraction portion is less than .1, append a 0 decimal
Serial.print("0");
}
Serial.print(Fract); // Otherwise print the fractional portion
}
So now, whenever we call case "1E" then the OneWire_Read() function is called and the temperature is printed as a serial message.
Creating a LabVIEW VI
So, now we need a LabVIEW VI to interface with this function call. To do this, I simplified the Digital Read VI and modified it to call case 1E, which is what we added:

This requests case 1E to run and then returns the 5 bytes written serially. This gives back the reading in celsius.
Here are the associated files:
Principal Test Engineer | National Instruments
Certified LabVIEW Architect
Certified TestStand Architect
06-07-2011 10:06 AM
- Mark as New
- Bookmark
- Subscribe
- Mute
- Subscribe to RSS Feed
- Permalink
- Report to a Moderator
Seth,
Thank you for taking the time to upload your code and write up this tutorial.
I wanted to let everyone know that the LabVIEW portion of addition your own sensors is even easier. Seth was working with an early BETA of the toolkit which did not include the Send / Receive helper VI. His custom VI can now be simplified to the following:
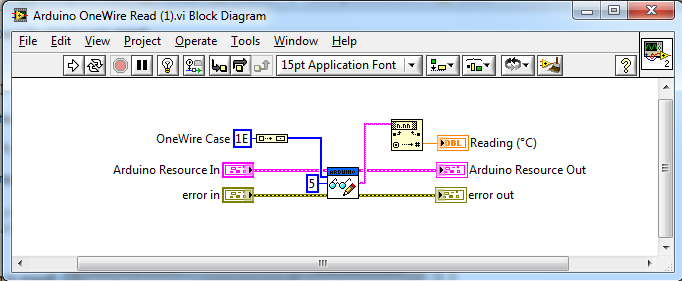
This VI is attached below.
Also keep in mind that as we add 'official' sensors to the toolkit we will be using command values in increasing order. We are currently using commands 0x00 - 0x29 and I'm always working to add more. If you want to develop your own sensors I recommend starting with command 0xFF and working your way down. This should prevent you needing to updated your custom code when a new version of the toolkit is released. Also please share any custom sensors you create and post in our Sensor Support Request thread if there is a sensor you would like to see added to the toolkit.
-Sam
LIFA Developer
08-20-2011 11:56 PM
- Mark as New
- Bookmark
- Subscribe
- Mute
- Subscribe to RSS Feed
- Permalink
- Report to a Moderator
Sam/Seth,
I'm having trouble implementing this interface. I can get the arduino code to work just fine, but cannot get any data into labview. I have connected a serial LCD to the arduino and entered print commands at various points of the arduino code. What I have found is the arduino code never seems to get to the 1-wire case. The labview vi does not seem to be sending the proper packet to activate the case. Is there a reason the code is titled _2009? Does this not work with the 2010 version of Labview? What can I do to trouble shoot this out further?
Thanks.
01-18-2012 07:28 PM
- Mark as New
- Bookmark
- Subscribe
- Mute
- Subscribe to RSS Feed
- Permalink
- Report to a Moderator
I appreciate the info on the one wire sensors. I was able to get this code to work for a single sensor. I would like to add sensors, but I am not very good with the source code. Is there any additional information on what I need to do to read in multiple one wire sensors in labview? thanks for the Help
04-08-2012 01:12 PM
- Mark as New
- Bookmark
- Subscribe
- Mute
- Subscribe to RSS Feed
- Permalink
- Report to a Moderator
Sam & Seth - you are super awesome! Your information was very usefull and informative! 
Many thanks!!! 
