- Subscribe to RSS Feed
- Mark Topic as New
- Mark Topic as Read
- Float this Topic for Current User
- Bookmark
- Subscribe
- Mute
- Printer Friendly Page
Adding serial ports to the Arduino Uno
11-17-2013 07:35 PM
- Mark as New
- Bookmark
- Subscribe
- Mute
- Subscribe to RSS Feed
- Permalink
- Report to a Moderator
Here is a description how to add a serial port to the Arduino Uno, using the SoftwareSerial library and
the LIFA Serial vi that can be found in the discussions for the Labview Interface for Arduino.
The goal is to control amateur radio transceivers via a software serial port on the Arduino
and generate the data formats with Labview. For example I want to use this setup to scan a
amateur radio band with a low power signal and record the SWR of antennas that I have assembled.
The transceiver I am using, the ICOM 706 MKIIG can be controlled with the ICOM communication
Interface-V CI-V.
1. Download the LIFA-Serial vi's:
https://decibel.ni.com/content/thread/16932
2. Unzip the file and implement the vi's as user library
(Implementation in the user.lib is optional)
3. Include the SoftwareSerial library in the LIFA Base:
#include <Wire.h>
#include <SPI.h>
#include <Servo.h>
#include "LabVIEWInterface.h"
#include <SoftwareSerial.h>
4. Define pins for SoftwareSerial in LabVIEWInterface$:
// Variables
unsigned int retVal;
int sevenSegmentPins[8];
int currentMode;
unsigned int freq;
unsigned long duration;
int i2cReadTimeouts = 0;
char spiBytesToSend = 0;
char spiBytesSent = 0;
char spiCSPin = 0;
char spiWordSize = 0;
Servo *servos;
byte customChar[8];
LiquidCrystal lcd(0,0,0,0,0,0,0);
unsigned long IRdata;
SoftwareSerial UnoSerial(2,3); //RX,TX added 10/16/13
IRsend irsend;
5. Modify the Addon text file included in theLIFA Serial package:
case 0x40: // Initialize Serial
UnoSerial.begin(((command[3])+(command[2]<<8))*100); //Serial1 replaced with UnoSerial
Serial.write('0');
break;
case 0x41: // Send Serial Data
for(int i=0; i<command[2]; i++)
{
UnoSerial.write(command[i+3]);
}
Serial.write('0');
break;
case 0x42: // Read Serial Data
int i;
i = UnoSerial.available();
Serial.write(i);
for (int j=0; j<i; j++)
{
Serial.write(UnoSerial.read());
}
break;
case 0x43: // End Serial Communication
UnoSerial.end();
Serial.write('0');
break;
6. Insert the modifications in the LIFA Base for Arduino and upload the new sketch.
7. Replace the file <command.ctl> in the LabviewInterface for Arduino (folder Type Defs)
with the command.ctl that is included in the LIFA Serial package.
8. Test of serial TX:
Attached is a vi I created to test the serial port: UnoSerial Tx test.vi

A test pattern is generated in a while loop, so that the bits sent via the serial
port can be analyzed with an oscilloscope. The probe of the oscilloscope is connected
via a 1K resistor in series to pin 3.
The array will later be used to generate the data format needed to communicate with
the IC 706 MKIIG which uses a CI-V system.
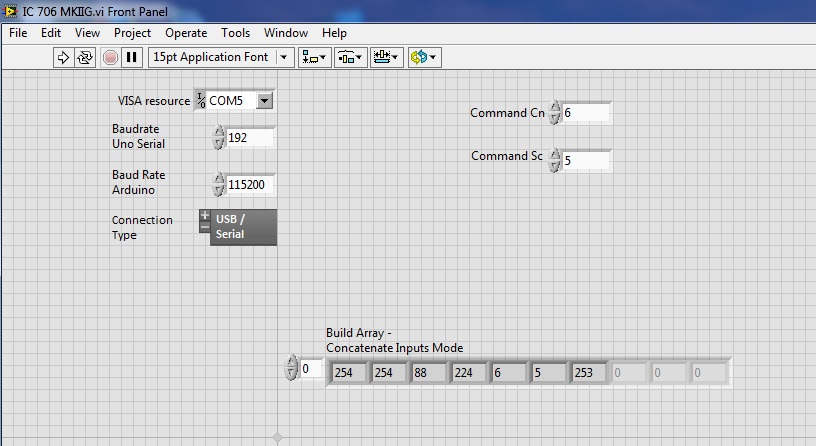
8. Controlling the ICOM 706 MKIIG.
Attached is also a short vi that shows how to control the IC706MKIIG via a software
serial port on the Arduino. In the example the operating mode is set to FM.
The baud rate of the serial port on pins 2,3 is set to 19200.
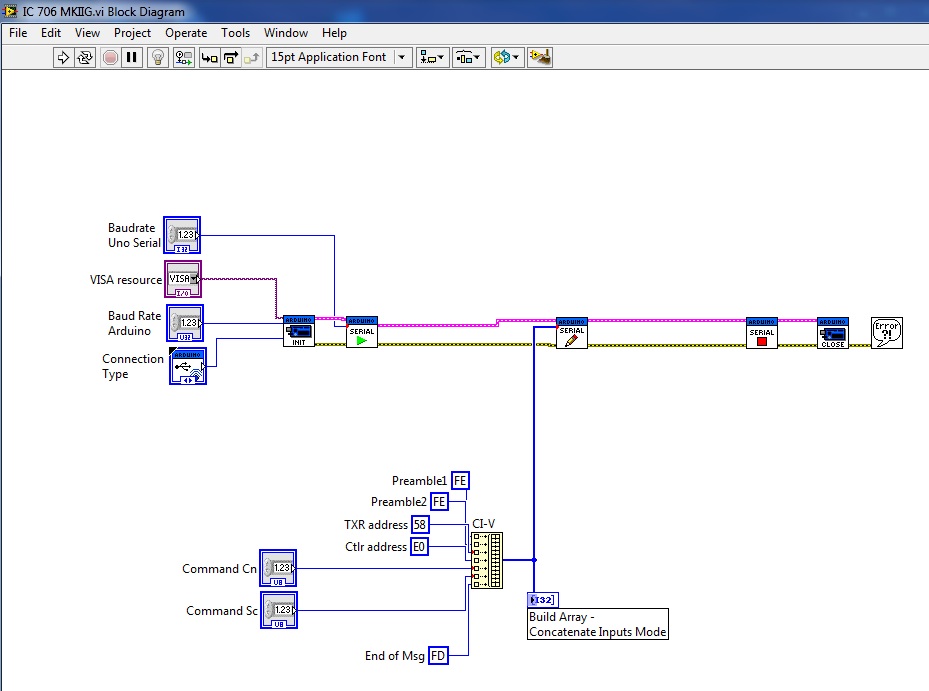
So far transmitting data via the software serial port is working, reading data will be the next step.
Your feedback and inputs are welcome.
