From 04:00 PM CDT – 08:00 PM CDT (09:00 PM UTC – 01:00 AM UTC) Tuesday, April 16, ni.com will undergo system upgrades that may result in temporary service interruption.

We appreciate your patience as we improve our online experience.

LabVIEW Interface for Arduino Discussions

cancel
Showing results for 
Search instead for 
Did you mean: 

Help with my project using LabView

Hello all!

I'm using an Arduino Mega 2560 to control a garden irrigation system. I have connected the following modules on it:


DHT11 (temperature + humidity sensor) connected to Digital Pin 2
Soil Moisure sensor connected to analog pin A0
2 Relay Module conected to digital pins 8 and 9
HC-SR04 Ultrasonic Sensor (measures distance) connected to digital pins 12 (trigger) and 11 (echo)

I need a simple GUI to show each of these modules reading values. There will be no input from this program to the arduino, everything is controlled by the arduino itself.

For DHT11, Soil sensor and distance sensor, I only need to read from arduino and print the values. For the relays just print whether it is on or off.

So far I configured LabVIEW with arduino tool kit and also added labview libraries to my arduino program. But I'm having a hard time trying to develop my labview project.

Can someone give me a hand?

Thanks in advance!!

0 Kudos
Message 1 of 13
(8,114 Views)

It sounds like you are trying to do more than one thing on the Arduino simultaneously.  You generally can't do this.  You would need to either implement everything in LabVIEW with LIFA or you would need to create custom functions in LIFA that read these sensors directly.

The other alternative, since you already have it implemented would be to simply use LabVIEW as a "Serial reader" and display the values when they are available.

Maybe if you post your original code (without LIFA) and then your code with LIFA so that we can see what you are trying to do and what you have done.

0 Kudos
Message 2 of 13
(4,880 Views)

Hi Nathan, thanks for your prompt response.

I guess your second option is what I'm looking for on this GUI.

This is an irrigation system for a backyard garden, so everything should be controlled by the arduino. I included a Bluetooth module so I can access the arduino information through a computer a few meters away from this garden.

That is why I want a GUI to show me the conditions of the garden irrigation system in a friendly interface.

I will add my code here, but first I need to let you know that I could not make LabView comunicate with my arduino just importing the LIFA library on the IDE 'Import Library..' option. Seems it only works when I open LIFA_Base along with all other files. This way I had to input my code directly on LIFA_Base file. So, I'm pasting here my original code and my Code inserted inside LIFA_Base code.

Original

#include <dht11.h>
#include <NewPing.h>
#define TRIGGER_PIN  12 
#define ECHO_PIN     11 
#define MAX_DISTANCE 200

NewPing sonar(TRIGGER_PIN, ECHO_PIN, MAX_DISTANCE);
int valorsensor;
dht11 sensor;
int uS;

void setup() {

  Serial.begin(57600); 
  pinMode(9, OUTPUT);  
  pinMode(8, OUTPUT);  
  digitalWrite(9, LOW); 
  digitalWrite(8, LOW); 
  delay(5000);
}

void loop() {

  uS = sonar.ping();

  while ((uS / US_ROUNDTRIP_CM) > 10) {

    valorsensor = analogRead(0);   

    Serial.print("Water level: ");
    Serial.print(uS / US_ROUNDTRIP_CM);
    Serial.println("cm");

    int chk = sensor.read(2);
    switch(chk) {
    case DHTLIB_OK:
      break;
    case DHTLIB_ERROR_CHECKSUM:
      Serial.println("Error checksum");
      break;
    case DHTLIB_ERROR_TIMEOUT:
      Serial.println("Timeout");
      break;
    default:
      Serial.println("unknown error");
    }
  
    Serial.print("Humidity (%): ");
    Serial.println((float)sensor.humidity, 2);
    Serial.print("Temperature (Celsius): ");
    Serial.println((float)sensor.temperature, 2);
    delay(1000);
    uS = sonar.ping();
    Serial.print("Soil = " );    
    Serial.println(valorsensor);
    {
      if(valorsensor > 600) {
        digitalWrite(9, HIGH);
        Serial.println("water pump on");
        delay(8000);
        digitalWrite(8, HIGH);
        Serial.println("solenoid valve on");
        delay(10000);
        digitalWrite(8, LOW);
        Serial.println("solenoid valve off");
        delay(8000);
        digitalWrite(9, LOW);
        Serial.println("water pump off");
      }
      else {
        Serial.println("soil ok");
      } 
    }
    Serial.println();
    delay(5000);                    
  }
 
  Serial.println("Water level too low!!");
  digitalWrite(9, LOW);
  delay(5000);
}

With LIFA

#include <Wire.h>
#include <SPI.h>
#include <Servo.h>
#include "LabVIEWInterface.h"
#include <dht11.h>
#include <NewPing.h>

#define TRIGGER_PIN  12 
#define ECHO_PIN     11 
#define MAX_DISTANCE 200


NewPing sonar(TRIGGER_PIN, ECHO_PIN, MAX_DISTANCE);
int valorsensor;
dht11 sensor;
int uS;

void setup() {

  Serial.begin(57600); 
  pinMode(9, OUTPUT);  
  pinMode(8, OUTPUT);  
  digitalWrite(9, LOW); 
  digitalWrite(8, LOW); 
  delay(5000);
}


void loop()
{  
  // Check for commands from LabVIEW and process them.  

  checkForCommand();
  // Place your custom loop code here (this may slow down communication with LabVIEW)
  { //inicio do loop
    uS = sonar.ping();

    while ((uS / US_ROUNDTRIP_CM) > 10) {

      valorsensor = analogRead(0);   

      Serial.print("Water level: ");
      Serial.print(uS / US_ROUNDTRIP_CM);
      Serial.println("cm");

      int chk = sensor.read(2);
      switch(chk) {
      case DHTLIB_OK:
        break;
      case DHTLIB_ERROR_CHECKSUM:
        Serial.println("Error checksum");
        break;
      case DHTLIB_ERROR_TIMEOUT:
        Serial.println("Timeout");
        break;
      default:
        Serial.println("unknown error");
      }

      Serial.print("Humidity (%): ");
      Serial.println((float)sensor.humidity, 2);
      Serial.print("Temperature (Celsius): ");
      Serial.println((float)sensor.temperature, 2);
      delay(1000);
      uS = sonar.ping();
      Serial.print("Soil = " );    
      Serial.println(valorsensor);
      {
        if(valorsensor > 600) {
          digitalWrite(9, HIGH);
          Serial.println("water pump on");
          delay(8000);
          digitalWrite(8, HIGH);
          Serial.println("solenoid valve on");
          delay(10000);
          digitalWrite(8, LOW);
          Serial.println("solenoid valve off");
          delay(8000);
          digitalWrite(9, LOW);
          Serial.println("water pump off");
        }
        else {
          Serial.println("soil ok");
        } 
      }
      Serial.println();
      delay(5000);                    
    }

    Serial.println("Water level too low!!");
    digitalWrite(9, LOW);
    delay(5000);
  }


  if(acqMode==1)
  {
    sampleContinously();
  }

}

0 Kudos
Message 3 of 13
(4,880 Views)

Yeah, so, one thing about LIFA is that it is a whole infrastructure.  It uses a serial protocol that requires it to know everything that is being sent over the serial line.  So, you can't send any communication over serial when using LIFA unless it is integrated into the architecture of LIFA.  That is why it will not work by simply pasting the code into LIFA_Base.ino.

0 Kudos
Message 4 of 13
(4,880 Views)

Hi Nathan,

Yes, that was what I meant, I added my original code in the LIFA_Base and opened it along with all the other files. This way I manage to correctly communicate LabView and Arduino That is how it looks:

autolifa.jpg

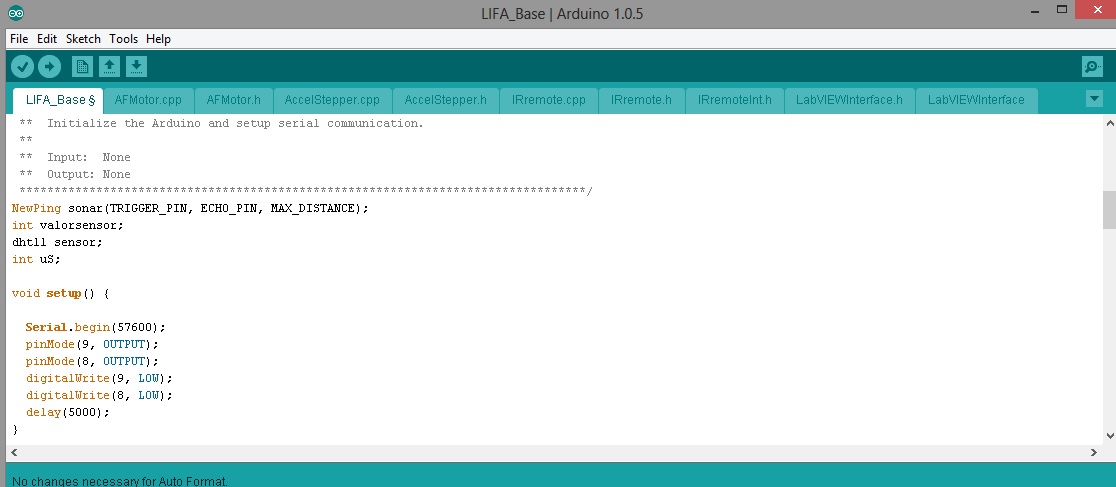
Base on that and looking at my original code, do you think it is possible to simple read and print all sensor values on a LabView interface?

Thanks!

Diego

0 Kudos
Message 5 of 13
(4,880 Views)

Like I said before, if you just want to read and display values with LabVIEW then you can simply build a serial monitor that parses the data.

If you actually want to be able to control things from LabVIEW, you will need to integrate each sensor into the framework of LIFA by adding a custom function for each of the functions/sensors that are not already implemented in LIFA.  This involves adding a function to the LIFA firmware and a corresponding VI in LabVIEW to access that function.

0 Kudos
Message 6 of 13
(4,880 Views)

Huumm.. Got it!!

I will try to build my LabView program as a serial monitor then, since it suffices my needs. I'll search for examples here on the forum. If you have any good example by hand please share with me. I'm still a begginer with LabView so examples help a lot

0 Kudos
Message 7 of 13
(4,880 Views)

I'm stuck trying to insert my code inside LIFA_Base.

I already put my code inside LIFA_Base and kept all other files as they were, as I pasted before:

autolifa.jpg

Only LIFA_Base was changed. This is the code:

Arduino Code inside LIFA_Base

/*********************************************************************************
**
**  LVFA_Firmware - Provides Basic Arduino Sketch For Interfacing With LabVIEW.
**
**  Written By:    Sam Kristoff - National Instruments
**  Written On:    November 2010
**  Last Updated:  Dec 2011 - Kevin Fort - National Instruments
**
**  This File May Be Modified And Re-Distributed Freely. Original File Content
**  Written By Sam Kristoff And Available At www.ni.com/arduino.
**
*********************************************************************************/


/*********************************************************************************
**
** Includes.
**
********************************************************************************/
// Standard includes.  These should always be included.
#include <Wire.h>
#include <SPI.h>
#include <Servo.h>
#include "LabVIEWInterface.h"
#include <dht11.h>
#include <NewPing.h>
#define TRIGGER_PIN  12  // Pin do arduino conectado ao trigger do sensor ultrassonico
#define ECHO_PIN     11  // Pin do arduino conectado ao echo do sensor ultrassonico
#define MAX_DISTANCE 400 // Distância máxima (em cm)

/*********************************************************************************
**  setup()
**
**  Initialize the Arduino and setup serial communication.
**
**  Input:  None
**  Output: None
*********************************************************************************/
NewPing sonar(TRIGGER_PIN, ECHO_PIN, MAX_DISTANCE); // Setup dos pins e distância máxima da variável do sonar
int valorsensor; // variável sensor de umidade do solo
dht11 sensor; // variável especial para leitura da temperatura e umidade do ar (sensor dht11)
int uS;

void setup()

  Serial.begin(57600);  // Inicializa comunicação serial
  pinMode(9, OUTPUT);   // Define o pin 9 (relay) como output
  pinMode(8, OUTPUT);   // Define o pin 9 (relay) como output
  digitalWrite(9, LOW);  // Desliga relay
  digitalWrite(8, LOW);  // Desliga relay
  delay(5000);
}


/*********************************************************************************
**  loop()
**
**  The main loop.  This loop runs continuously on the Arduino.  It
**  receives and processes serial commands from LabVIEW.
**
**  Input:  None
**  Output: None
*********************************************************************************/
void loop()
{  
  // Check for commands from LabVIEW and process them.  

  checkForCommand();
  // Place your custom loop code here (this may slow down communication with LabVIEW)
  uS = sonar.ping(); // atribui à variável o valor do ping (distância) em microsegundos (uS)

  while ((uS / US_ROUNDTRIP_CM) > 10) { //checa se o valor do nível do tanque é maior que 10cm. Caso esteja acima segue com as demais funções

    valorsensor = analogRead(0);    // o valor em A0 e atribui à variável

    Serial.print("Nivel no tanque: ");
    Serial.print(uS / US_ROUNDTRIP_CM); // Converte o tempo de ping em distância (cm) e imprime no monitor. (0 = fora do range ou sem retorno do eco)
    Serial.println("cm");

    int chk = sensor.read(2); //atribui a variável chk o valor lido pelo sensor de temperatura no pino 2
    // verifica erros no leitor de temperatura e umidade do ar
    switch(chk) {
    case DHTLIB_OK: // caso o check der ok faz nada se não imprime o erro
      break;
    case DHTLIB_ERROR_CHECKSUM:
      Serial.println("Erro no checksum");
      break;
    case DHTLIB_ERROR_TIMEOUT:
      Serial.println("Tempo esgotado");
      break;
    default:
      Serial.println("Erro desconhecido");
    }
    //imprimi os valores de temperatura e umidade do ar
    Serial.print("Umidade do ar (%): ");
    Serial.println((float)sensor.humidity, 2); //imprime valor da umidade do ar
    Serial.print("Temperatura (graus Celsius): ");
    Serial.println((float)sensor.temperature, 2); //imprime valor da temperatura
    delay(1000);
    uS = sonar.ping(); // Check do ping (distância) dentro do loop while
    Serial.print("Umidade solo = " );    
    Serial.println(valorsensor); // imprime valor da umidade do solo no monitor serial
    {
      if(valorsensor > 600) {
        digitalWrite(9, HIGH); //ativa o relay da bomba caso o sensor de umidade do solo esteja >600
        Serial.println("ativando bomba");

        int i = 1;
        while ((i<=8000) && ((uS / US_ROUNDTRIP_CM) > 10))   // loop while checa nível do tanque enquanto irriga
        {
          uS = sonar.ping(); // Check do ping (distância) dentro do loop while
          delay(1);
          i++;
          Serial.print("i = ");
          Serial.println(i,DEC);
        }    

        digitalWrite(8, HIGH); //ativa o relay da valvula de fertilização
        Serial.println("ativando solenoide");

        i = 1;
        while ((i<=8000) && ((uS / US_ROUNDTRIP_CM) > 10))   // loop while checa nível do tanque enquanto irriga
        {
          uS = sonar.ping(); // Check do ping (distância) dentro do loop while
          delay(1);
          i++;
          Serial.print("i = ");
          Serial.println(i,DEC);
        }

        digitalWrite(8, LOW); //desativa o relay da valvula de fertilização
        Serial.println("desativando solenoide");

        i = 1;
        while ((i<=8000) && ((uS / US_ROUNDTRIP_CM) > 10))   // loop while checa nível do tanque enquanto irriga
        {
          uS = sonar.ping(); // Check do ping (distância) dentro do loop while
          delay(1);
          i++;
          Serial.print("i = ");
          Serial.println(i,DEC);
        }

        digitalWrite(9, LOW);
        Serial.println("desativando bomba"); // desativa o relay da bomba caso o sensor de umidade do solo esteja <600
      }
      else { // se o sensor do solo marcar > 600 apenas imprime a informação
        Serial.println("Boa umidade do solo");
      } 
    }
    Serial.println();
    delay(5000);                    
  }
  //caso o n;ivel do tanque esteja abaixo de 10cm desliga o relay(bomba) por segurança e imprime o alerta
  Serial.println("Nivel do tanque baixo!!");
  digitalWrite(9, LOW);
  delay(5000);

  if(acqMode==1)
  {
    sampleContinously();
  }

}

Now, the problem. Whenever I upload this code I get no errors. But when it starts, the Ultrasonic distance module (HC-SR04) keeps sending 0cm doesnt matter the real distance.

If I upload the same code out of LIFA structure It runs normally and distance is correctly read from the sensor.

I guess I need to change some other file from LIFA structure other than LIFA_Base, but I could not find how to do that.

Can someone help me?

0 Kudos
Message 8 of 13
(4,880 Views)

When implementing new things into LIFA you cannot start printing in to serial in the loop().  LIFA is based on a framework and anything added to it must also be within that framework.  Adding serial prints anywhere outside of this framework prevents LIFA from running correctly.

The first step to adding functions to LIFA is duplicating an existing function like digital read or analog read.  So, you duplicate one of these functions first with a new command index and likewise on the LabVIEW side and test it to make sure it works (meaning that you duplicated it correctly).

Then, once that is working, you can modify it to add your functionality.  99% of all the changes I make to LIFA are in LabVIEWInterface.ino which is where you will see the LIFA framework.  It's rare to need to modify LIFA_Base.

Moral of the story is that copy pasting code is not possible with LIFA.  So, try and duplicate a function and if that works, modify it to add some of your custom code.

0 Kudos
Message 9 of 13
(4,880 Views)

Nathan,

I tried here, but don't know how to do that. In fact I thought I could include my code inside LIFA_Base or LabVIEWinterface in a way both the custom code and LIFA structure could work in parallel. Since I cannot upload two codes, if I cannot run my code and LIFA together, then there is no way to make this interface using LabView

I'm a bit frustrated about that since I understand that LIFA should interact with arduino without preventing it from running instructions by its own, in other words, I guess several project ideas would need to be able to run controlling instructions and talk to LabView at the same time.

No one ever get success on that?

0 Kudos
Message 10 of 13
(4,880 Views)