- Subscribe to RSS Feed
- Mark Topic as New
- Mark Topic as Read
- Float this Topic for Current User
- Bookmark
- Subscribe
- Mute
- Printer Friendly Page
NI sbRIO GPIC Evaluation Kit - Opening the Box and Getting Started!
02-18-2013 08:28 PM
- Mark as New
- Bookmark
- Subscribe
- Mute
- Subscribe to RSS Feed
- Permalink
- Report to a Moderator
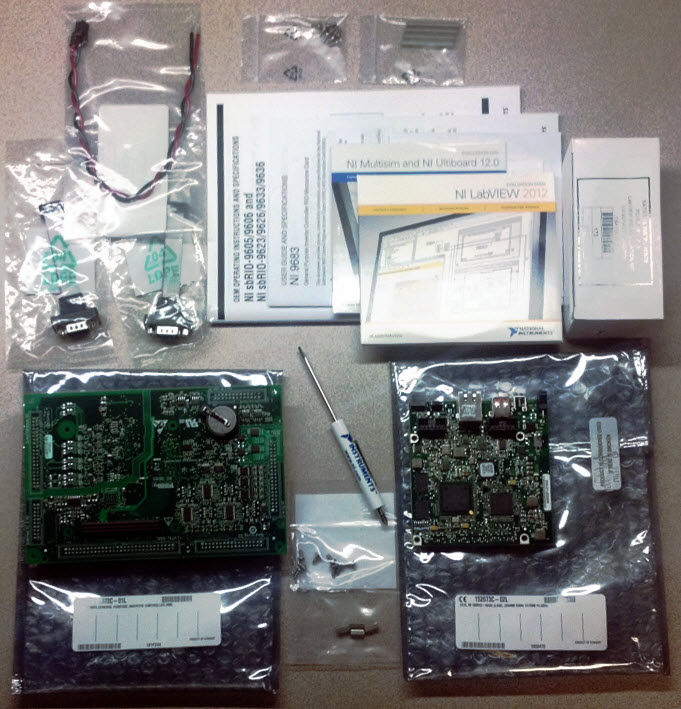
The first thing to do is assemble your sbRIO General Purpose Inverter Controller Stack. Ground yourself before opening the bags since the raw circuit boards are static sensitive. Below is a phot showing the contents of the NI sbRIO GPIC Evaluation Kit.
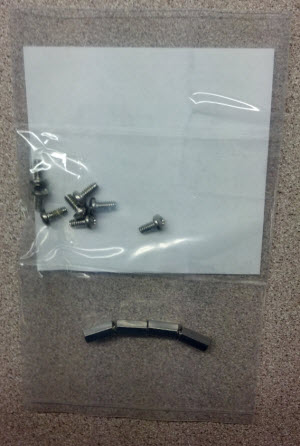
Locate the bag containing quantity 4 of the 0.380" Long Standoffs and quantity 8 of the 4-40x1/4" Phillips Pan Screws.
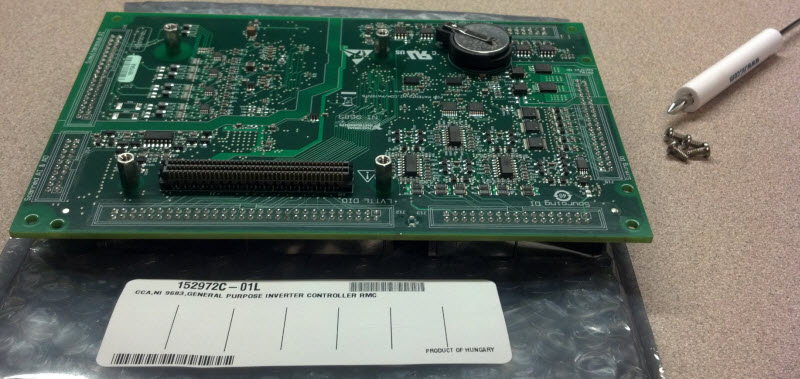
Install these special length standoffs onto the NI 9683 GPIC RIO Mezzanine Card as shown below. You will need to use the NI screwdriver (included) to tighten the screws because the threads on the 4-40 screws contain a retention compound. For more information about the NI 9683 GPIC mezzanine card, see the NI 9683 User Guide and Specifications.
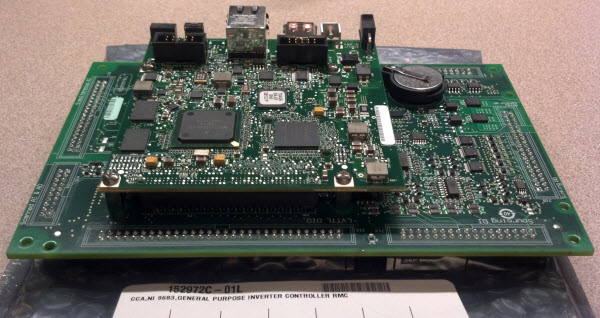
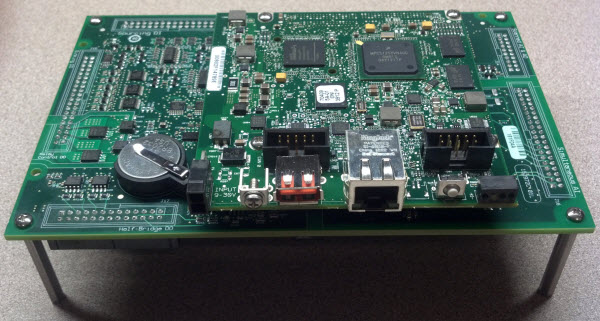
Then install the sbRIO-9606 processor and FPGA board onto the RMC connector and secure it using the remaining four screws as shown below.
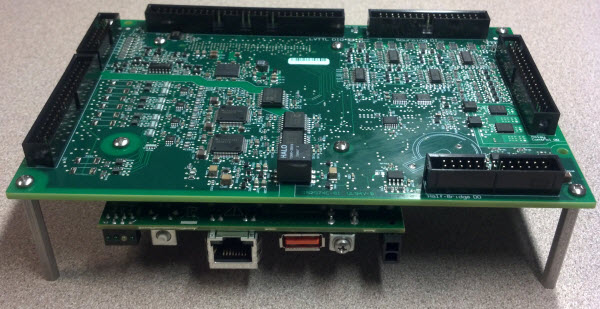
If you are using the sbRIO GPIC system standalone, install the 1.5" standoffs in either bottom or top orientation as desired. Photos of both orientations are shown below.
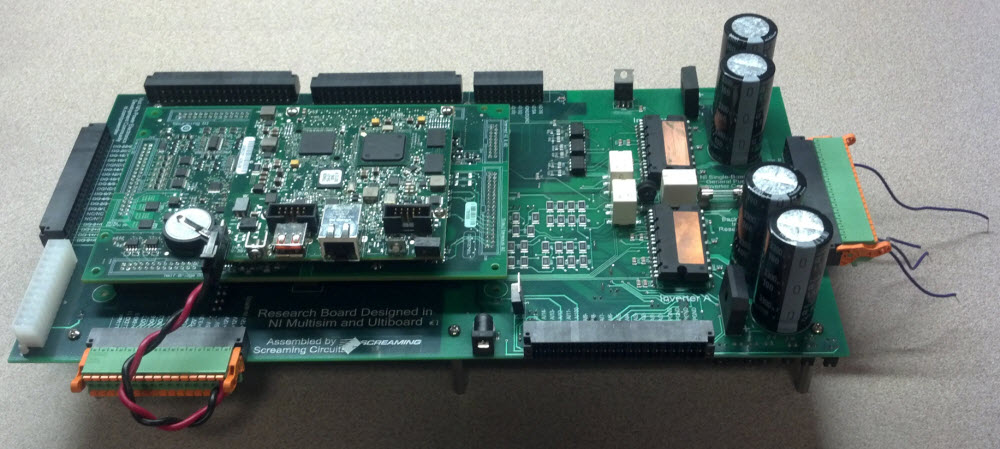
Or, if you are using the open source GPIC back-to-back 3-phase inverter research board, install the NI sbRIO GPIC on the inverter mating board as shown.
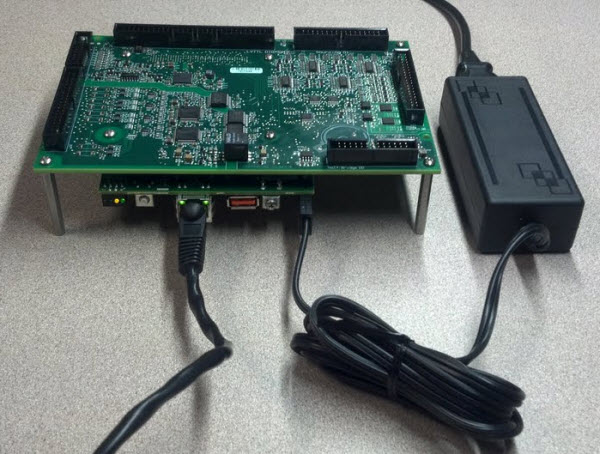
Connect an Ethernet cable (not included) to the sbRIO-9606. Connect the PS-2 power supply with 2-position plug (included) to the sbRIO-9606. Connect a power cord appropriate for your region (not included) to the PS-2 power supply with 2-position plug. After booting, the sbRIO-9606 orange Status LED should blink twice every few seconds, indicating that no software is installed. For more information, see the NI sbRIO-9605/9606/9623/9626/9633/9636 OEM Operating Instructions and Specifications.
Below is a list of NI power cord part numbers by region:
Description | NI Part Number |
Power Cord, AC, U.S., 120 VAC, 2.3 meters | 763000-01 |
Power Cord, 240V, 10A, North American | 763068-01 |
Power Cord, AC, Japan, 100 VAC | 763634-01 |
Power Cord, 240V, 10A, U.K. | 763064-01 |
Power Cord, 220V, 10A, Swiss | 763065-01 |
Power Cord, 240V, 10A, Australia | 763066-01 |
Power Cord, 240V, 10A, Euro, Right Angle | 763067-01 |
Make sure you have the required software installed on your computer. See the list on the NI Power Electronics Design Guide download page. In particular, you will need NI RIO and the NI CompactRIO Module Software 14.5 or higher. Training material and the GPIC Reference Design Code (unzip to a short path like C:\Powerdev... not your desktop) and is available from the design V training course web page below.
NI Power Electronics Control Design V Training Course
In particular, view the first tutorial video which demonstrates how to setup and configure your sbRIO GPIC on the network and download the GPIC Reference Design code to the real-time operating system and FPGA.
You might also be interested in the following older material:
Download the NI Power Electronics Design Guide and Evaluation Software
Here are detailed instructions on setting up your sbRIO GPIC for the first time and installing the firmware on it.
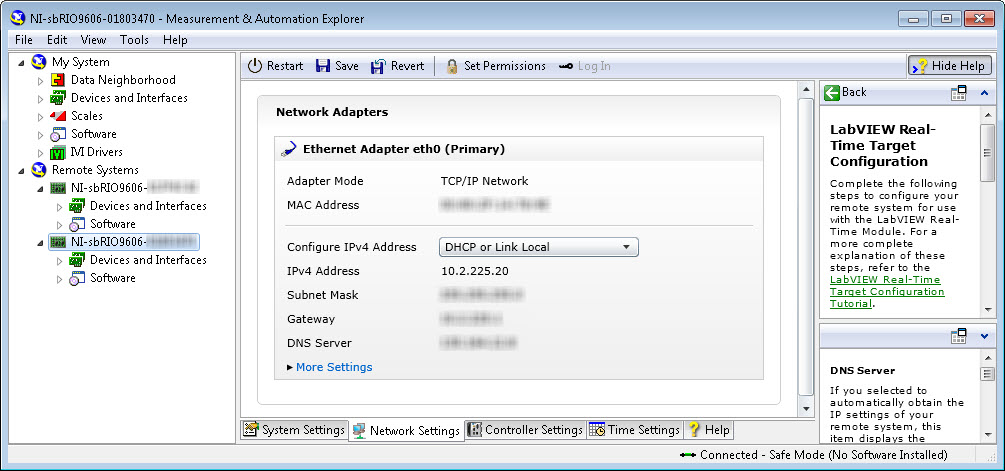
Launch NI MAX application, by clicking the shortcut on your desktop. Expand Remote Systems and you should see the NI-sbRIO9606 system. If the system does not appear under the Remote Systems tab, ensure that it is connected to the same Ethernet switch and subnet as your computer, then navigate to View>Refresh.
Notes:
- If the sbRIO-9606 system does not appear with an IP Address under your local subnet and the Software tab is not visible under the system, go to the Controller Settings tab and check the IP Reset box. Then click the Restart button. After the system has rebooted, uncheck the IP Reset box.
- The MAC Address is included on a label on the sbRIO-9606 if you ever need to identify which one you're connected to.
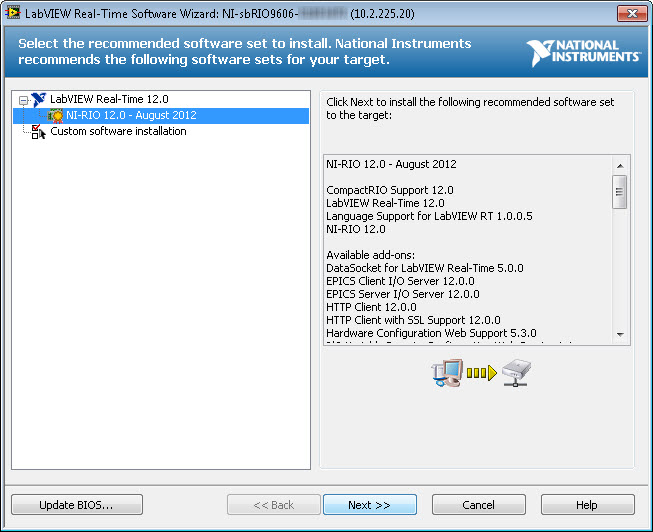
For your new GPIC you will need to install the embedded systems software.Click on the Software tab under the NI-sbRIO9606 system and click the Add/Remove Software button. Select NI-RIO 12.0 - August 2012 or higher. Then click Next to select the software items to install.
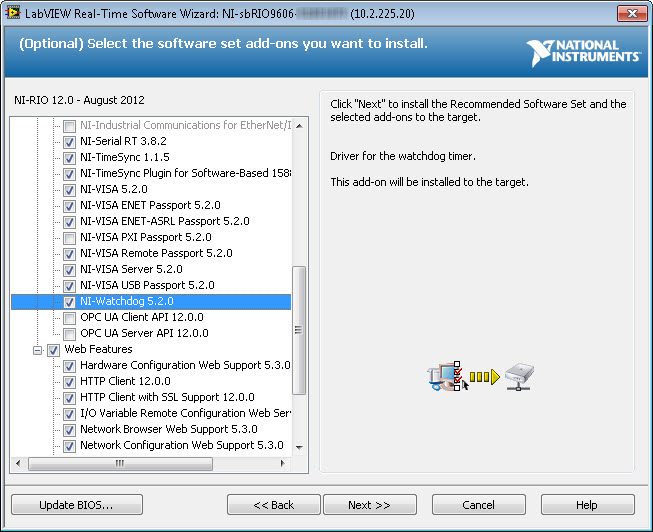
In particular, NI System Configuration, System State Publisher, Network Streams, and NI Watchdog are required.
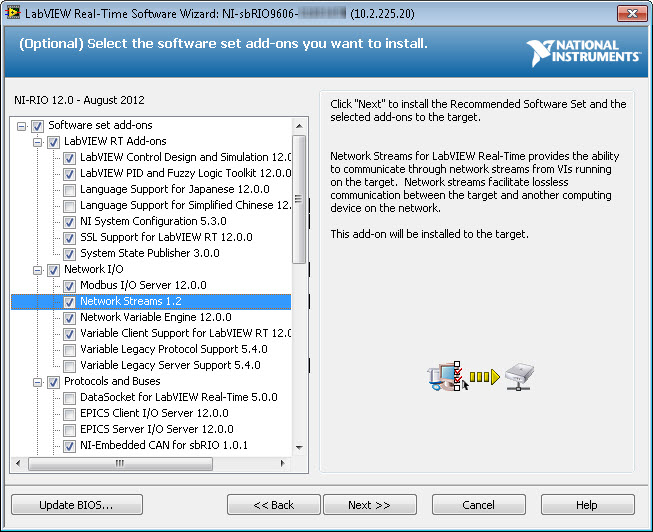
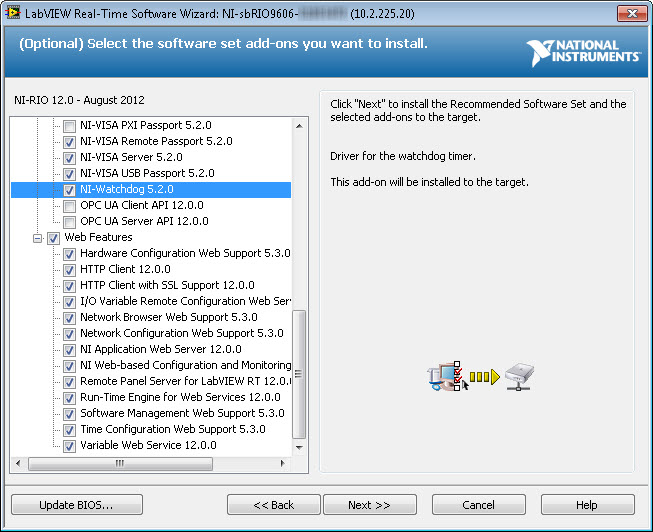
Here is a typical firmware installation list.
LabVIEW RT Add-Ons
• NI System Configuration
• System State Publisher
Network I/O
• Network Streams
Protocols and Buses
• NI-Watchdog
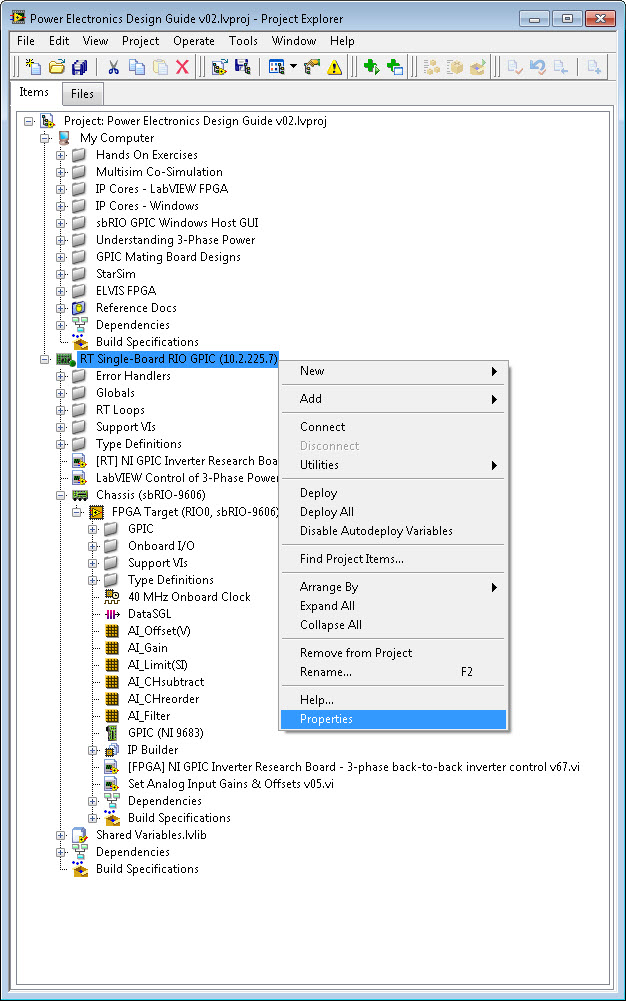
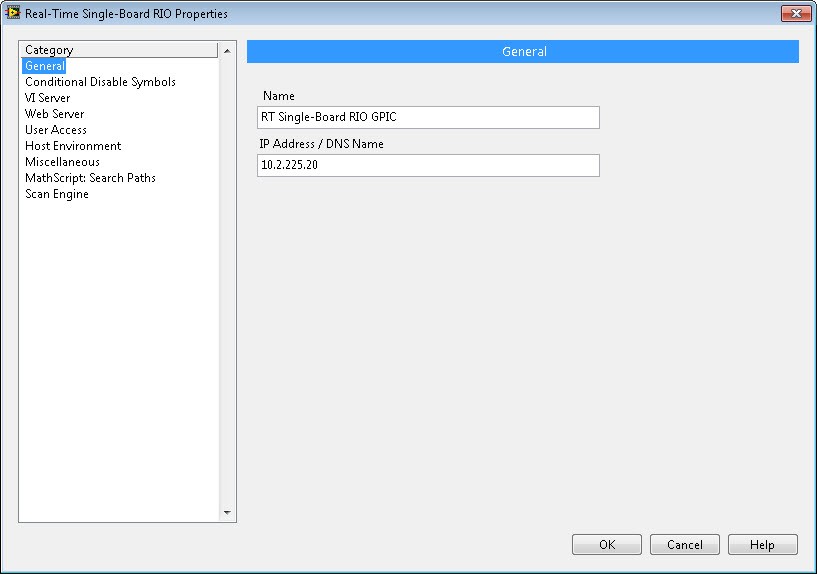
Then launch LabVIEW and open the NI Power Electronics Design Guide Project. Right-click on the RT Single-Board RIO GPIC target, go to Properties, enter the IP Address, and click OK.
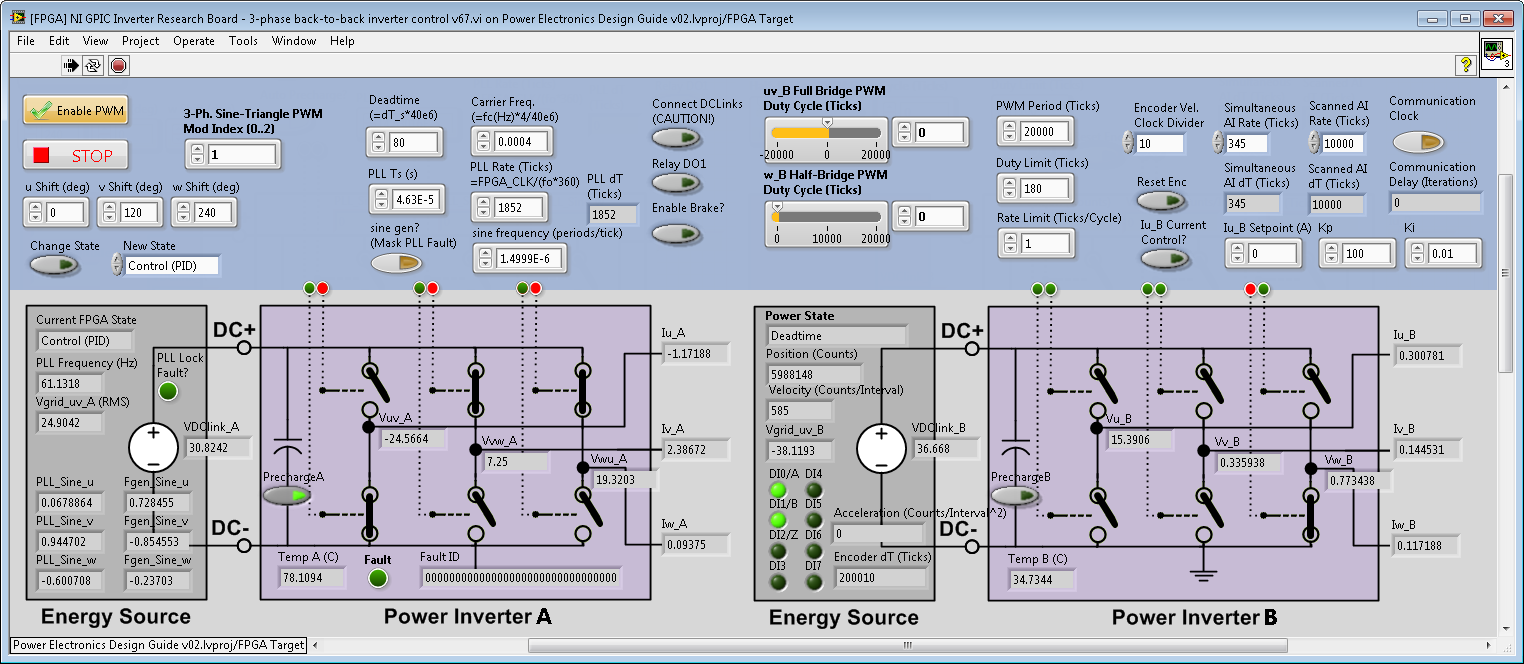
Then run the FPGA application, "[FPGA] NI GPIC Inverter Research Board - 3-phase back-to-back inverter control v__.vi". You will need to compile it.
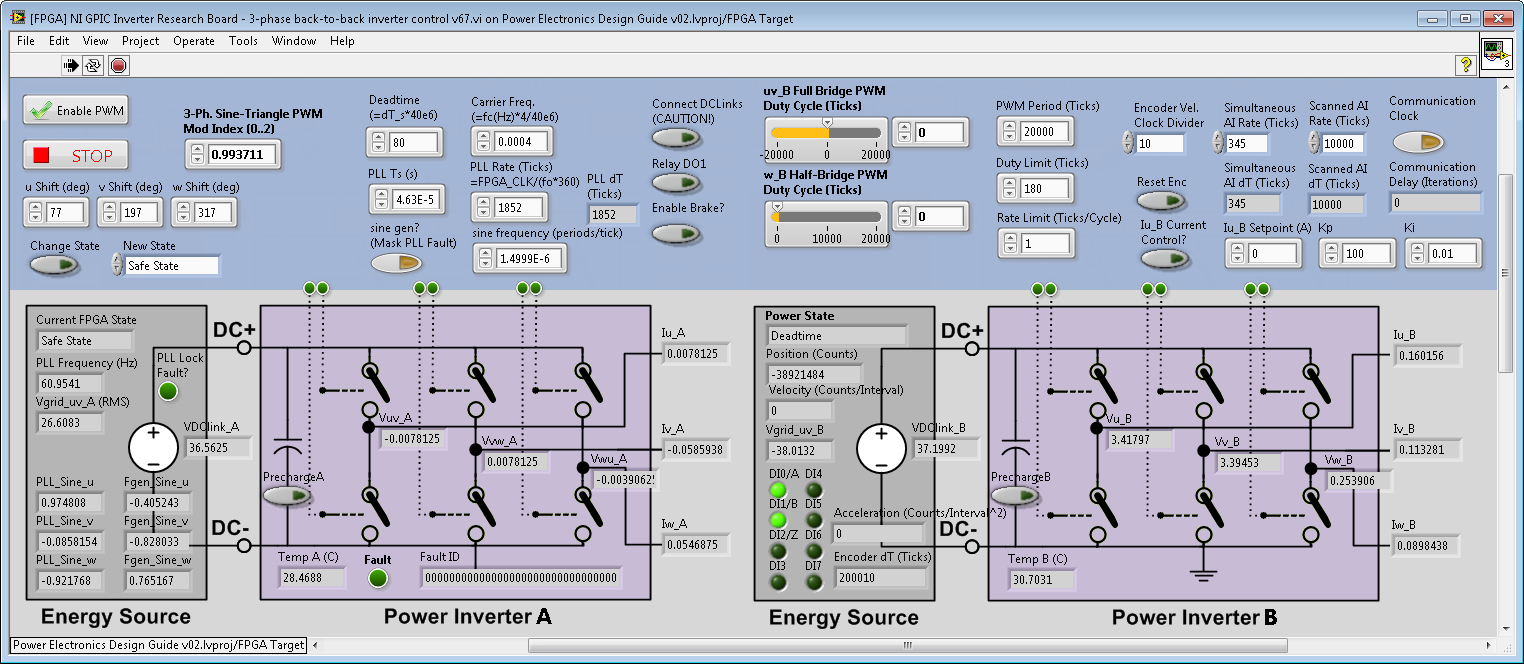
To operate the inverter, select a New State of "Control (PID)" or "Manual" and click the Change State button. Then click Enable PWM and set the desired modulation index (3-Ph. Sine-Triangle PWM Mod Index (0..2)).
If you are in a hurry and don't want to wait for the FPGA to compile, you can point the RT application ("[RT] NI GPIC Inverter Research Board v__.vi") to the compiled FPGA bitstream ("..\FPGA Bitfiles\PowerElectronics_FPGATarget_[FPGA]NIGPICInve_Y8hHPxj4JeE.lvbitx"). However, you won't be able to run the FPGA application in interactive debugging mode, so I recommend doing the FPGA compile when you have time.
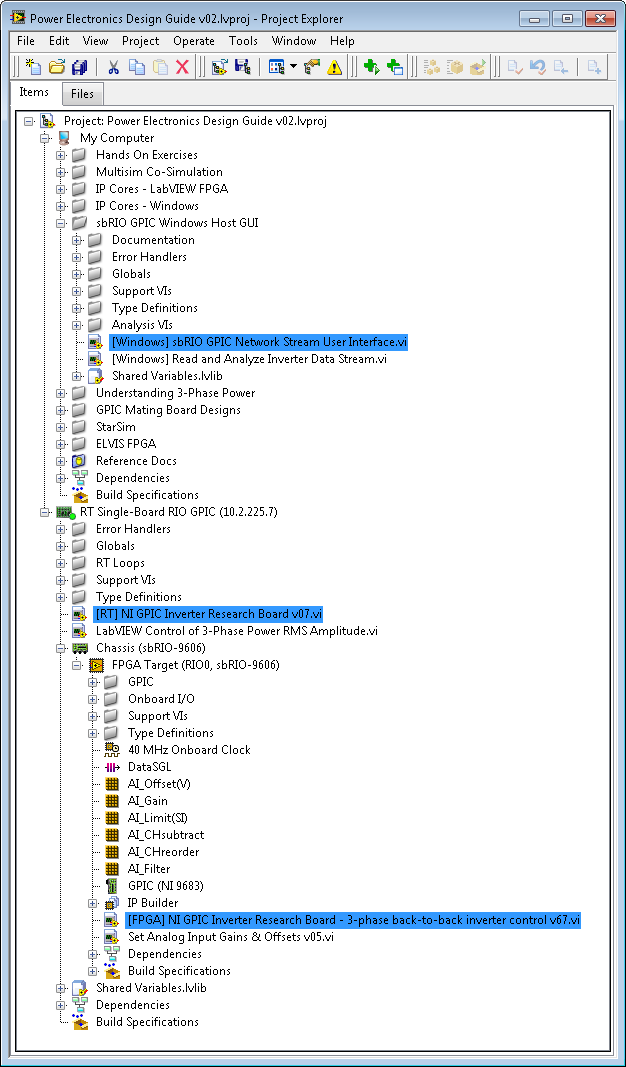
The location of the FPGA, RT and Windows Host application VIs in the LabVIEW Project are shown below.
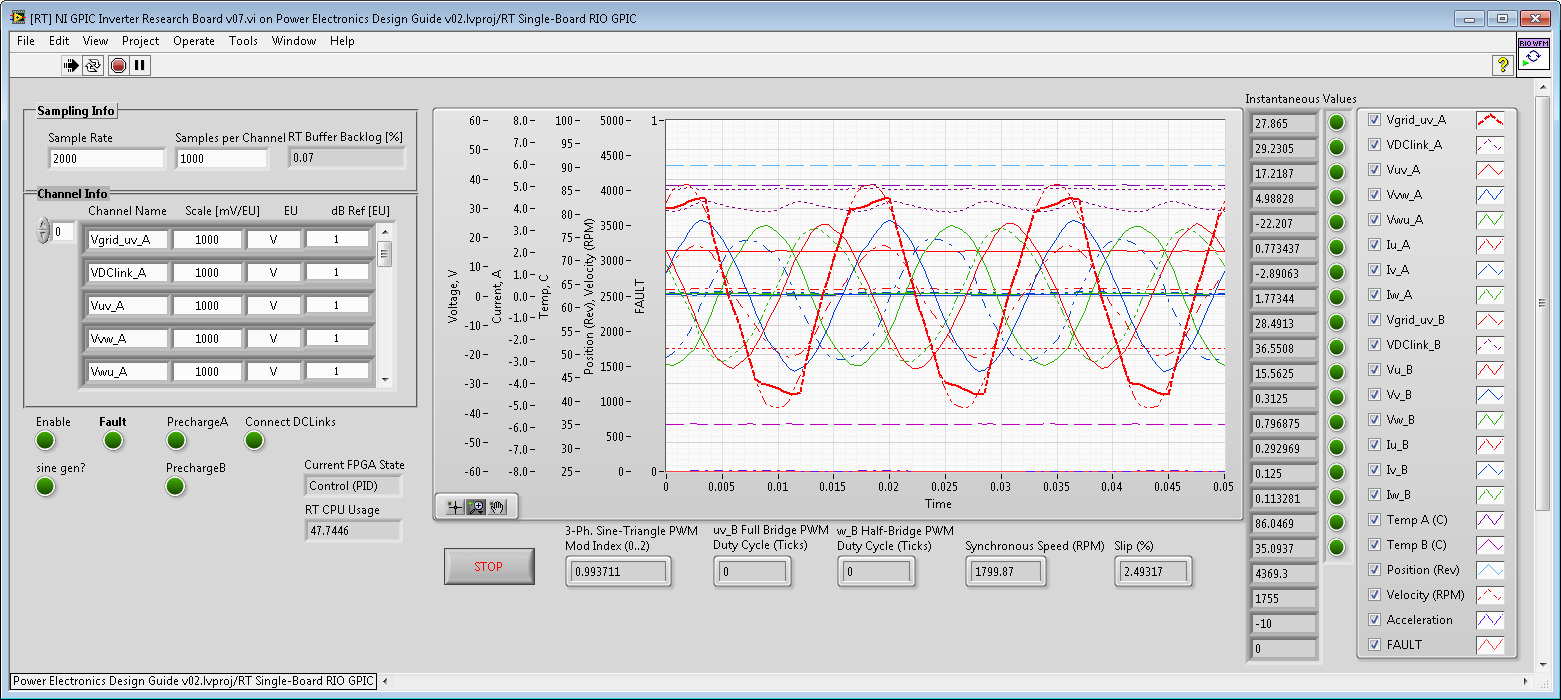
Run the RT application, "[RT] NI GPIC Inverter Research Board v__.vi".
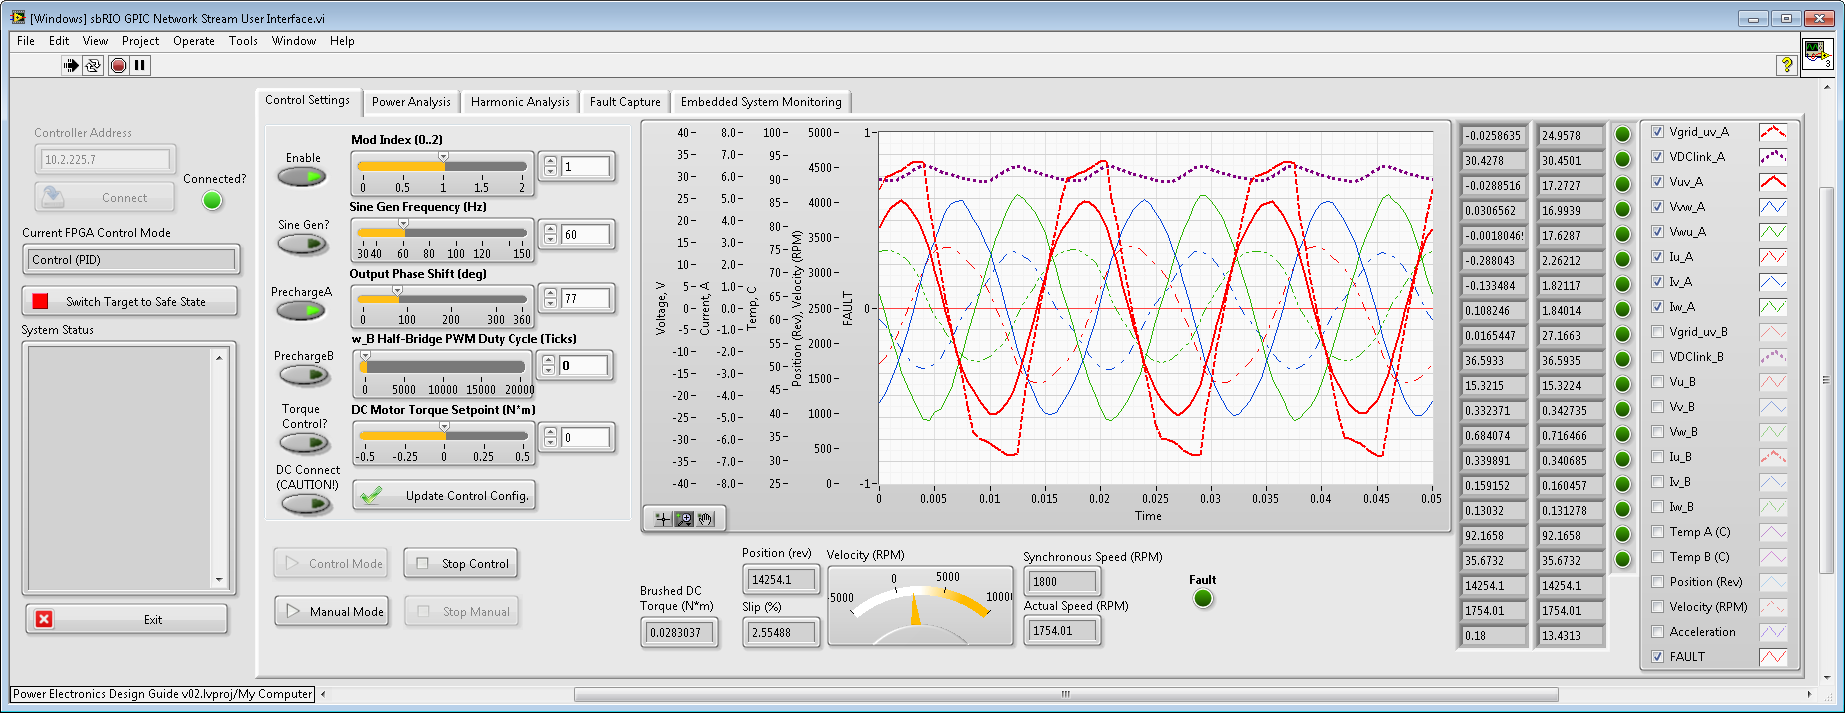
Open the Windows host application, "[Windows] sbRIO GPIC Network Stream User Interface.vi". Set the Controller Address to match the IP address of your sbRIO-9606 system. Then run the host application and click Connect. If the FPGA application were not already in Control (PID) mode (which is normally the case), you would then click the Control Mode button.
Note:
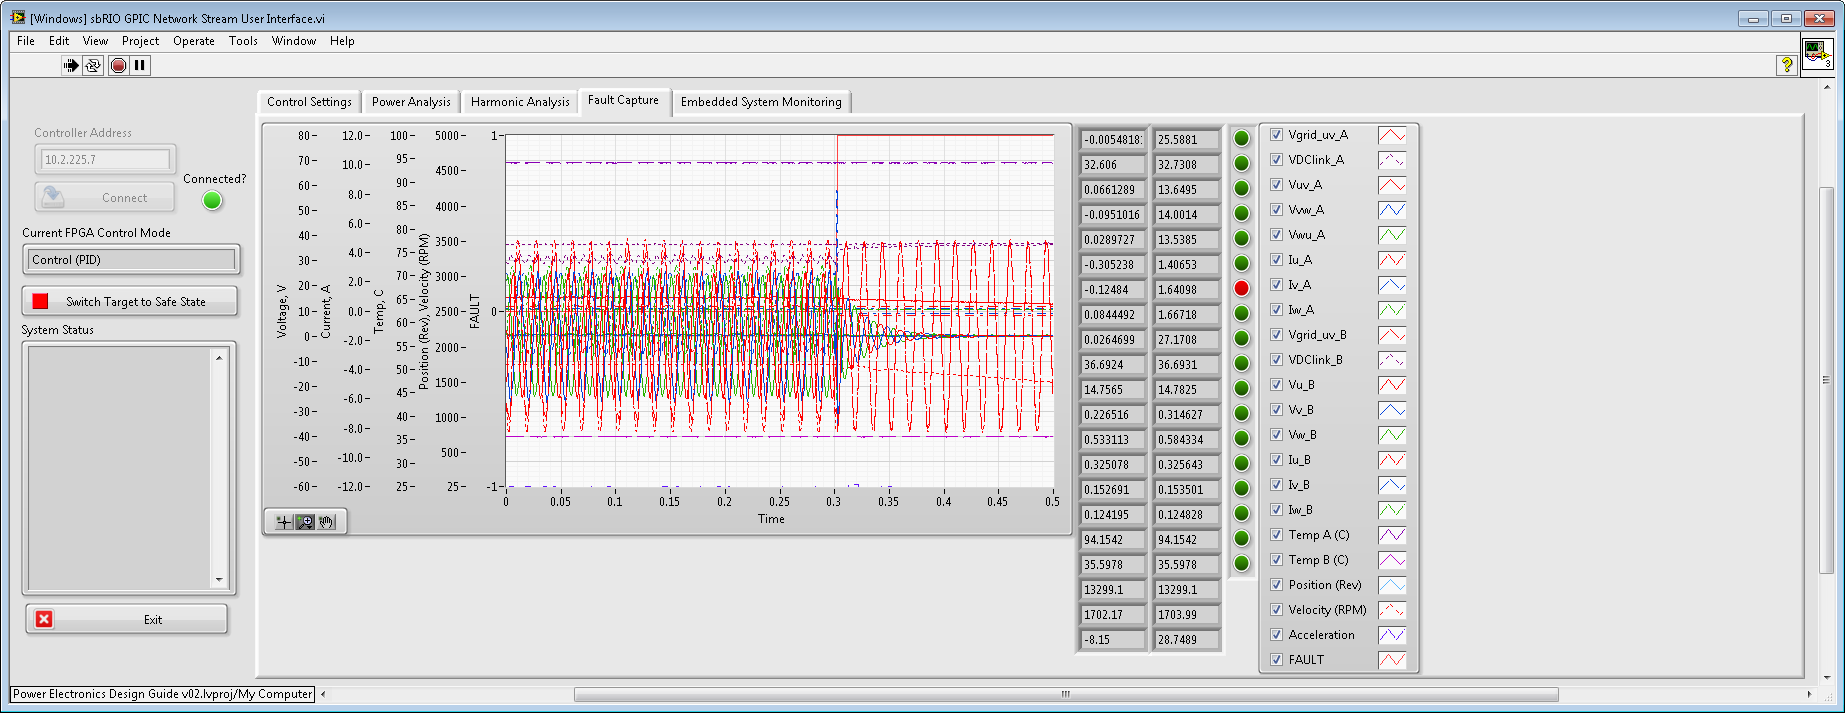
- If a fault occurs, you can view the network stream waveform at the time of the fault by clicking on the Fault Capture tab, as shown below with an 3-phase induction motor connected to inverter A.
- To reset a fault, click the Enable button to disable. Then click the Enable button again to clear the fault and re-enable.
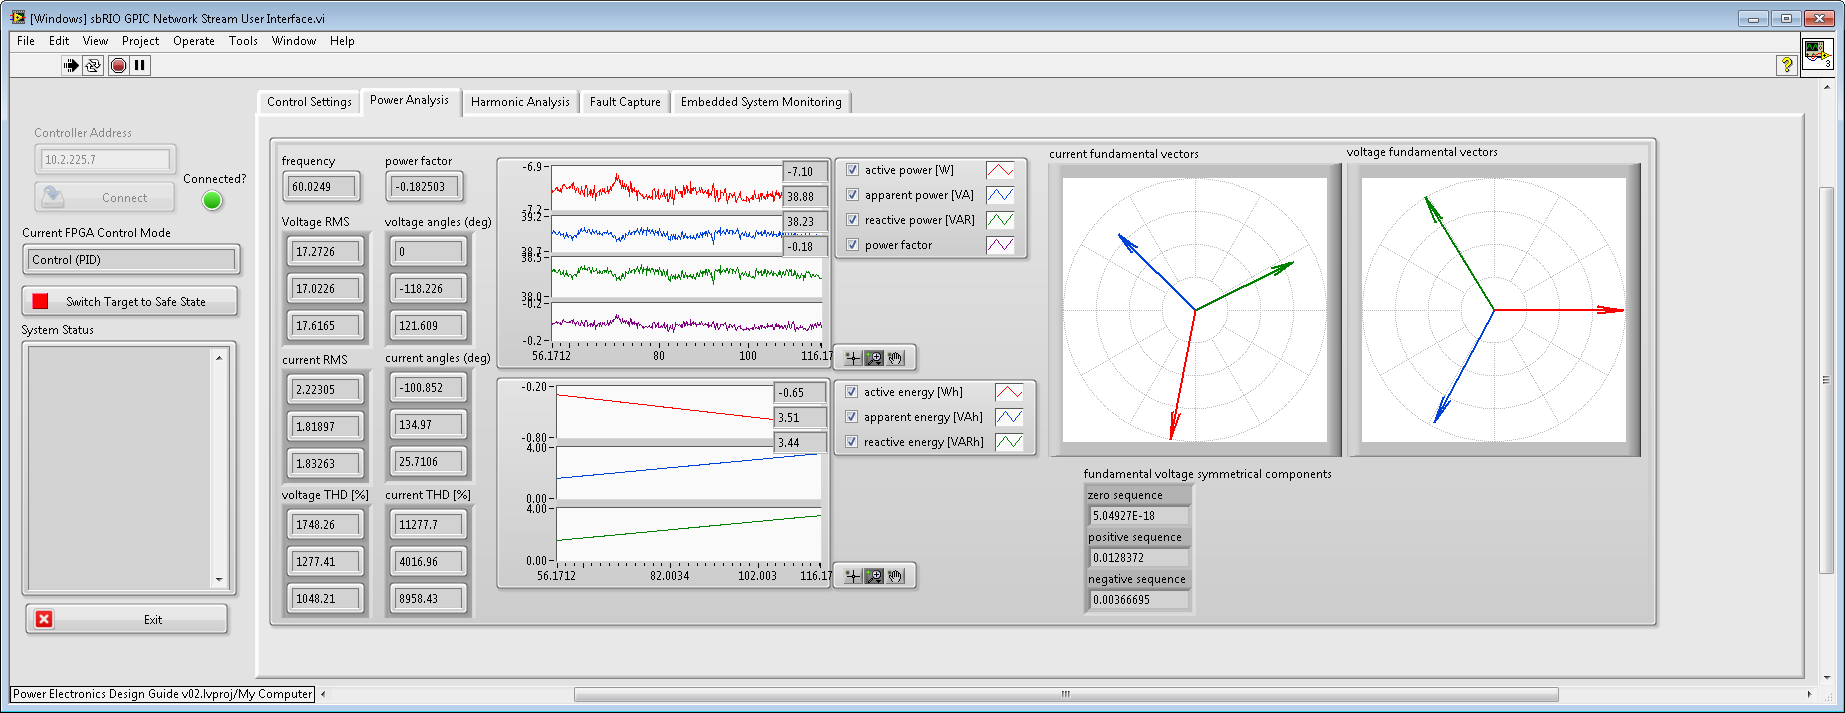
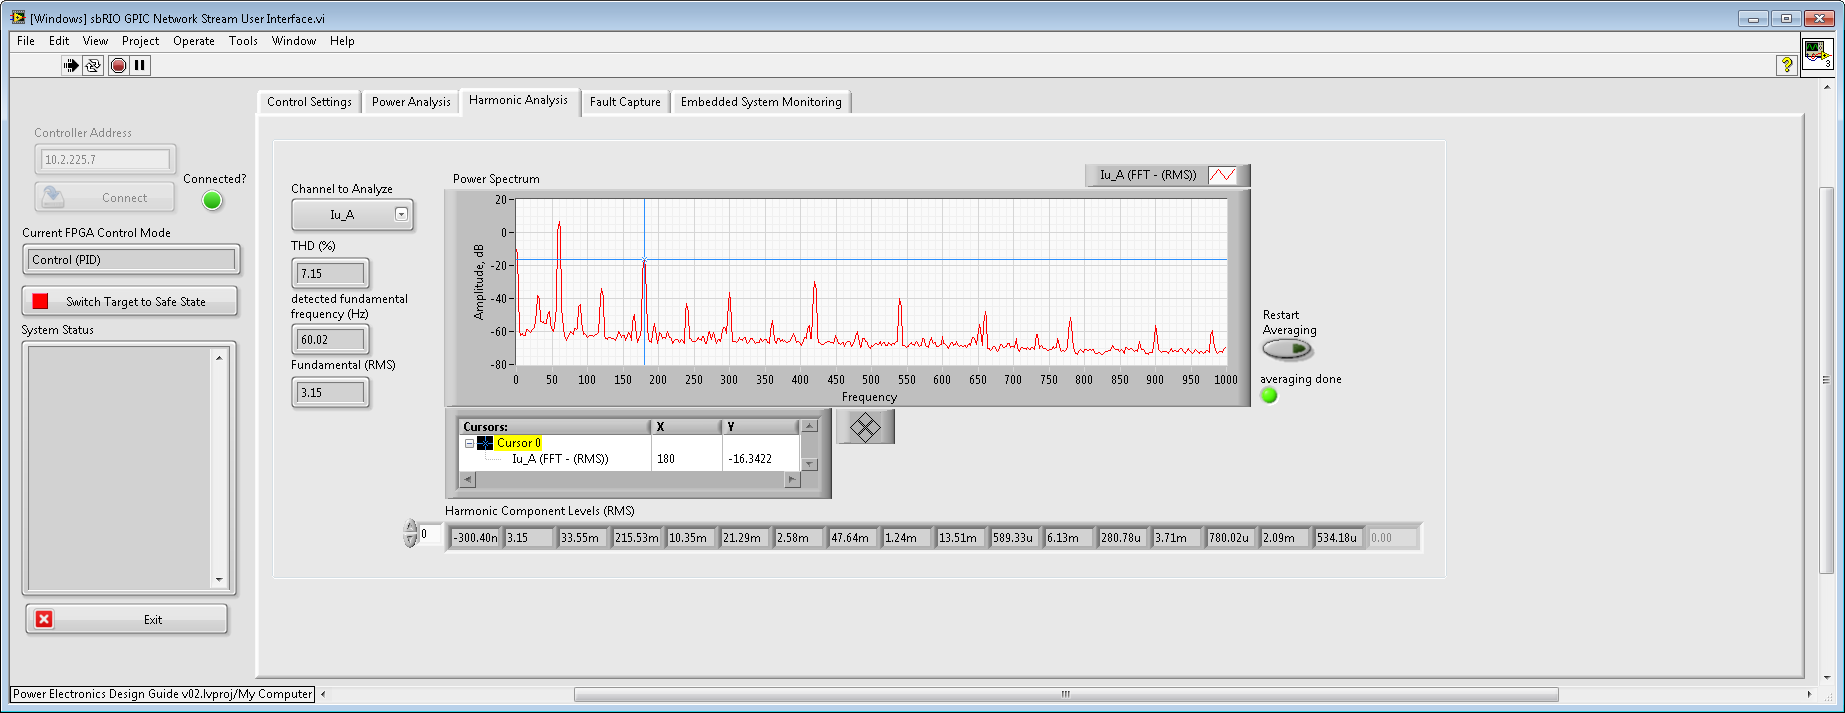
Examples of the Power Analysis, Harmonic Analysis and Embedded System Monitoring tabs are shown below.

To learn the fundamentals of programming an NI RIO embedded system using LabVIEW FPGA and LabVIEW Real-Time, refer to the Single-Board RIO Training Module below. Optionally, you can purchase an NI LabVIEW RIO Evaluation Kit for just $399 USD.
Single-Board RIO Training Module- How to Begin Programming with NI RIO
02-19-2013 10:07 AM
- Mark as New
- Bookmark
- Subscribe
- Mute
- Subscribe to RSS Feed
- Permalink
- Report to a Moderator
This was Very Useful Brian! Many Thanks!
04-03-2013 10:33 AM
- Mark as New
- Bookmark
- Subscribe
- Mute
- Subscribe to RSS Feed
- Permalink
- Report to a Moderator
Hello,
I get this error when I compile the application "[FPGA] NI Research Board GPIC Inverter - 3-phase back-to-back inverter v__.vi Control". No matter if it's the Internet. See if you help me fix it please.
thanks
04-03-2013 05:44 PM
- Mark as New
- Bookmark
- Subscribe
- Mute
- Subscribe to RSS Feed
- Permalink
- Report to a Moderator
Most likely you are missing the NI-RIO Device Drivers. Here is a link to the February 2013 update.
http://joule.ni.com/nidu/cds/view/p/id/3769/lang/en
Note: You no longer need to install "CompactRIO Module Software 12.0.1" separately since support for the NI 9683 GPIC RMC is now included in the standard NI RIO driver.
For a complete list of software to go with the NI Power Electronics Design Guide code, see this page.
04-04-2013 07:11 AM
- Mark as New
- Bookmark
- Subscribe
- Mute
- Subscribe to RSS Feed
- Permalink
- Report to a Moderator
Thanks for your attention.
The page there is shown below.
04-08-2013 09:35 AM
- Mark as New
- Bookmark
- Subscribe
- Mute
- Subscribe to RSS Feed
- Permalink
- Report to a Moderator
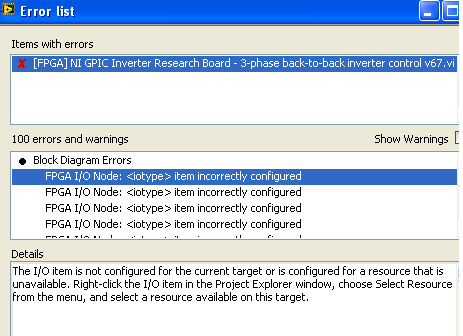
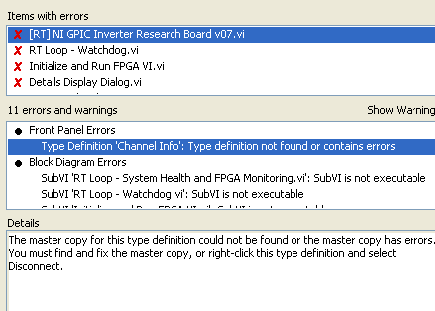
Here I leave the photo below of the errors that I get when I apply the [RT] NI GPIC Inverter Research Board ..
When I run it I get a folder to store something in this case I click to cancel. not if it is correct.
thank you very much
04-08-2013 10:17 AM
- Mark as New
- Bookmark
- Subscribe
- Mute
- Subscribe to RSS Feed
- Permalink
- Report to a Moderator
It looks like you either: 1. you have missing/renamed files from unzipping to a path that is too long, and/or 2. you do not have the correct embedded software installed on your sbRIO-9606, and/or 3. you do not have all the required development software installed on your machine.
Suggestions:
1. Make sure you unzip to a short directory path such as "C:\power_electronics_design_guide". If you unzip to a long path location such as your desktop, the file and folder names may be truncated and therefore the VIs won't be found or properly loaded when you open the project and try to open the VIs.
2. Make sure you have the firmware for the RT Watchdog and System Health and FPGA Monitoring installed. From NI MAX, expand Remote Systems and find your NI-sbRIO9606. Then expand to show the Software tab and click Add/Remove Software. Select NI-RIO 12.1 - February 2013 and click Next. Make sure you've checked the recommended items explained above in this post, including NI System Configuration, System State Publisher, NI-Watchdog, etc. To be sure, I'd recommend clicking the check box at the very top and installing all the available drivers.
3. As a reminder, make sure you have all the software installed that's recommended on this page. You do not need to install the items marked optional.
04-10-2013 09:28 AM
- Mark as New
- Bookmark
- Subscribe
- Mute
- Subscribe to RSS Feed
- Permalink
- Report to a Moderator
Hello,
I have checked all the points I've mentioned and I think everything is fine.
I still leave only a mistake.
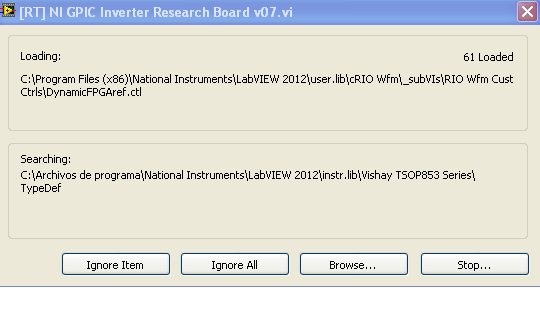
When you run the application "[RT] NI Research Board GPIC v__.vi Inverter", the program will stop me on the next file.
04-10-2013 10:09 AM
- Mark as New
- Bookmark
- Subscribe
- Mute
- Subscribe to RSS Feed
- Permalink
- Report to a Moderator
It looks like you do not have the NI CompactRIO Waveform Reference Library 4.01 installed. Please follow the link from here, then install it, restart LabVIEW and try again.
Download the NI Power Electronics Design Guide and Evaluation Software
04-16-2013 05:23 AM
- Mark as New
- Bookmark
- Subscribe
- Mute
- Subscribe to RSS Feed
- Permalink
- Report to a Moderator
Hello,
I still rises this error when running the application "[RT] NI Research Board GPIC v__.vi Inverter",
I seem to be missing some file to install

