- Subscribe to RSS Feed
- Mark Topic as New
- Mark Topic as Read
- Float this Topic for Current User
- Bookmark
- Subscribe
- Mute
- Printer Friendly Page
Propose a new Icon Template for Send Message Methods
01-23-2015 12:48 PM
- Mark as New
- Bookmark
- Subscribe
- Mute
- Subscribe to RSS Feed
- Permalink
- Report to a Moderator
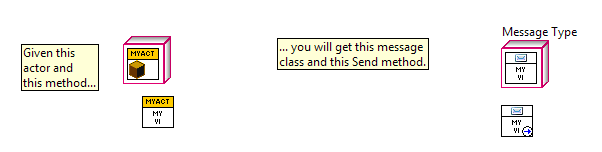
I'd like to propose a new Icon Template for the default Send Message Icon. The reason for this is, the current Icon template does not allow for easy icon modification such as glyphs or text. Since the blue arrow in directly in the center of the send method icon and it is a single layer in the icon.
I'd like to propose a modification of the that icon that would allow easier insertion of text, or even automatic insertion of text when the message is created.

This Icon fits mostly with the standard class icon layout and provides an area for glyphs or text. It has the blue arrow we are all familiar with and adds the message glyph for aesthetics.
It would be nice that the message icon be create as template rather than a layer, if possible.
Anyway, that's it.
Thanks
Brian Shea
Certified LabVIEW Architect
01-23-2015 01:07 PM
- Mark as New
- Bookmark
- Subscribe
- Mute
- Subscribe to RSS Feed
- Permalink
- Report to a Moderator
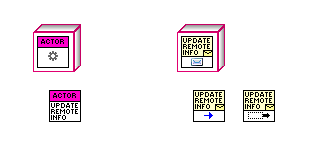
There was a fair amout of discussion not too long ago on the forums about ways to improve. Here's what it will look like for 2015:
01-23-2015 01:29 PM
- Mark as New
- Bookmark
- Subscribe
- Mute
- Subscribe to RSS Feed
- Permalink
- Report to a Moderator
Both options would be an improvement. I particularly like the option where the message icon incorporate the class icon.
01-23-2015 01:38 PM
- Mark as New
- Bookmark
- Subscribe
- Mute
- Subscribe to RSS Feed
- Permalink
- Report to a Moderator
Works for me! Thanks!
Certified LabVIEW Architect
01-23-2015 03:54 PM
- Mark as New
- Bookmark
- Subscribe
- Mute
- Subscribe to RSS Feed
- Permalink
- Report to a Moderator
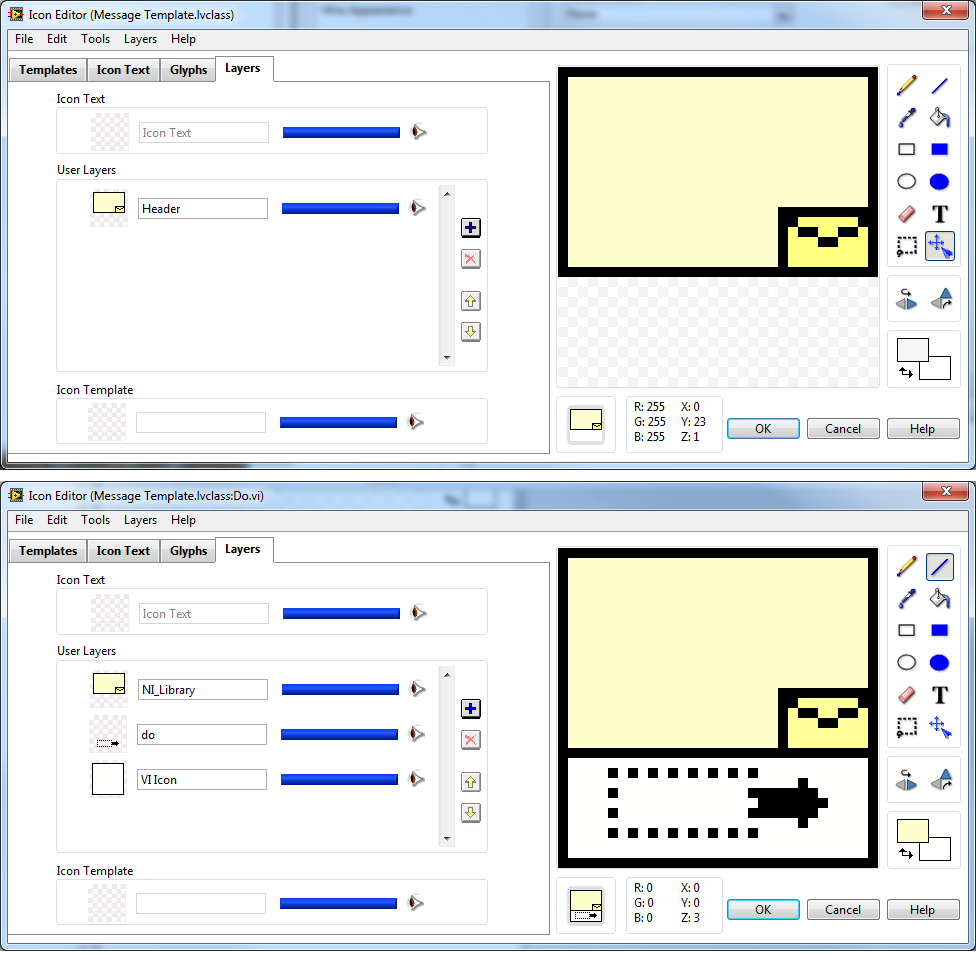
I missed out on the original forum discussion too, and it sounds like the matter may already be settled, but just to throw it out there I've been creating message classes with an extra large header field like so:
Reasoning:
- The upper portion (header) generally shows the intent of the class. In the case of messages this is the more significant info, so that portion of the icon is expanded. Only needing to change the VI Icon Template of the class makes maintenance easier if the actor method was to be renamed, etc.
- The lower portion shows the intent of the method, which for messages is typically just Send or Do, so it doesn't need much space.
- Since message classes can be sent to children of the original actor class, I don't think it's critical to have the original actor's header name/color reflected in the message class.
It's also pretty easy to customize the version used on your system by modifying the template located in: ...\LabVIEW 20xx\project\_Message Maker\_templates\Message Template\
That's my too-late two cents!
01-23-2015 04:15 PM
- Mark as New
- Bookmark
- Subscribe
- Mute
- Subscribe to RSS Feed
- Permalink
- Report to a Moderator
D_Hooks... that is a novel approach and one I wish I'd seen proposed earlier.
Still, it isn't too late to change... for 2016. 🙂
Do others like this style?
01-23-2015 10:39 PM
- Mark as New
- Bookmark
- Subscribe
- Mute
- Subscribe to RSS Feed
- Permalink
- Report to a Moderator
I like it enough that I'm changing the way I do it from now on.
01-26-2015 03:21 PM
- Mark as New
- Bookmark
- Subscribe
- Mute
- Subscribe to RSS Feed
- Permalink
- Report to a Moderator
01-27-2015 09:54 PM
- Mark as New
- Bookmark
- Subscribe
- Mute
- Subscribe to RSS Feed
- Permalink
- Report to a Moderator
Would you be able to post a quick tutorial for some newbies that are thoroughly confused about icon editing....
The middle line plays tricks on me with the text. Sometime the text is above it; sometimeit's below it; sometimes totally ignores it!
01-29-2015 01:15 AM
- Mark as New
- Bookmark
- Subscribe
- Mute
- Subscribe to RSS Feed
- Permalink
- Report to a Moderator
Jeannius - there are a couple of things going on here.
If you create an icon for a single VI, using the Icon Editor window to enter Icon Text line(s), the line(s) should be centered vertically within your icon.
If you are dealing with a VI within a LabVIEW Class (or project Library), then you can create an icon for the class and apply it to all of the VIs within the class. Typically the class icon is just a header field, leaving a bunch of space below to add additional text or glyphs for each individual VI within the class.
You can edit the class icon by right clicking on the class within the project, selecting Properties >> General Settings >> Edit Icon... You can apply the class icon to all VIs within the class by right clicking on the class within the project, selecting Properties >> General Settings >> Apply Icon to VIs. At this point a layer named NI_Library is added to each VI within the class.
When you edit the class icon, any Icon Text you add is centered between the top and bottom lines in the class icon. When you edit an individual VI's icon, you should have a bottom most layer that covers the entire area of the icon. Any Icon Text you add to the VI will be centered between the bottom of the NI_Library layer and the bottom of the entire icon.
So, if you were to add text to the Message Template.lvclass icon below, it would appear in the yellow area, centered vertically. If you were to add text to the Do.vi icon below, it would appear in the lower white portion centered vertically (along with the "do" image shown).
NI also provides some step-by-step instructions for creating a Class/Library icon here.
Attached is my modified version of Message Template.lvclass in case you would like to play around with editing the icons, or in case anyone else would like to try out using the style of message icon I described previosly.