- Document History
- Subscribe to RSS Feed
- Mark as New
- Mark as Read
- Bookmark
- Subscribe
- Printer Friendly Page
- Report to a Moderator
- Subscribe to RSS Feed
- Mark as New
- Mark as Read
- Bookmark
- Subscribe
- Printer Friendly Page
- Report to a Moderator
Overview
Do you ever feel like your VI is too bulky or 'fat'?. This could sometimes be because of repeated parts of code that you can in fact 'slim' down. This example shows you how to use Sub VIs inside a VI to make your VI less bulky and clearer to understand.
Description
LabVIEW uses subVIs to create modularity. A subVI is basically just a VI within a VI and is similar to subroutines in text-based programming languages. Every SubVI has its own icon which can be edited to be more meaningful and recognisable. This icon is found in the upper-right corner of the front panel and block diagram windows of the VI, and is what identifies the subVI on the block diagram of your calling VI.
SubVIs are mostly used when there is a chunk of code that is repeated several times throughout the VI and can infact be replaced by a subVI instead; making the VI appear smaller and simpler. SubVIs can also be used when you would like your VI to appear less complex and especially when the user doesn't need to see a particular part of the code to understand what is going on. When you place a SubVI on your block diagram you can always double click the subVI to open up it's block diagram and front panel to view what part of code is hidden in it.
The SubVI also has a connector pane which is made up of rectangles representing a terminal each. The connector pane is found next to the icon in the upper right corner of the front panel and can be edited depending on what connections you require you SubVI to have.
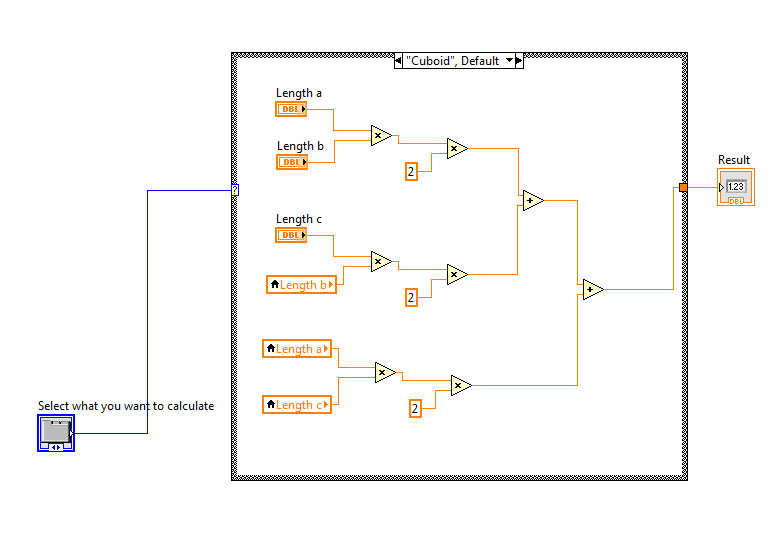
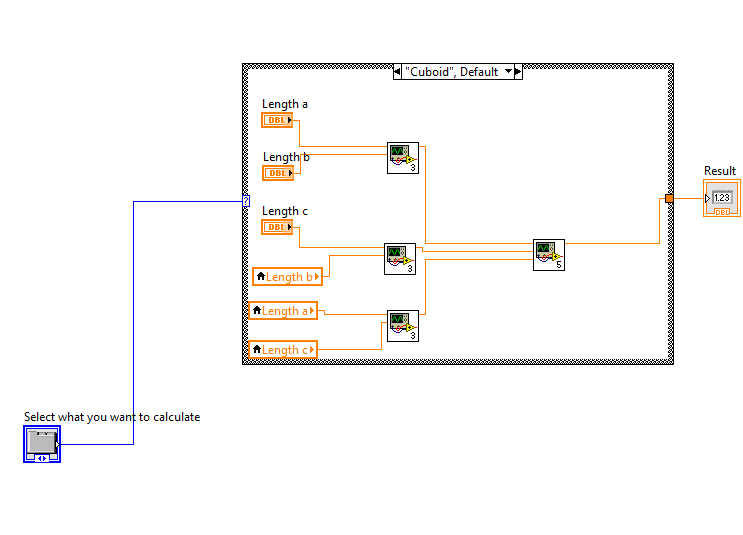
I have attached two files to this example; one which is a VI that performs simple calculations and the other is a project containing the same VI with other SubVIs. You will notice that the Calculate1.vi calculates surface area for different shapes in each of its cases and these calculations have some repeated elements. If you open the calculation.vi from the project attached (surface.lvproj) you will notice that these repeated chunks have been replaced by SubVIs. I have chosen a simple example to demonstrate the usefulness of SubVIs. This can also be done in exactly the same way with more complex code. Below I have outlined ways to create subVIs and use them where necessary
Steps to Create a SubVI from an already existing VI
- Select the part of code you would like to turn into a SubVI using the cursor. Make sure to include the wires connecting to each item.
- Click on edit and select 'Create SubVI' from the drop down menu.
- Your section of code will now be replaced by a Sub VI
- Double click on this subVI to edit its icon or connector pane.
- Save this SubVI in the project folder to be able to reuse it whenever necessary
Ways to Place a SubVI on the block Diagram
You can also move already existing VIs into another VI as SubVIS. There are different ways to do this.
- Drag the VI from the Project Explorer to the block diagram.
- Click 'Select a VI' on the Functions palette and then navigate to the VI.
- Drag the icon from an open VI to the block diagram of another VI.
- Use Quick Drop to search an open project for VIs contained in the project.
Additional Images
Pictured below show the same VI , the first one without SubVIs and second one with SubVIs.
(see the fat loss in these before and after pictures?)
My Other New Year's Resolution is to... |
|---|
