- Document History
- Subscribe to RSS Feed
- Mark as New
- Mark as Read
- Bookmark
- Subscribe
- Printer Friendly Page
- Report to a Moderator
- Subscribe to RSS Feed
- Mark as New
- Mark as Read
- Bookmark
- Subscribe
- Printer Friendly Page
- Report to a Moderator
VI Package Manager: Custom Installation Options
Overview
In our overview of building VI Package files using VI Package Manager, we have created a package, modified our palette, added examples, help files, tools menu items, and a license agreement. There are two more options that may apply to certain add-ons: installation requirements and installation actions.
Package Installation Requirements
If your package is only intended for certain LabVIEW versions or specific operating systems, you can specify this in the Install Requirements category. If the user’s computer does not meet the requirements, they will not be able to install the package.
To use the requirements options, follow the instructions below.
- Select the Install Requirements category.

- Use the Operating System option to restrict the operation systems that can install the package.
- Use the LabVIEW option to restrict which LabVIEW versions can install the package.
Custom Installation Locations Outside of LabVIEW
In previous tutorials, we installed all of the package’s contents to folders in the LabVIEW hierarchy: vi.lib, examples, etc. In addition to these locations, VIPM enables you to install files to many different OS-specific folders: desktop, documents, temporary directory, program files, and many more.
To utilize these destinations, follow the instructions below.
- In the Package Builder, select the Destinations category.
- Add a new destination with the Add Destination button.
- Enter a name for the destination in the Name field.
- Select a Base Path.
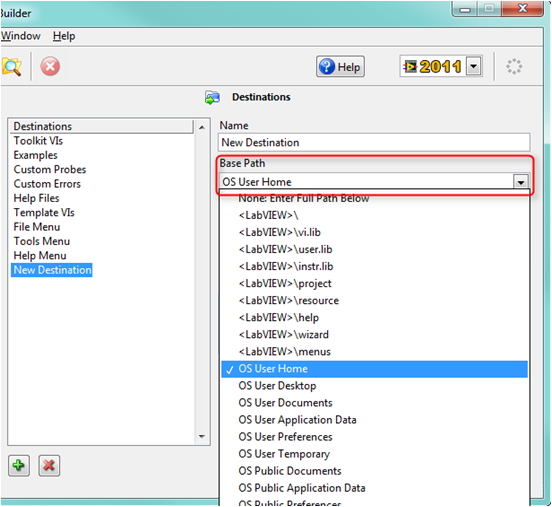
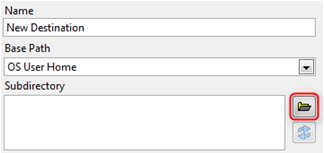
- Enter a Subdirectory, if desired.
Hint: If you’d like to see where the Base Path resides on your computer, simply select the Base Path and browse for a subdirectory.
-
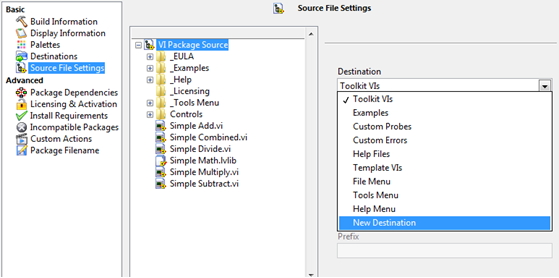
You can now use this new Destination for your files in the Source File Settings category.
Custom Package Installation Actions
In some situations, you may need to perform specific actions before or after the user installs your package. For example, you might need to edit the Windows Registry, check to see if another program is installed, or change behavior based on what version of LabVIEW is being used. All these can be done with VIPM’s Custom Actions.
Custom Actions are simple VIs that you write to perform specific actions. These VIs will automatically run during building, installing, and uninstalling the package. These VIs will run in the version of LabVIEW the package is being built in or installed to.
To add custom action VIs to your package, follow the instructions below. The instructions assume you have a VI you would like to run as a Custom Action.
Select the Custom Actions category.

You can now select VIs for any of the six available Custom Actions:
- Pre-Build VI – This VI will run immediately before VIPM builds this package.
- Post-Build VI – This VI will run immediately after VIPM builds this package.
- Pre-Install VI – This VI will run immediately after the user confirms the package installation, but before VIPM installs any of the package content.
- Post-Install VI – This VI will run immediately after VIPM completes the package installation, before the user is notified.
- Pre-Uninstall VI – This VI will run immediately after the user confirms the uninstallation of the package, but before VIPM removes any of the package content.
- Post-Uninstall VI – This VI will run immediately after VIPM completes uninstalling, before the user is notified.
Next Steps
Click here to go back to the table of contents, or continue to managing licensing and activation.
