- Document History
- Subscribe to RSS Feed
- Mark as New
- Mark as Read
- Bookmark
- Subscribe
- Printer Friendly Page
- Report to a Moderator
- Subscribe to RSS Feed
- Mark as New
- Mark as Read
- Bookmark
- Subscribe
- Printer Friendly Page
- Report to a Moderator
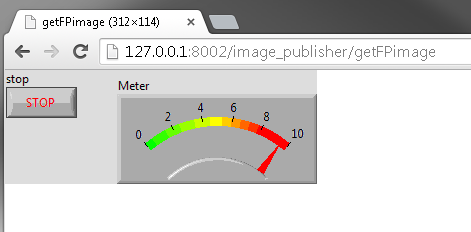
New Getting Started Series | See an Image of the Front Panel on the Web
________________________________________
Overview
Sometimes all you want is to see your front panel through the web. This tutorial will step you through how to create a basic LabVIEW Web Service method that will display the current image of your front panel when you go to that webpage.
This tutorial is loosely based off of the Web Services showcased in the Weather Monitoring Example Project that ships with LabVIEW. You can find this example by going to Help > Find Examples and searching for “Weather Monitor”. Note that this will not work for applications on a RT target, since RT executables do not have front panels!
________________________________________
Prerequisites
You should be able to create a basic Web Service and build a LabVIEW executable with Application Builder.
My First LabVIEW Web Service - Adding Two Numbers
Building a Stand-Alone Application in LabVIEW
Hardware
None
Software
LabVIEW 2013 or newer
Application Builder
________________________________________
Procedure
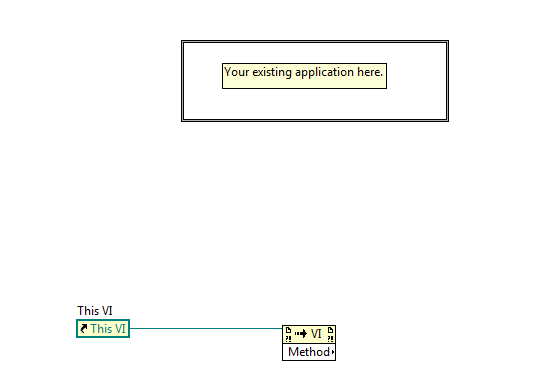
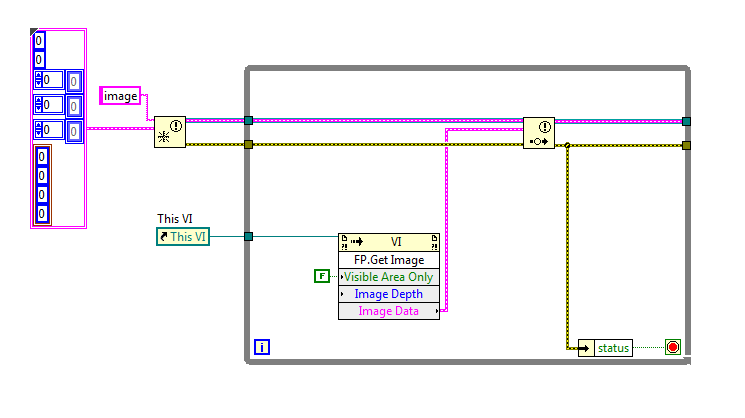
First, we will be getting an image of the front panel using a VI Server Method. Open up the VI that you want to publish to the web. Now below your existing code, drop a VI Server Reference and an Invoke Node from the Applications Control Palette. Wire them together as shown below.
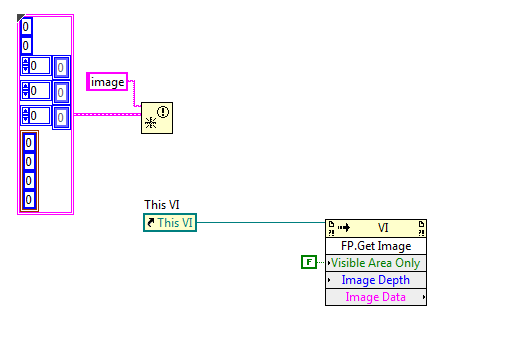
On the Invoke Node, click Method and select Front Panel > Get Image. Wire a false constant into Visible Area Only as shown.

When executed, the Method will grab an image of the front panel. Now we need to transfer the image to a web method VI. In LabVIEW 2013 and newer, web method VIs operate in the space as the main VI. This means we can use any method of inter-VI communication to send data between the main VI and the web method. In this example, we will be using a named notifier.
From the Notifier Palette, drop an Obtain Notifier and give the notifier a name. In this case, I’ve named the notifier “image”. We will need to specify the data type of the notifier. Right click the Image Data Output of the Invoke Node, and select Create > Constant. Wire this constant into Obtain Notifier to set the data type.
Now let’s send the image to the notifier. Drop a Send Notification function and wire in the notifier reference and the image data as follows.
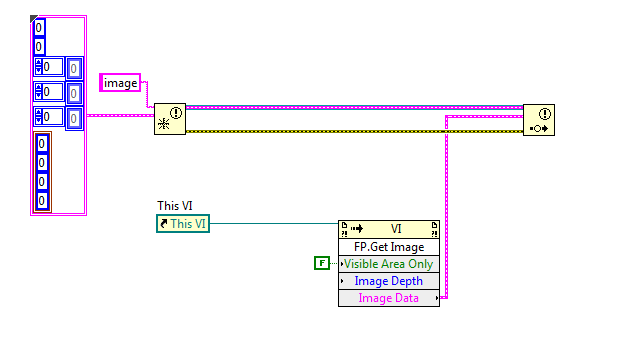
Enclose the code in a while loop, so that the main VI will continually send new front panel images to the notifier. You will have to implement your own method to stop this loop along with the rest of your application. See the attached example project for one method of accomplishing this.
This completes the necessary modifications for the main VI. Now we will need to create the web method VI to publish the images to the web.
In your project, create a new Web Service. Next, create a new VI in the Web Resources folder.
Go to the block diagram of the new VI. Now copy the code to initialize the notifier from our main VI as shown below. Additionally, wire in a false constant into the Create if not found? terminal.
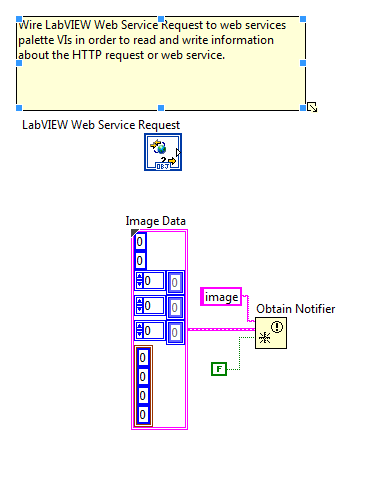
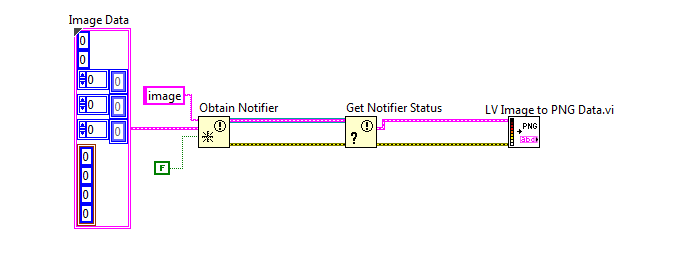
Since we named our notifier in the main VI, this will obtain the notifier we created there. Drop a Get Notifier Status function to read the data from the Notifier. Next drop a LV Image to PNG Data function to convert the image data into a png image file. Wire them as shown below.
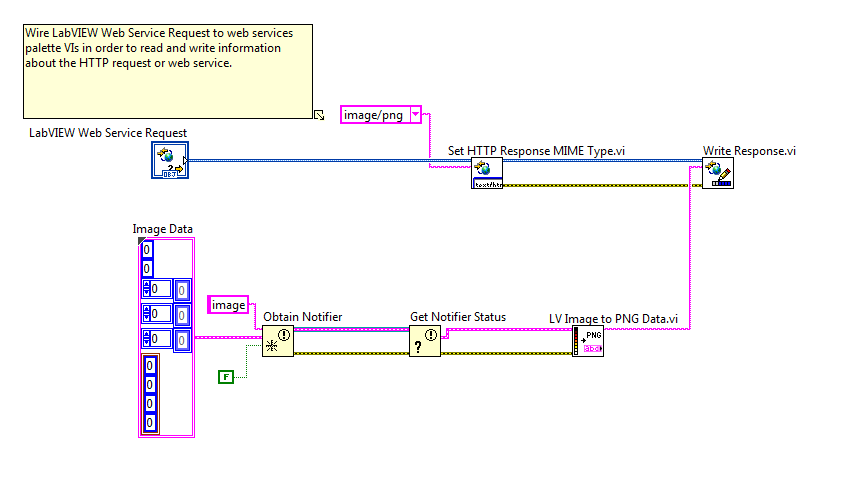
Now we will tell the web page to output an image, and then write the image data. Go to the Connectivity > Web Services > Output Palette. Drop a Set HTTP Response MIME Type. Create a constant for the MIME Type terminal. In the dropdown menu, select “image/png”.
Next, drop a Write Response function and wire the Web Service Request and the png data into the appropriate terminals. Your web method should look as follows.
Save the the web method VI. The name of the web method will be part of the URL of the webpage.
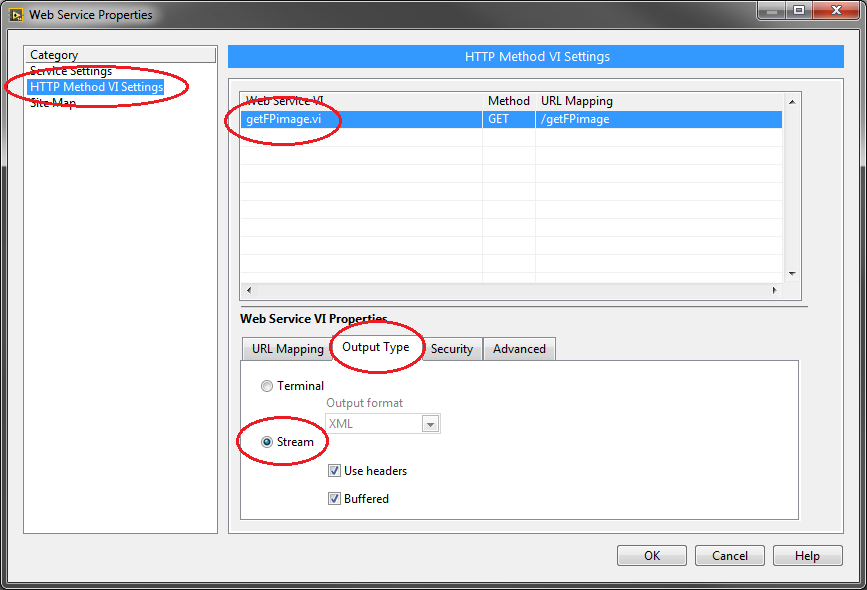
We will now configure the Web Service so that it can respond with the image data on a webpage. Right click on your Web Service in the project explorer and go to Properties. Click on the HTTP Method VI Settings tab on the left. Then click on your web method VI. On the Output Type tab, select Stream. Click OK to save the settings.
Now we will need to create an application with the Web Service. Under Build Specifications, create a new application. Under the source files tab, include the files that you need to run your application. On the Web Service tab, check the Web Service to include it as part of your application.
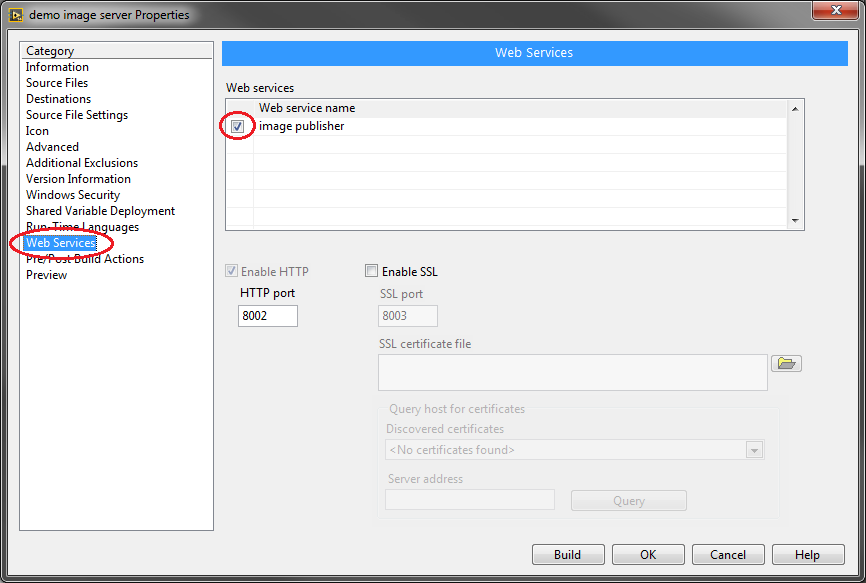
Now build and run the application. This will automatically publish the web service. To get the URL of your web method, right click the web method VI in the project explorer and select Show Method URL.
Because the web method is running from the executable, it uses the 8002 port instead of 8080. Be sure to change the port to 8002 in the URL.
________________________________________
Next Steps
Download the Zipped Project below to see completed example of this tutorial
Use simple JavaScript and HTML to format your web page and add functionality
See this example modified to automatically refresh the image through simple JavaScript code
