- Document History
- Subscribe to RSS Feed
- Mark as New
- Mark as Read
- Bookmark
- Subscribe
- Printer Friendly Page
- Report to a Moderator
- Subscribe to RSS Feed
- Mark as New
- Mark as Read
- Bookmark
- Subscribe
- Printer Friendly Page
- Report to a Moderator
The myExplorer remote controlled vehicle
myExplorer is a remote controlled vehicle that uses the National Instruments myRIO embedded controller. myExplorer communicates with the user’s laptop or desktop via WiFi, therefore it can be used in any location with access to a wireless network, such as at home, at the office and in the lecture theatre. myExplorer receives the commands that tell it where to go, while streaming video back to the computer, so that the user knows where it is headed to even when it is on the other side of the building. myExplorer was built as part of a 1 week intern project at National Instruments UK and Ireland.
The following short video shows the myExplorer in action
myExplorer, as the name suggests, is created to allow its user to explore without leaving the chair. Admittedly, because of the limited power of the motors, in its current form myExplorer is more of a prototype or a fun little toy rather than a powerful exploration vehicle. However, the LabVIEW code would require little modification in order to scale up the project.

The user commands myExplorer by pressing one or more arrow keys (↑↓←→) at the same time. The VI that runs on the computer has an intelligent method of interpreting arrow key press/release events, such that all combinations of keys simultaneously pressed translate to an appropriate command that is sent to the myRIO. For example, if the ↑ and ← keys are pressed at the same time, myExplorer will turn left while still going forwards. if the ↑, ← and → keys are pressed at the same time, myExplorer will move forwards because the left and right arrow key presses cancel each other out. This event handling functionality is available for download here: https://decibel.ni.com/content/docs/DOC-34335

The VI that runs on the real-time processor of the myRIO interprets the movement commands and sends appropriate signals to each of the 4 motors. The motors are controlled through 2 double H bridges hidden in the base of the vehicle. Because each motor has to be able to go forwards and backwards, 2 pins are required to control each motor – therefore 8 output lines are used. Out of these 8 output lines, 4 are analog output and 4 are PWM. Despite the fact that the max output voltage of the PWM lines is 3.3 Volts, compared with 5 Volts for AO, because of how the H-Bridges work, this was not a problem – The AO and PWM are functionally equivalent in this project.

(Above) The circuit board composed of 2 x H-Bridge Motor Driver 1A – SN754410 and 1 x voltage regulator that brings down the 7.5 V of the 5 AA battery pack to 5V needed to power the 2 H-Bridge ICs

The body, motors and wheels of myExplorer are part of an off the shelf robotics kit available to buy online. The 4 motors are powered by 5 AA batteries (the battery rack comes with the kit), but the myRIO is powered from a separate LiPo battery, as it was found that the AA batteries cannot provide enough current for both the motors and the myRIO at the same time). A point of improvement would be to power both the motors and the myRIO from the LiPo, thus allowing the motors to draw more current and saving the weight of the 5 AA batteries while removing the need for replacing batteries. This will make the vehicle faster and reduce the maintenance work.)

Attached is the myExplorer LabVIEW project. Alongside the VIs, it contains pinout documentation files. The code is based on 2 example projects – “Simple TCP” for transmitting the movement commands and “Simple Network Streams” for transmitting the video feed.
Your feedback and questions are welcome.
Wiring Diagram: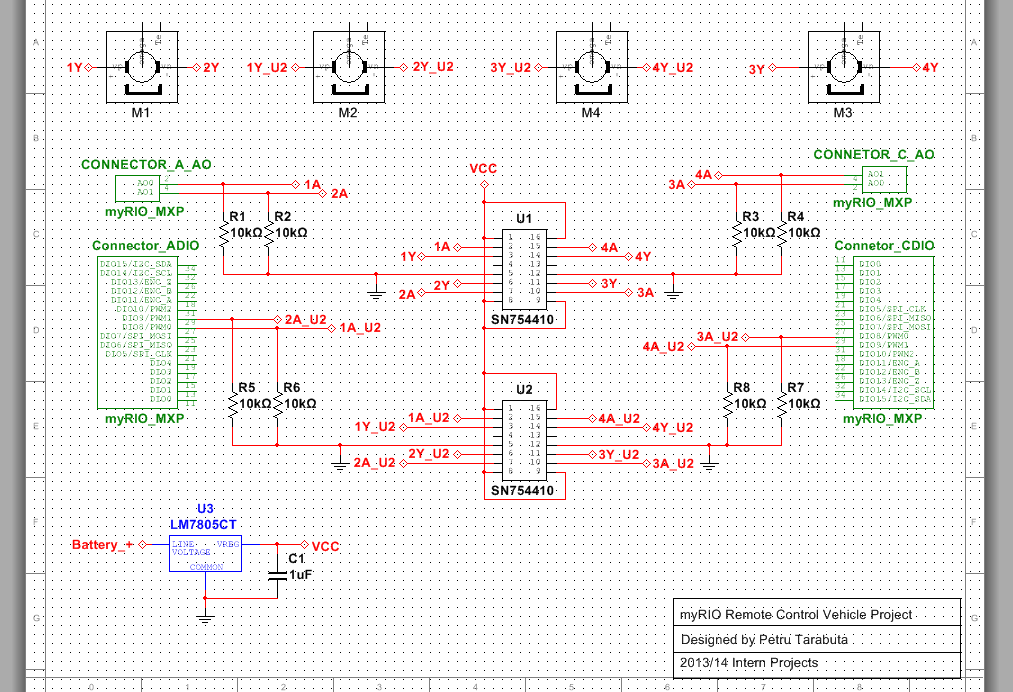
Parts List:
Part | Qty |
myRIO 1900 | 1 |
DFRobot 4WD Arduino Mobile Platform | 1 |
Microsoft LifeCam HD-3000 | 1 |
H-Bridge Motor Driver 1A – SN754410 | 2 |
SB300 Solderable BreadBoard | 2 |
Duracell 1.5 V 2400 mAH rechargeable batteries – Pack of 4 | 2 |
Battery charger – 3/4.5/6/7.5/9/12 Volts output | 1 |
LiPo 11.1 V battery | 1 |
LiPo battery charger | 1 |
Programmed in LabVIEW 2013
- Mark as Read
- Mark as New
- Bookmark
- Permalink
- Report to a Moderator
This is a great project. I have been tasked to bring interest to a commuity college. This will be a great starting place. well done
- Mark as Read
- Mark as New
- Bookmark
- Permalink
- Report to a Moderator
Well Done , I like your work it is amazing
I have auestion for , how can you connect between myrio and the camera (webcam) ?
I am trying to do that through USB flash drive built in myrio but it dosen't work , do you mind if you help me in that ?????
- Mark as Read
- Mark as New
- Bookmark
- Permalink
- Report to a Moderator
the is errot is appeared to me
| LabVIEW: Failed to load shared library nivissvc.*:LV_Dispose:C | . Ensure that the library is present on the RT target. Use MAX to install NI software or FTP to transfer custom libraries to the RT target. |
